Prerequisites
- OpsRamp and HPE Compute Ops Management (COM) services should be in the same workspace for COM customers seeking to use OpsRamp for centralized observability.
- Users should have access and be able to launch OpsRamp and COM services in the same workspace.
- OpsRamp should support verification based webhooks.
Case scenario
Let us consider a scenario where a server experiences a fan failure. As a result there is Redfish-based alert, which is used by COM to monitor on its health. As the fan failure leads to rising temperatures, another alert for thermal conditions is triggered. These alerts flow into OpsRamp, which correlates them and creates an incident. The incident is then notified to the appropriate stakeholders.
OpsRamp proactively executes an automated remediation script that gracefully powers off the server, ensuring system protection and quick response and recovery, preventing escalation and reducing downtime significantly.
Configure HPE COM integration
Click here to see the steps to configure and install the integration:
Create a webhook on OpsRamp
Login to OpsRamp.
To select your client, navigate to All Clients, and click the Client/Partner dropdown menu.
Note: You may either type your client’s name in the search bar or select your client from the list.Navigate to Setup → Account. The Account Details screen is displayed.
Select the Integrations tile.
The Installed Integrations screen is displayed, with all the installed applications. Click + ADD on the Installed Integrations page.
If you do not have any installed applications, you will be navigated to the Available Integrations page. The Available Integrations page displays all the available applications along with the newly created application with the version.
Note: Search for the application using the search option available. Alternatively, use the All Categories option to search.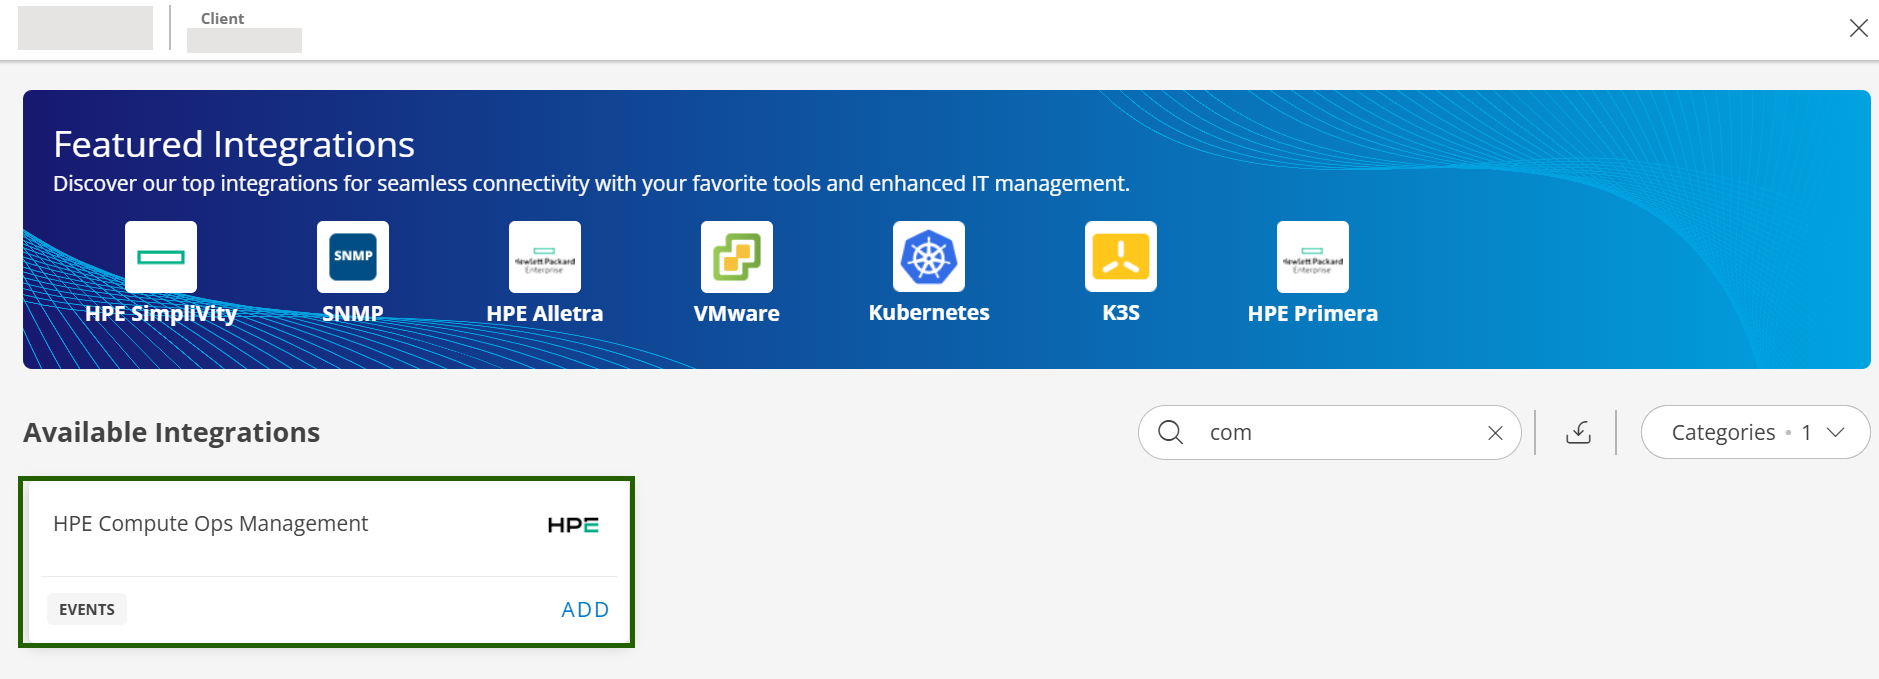
Click +ADD on the HPE Compute Ops Management tile.

Enter the following information:

CONFIGURE
Field Name Field Type Description Name String Enter a unique name for the integration. Alert Source Dropdown HPE COM. Indicates that the alert originated from the source, i.e. HPE COM.
The Source column in Alerts browser displays HPE COM.Description String Provide a description for the integration. Click Next. The INBOUND screen is displayed.
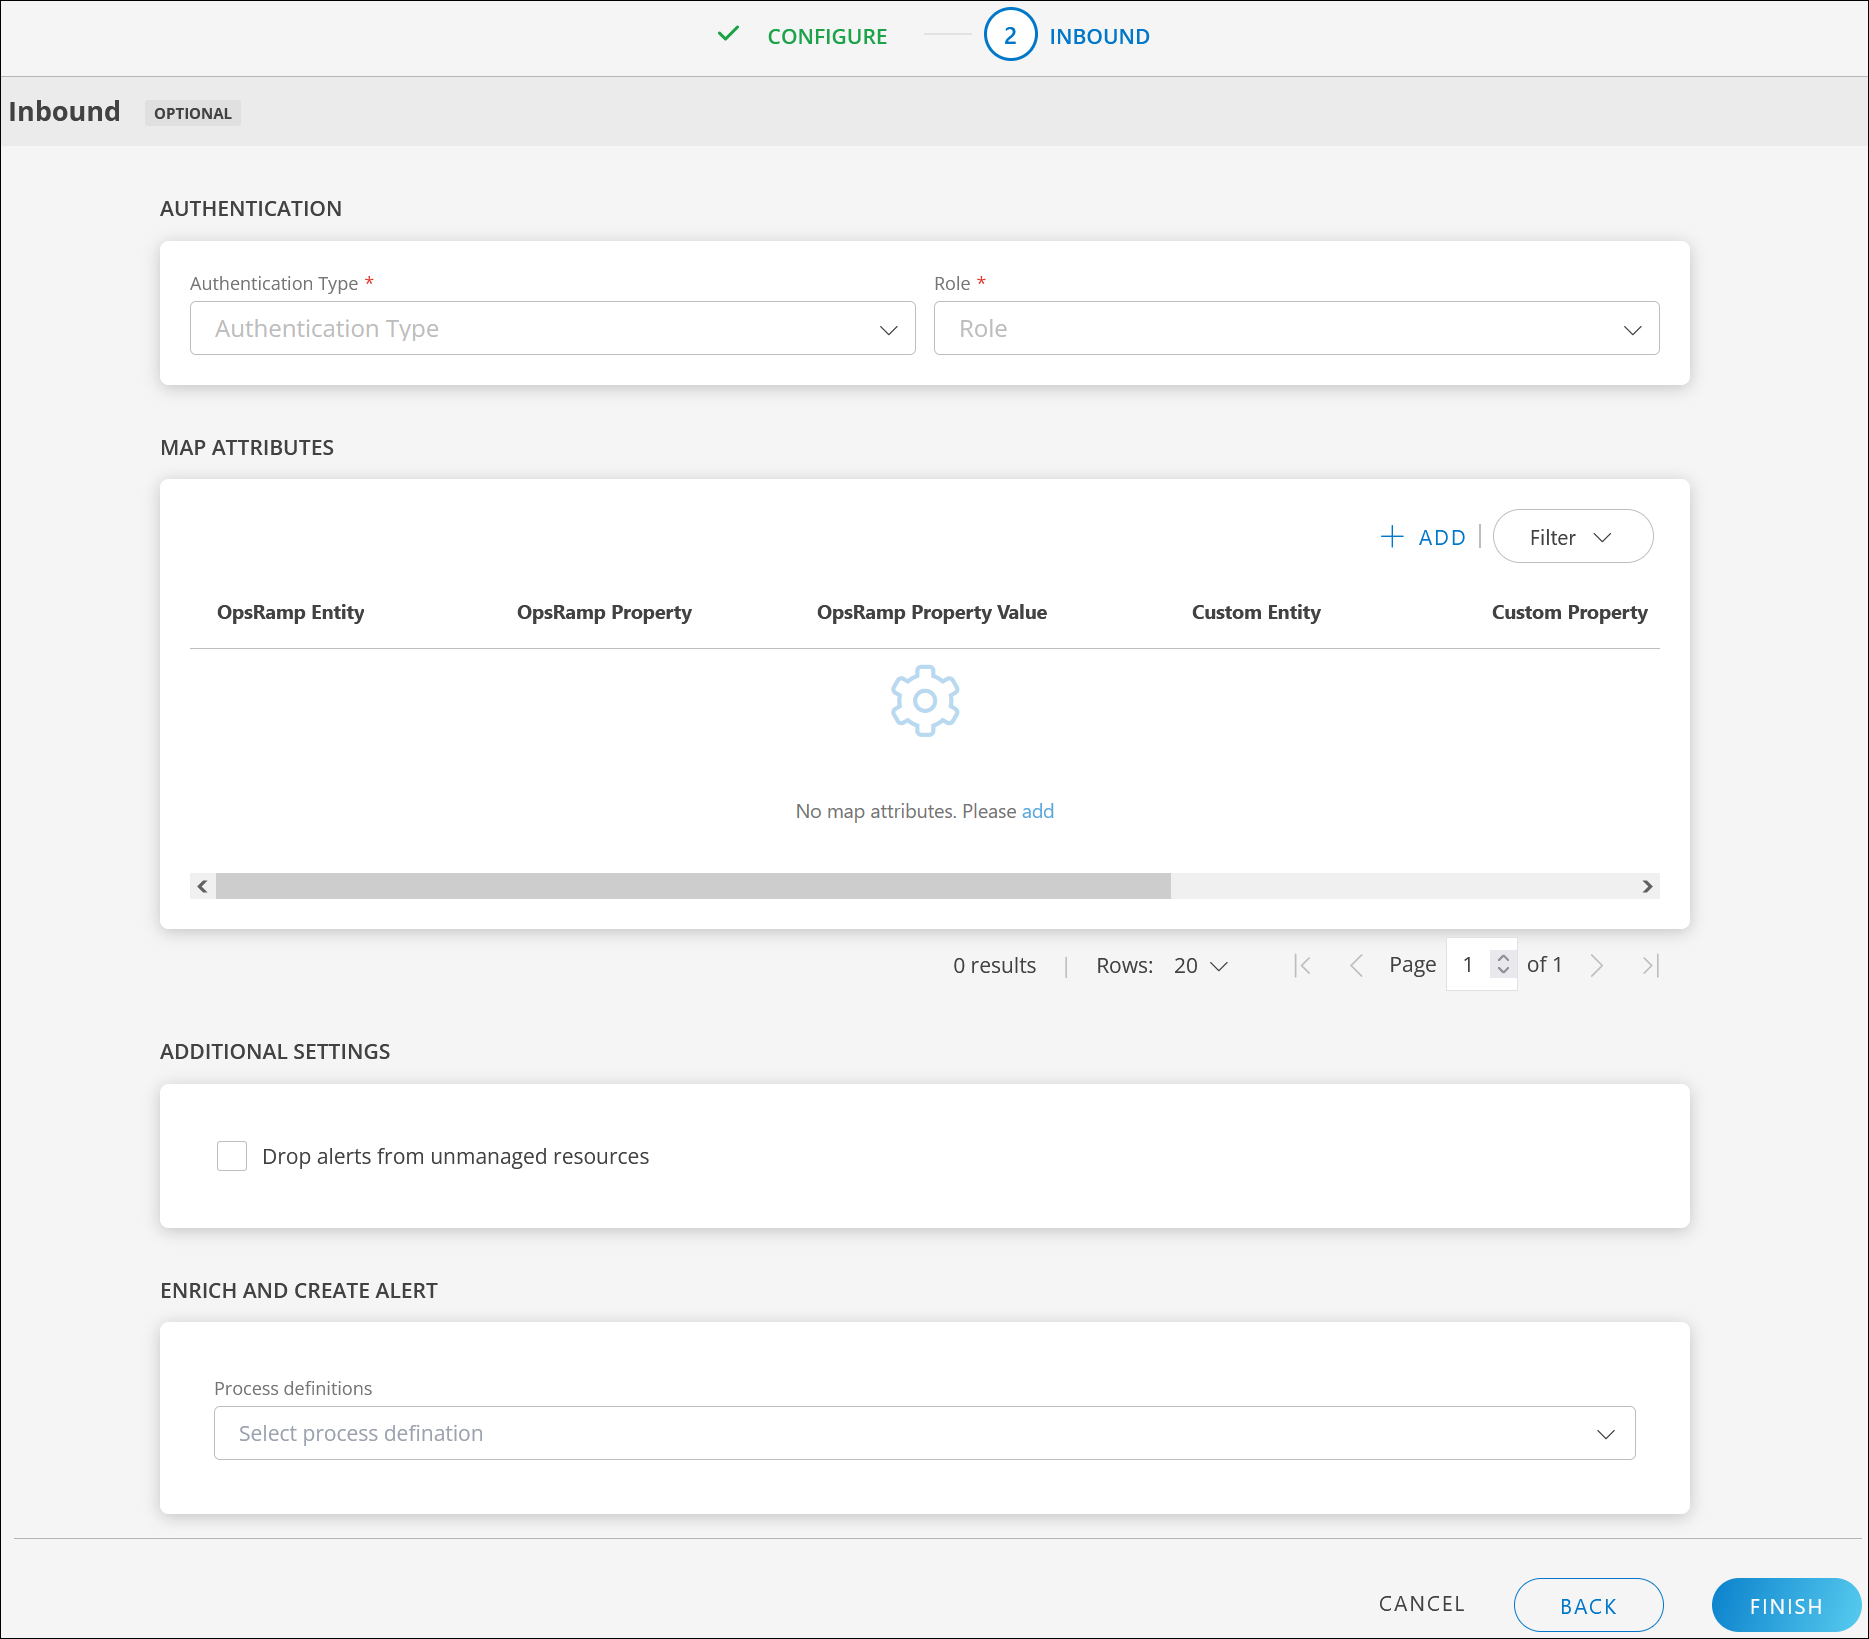
Configure INBOUND communication
AUTHENTICATION:
Field Name Field Type Description Authentication Type Dropdown OpsRamp supports APIs with WEBHOOK for the integration.
Select WEBHOOK.GENERATE KEY: Click to generate the Tenant ID, Token, Webhook URL, and Curl command. Use the copy icon to make a note of these.
The Curl command is used to connect to COM and provide authentication and other event information.Enable Webhook Handshake (selected by default): This is a mechanism used when setting up webhook integrations. COM sends a verification request to OpsRamp webhook endpoint. OpsRamp responds with an acknowledgment to confirm it is the intended recipient. After verification, COM pushes real-time event payloads to OpsRamp.
It is mandatory to enable this option, else COM events will not be sent to OpsRamp.- PROPERTIES: The key-value pair for the configuration properties of the webhook handshake is populated automatically. You can add more key-value pairs.
- PROPERTIES: The key-value pair for the configuration properties of the webhook handshake is populated automatically. You can add more key-value pairs.
MAP ATTRIBUTES: Map COM entity attributes with OpsRamp entity.
Click +ADD and enter the following information in the ADD MAP ATTRIBUTES window:Field Name Field Type Description OpsRamp Entity Dropdown Select Alert from the dropdown. OpsRamp Property Dropdown Select OpsRamp property from the dropdown. COM Entity String Enter COM Entity value. COM Property String Enter COM Property value. PARSING CONDITION: To give a parsing condition:
- Click +ADD and provide values in the Operator and Value fields.
- Click SAVE.
PROPERTY VALUES: Click +PROPERTY VALUE. Enter the following information and click SAVE.
(Or)Field Name Field Type Description COM Property Value String Enter COM property value in the box. OpsRamp Property Value Dropdown Select a value from the dropdown.
Based on the OpsRamp Property selected above, the options in this field appear.Default Value: Select a default value from the dropdown. If the above condition does not meet the criteria, the default value is considered.


Field mappings
Event type: Alert
Following are the sample field mappings on OpsRamp side to receive Inbound events from COM request payload for Alert event type:
| OpsRamp Entity | OpsRamp Property | OpsRamp Property Value | COM Entity | COM Property | COM Property Value |
|---|---|---|---|---|---|
| ALERT | alert.currentState | Critical | Alert | severity | CRITICAL |
| ALERT | alert.currentState | Warning | Alert | severity | WARNING |
| ALERT | alert.currentState | Ok | Alert | severity | OK |
| ALERT | alert.description | Alert | description | ||
| ALERT | alert.subject | Alert | message | ||
| ALERT | alert.serviceName | Alert | category | ||
| ALERT | alert.deviceName | Alert | serverId |
Event type: Server
Following are the sample field mappings on OpsRamp side to receive Inbound events from COM request payload for Server event type:
| OpsRamp Entity | OpsRamp Property | OpsRamp Property Value | COM Entity | COM Property | COM Property Value |
|---|---|---|---|---|---|
| ALERT | alert.currentState | Critical | Alert | health.summary | CRITICAL |
| ALERT | alert.currentState | Warning | Alert | health.summary | WARNING |
| ALERT | alert.currentState | Ok | Alert | health.summary | OK |
| ALERT | alert.description | Alert | host.osDescription | ||
| ALERT | alert.subject | Alert | type | ||
| ALERT | alert.serviceName | Alert | host.osName | ||
| ALERT | alert.deviceName | Alert | name |
Note:
- The property names and values for OpsRamp are fixed and mandatory for integration to work.
- The property names and values for COM can be modified as per incoming request payload.
The screen looks something like this:
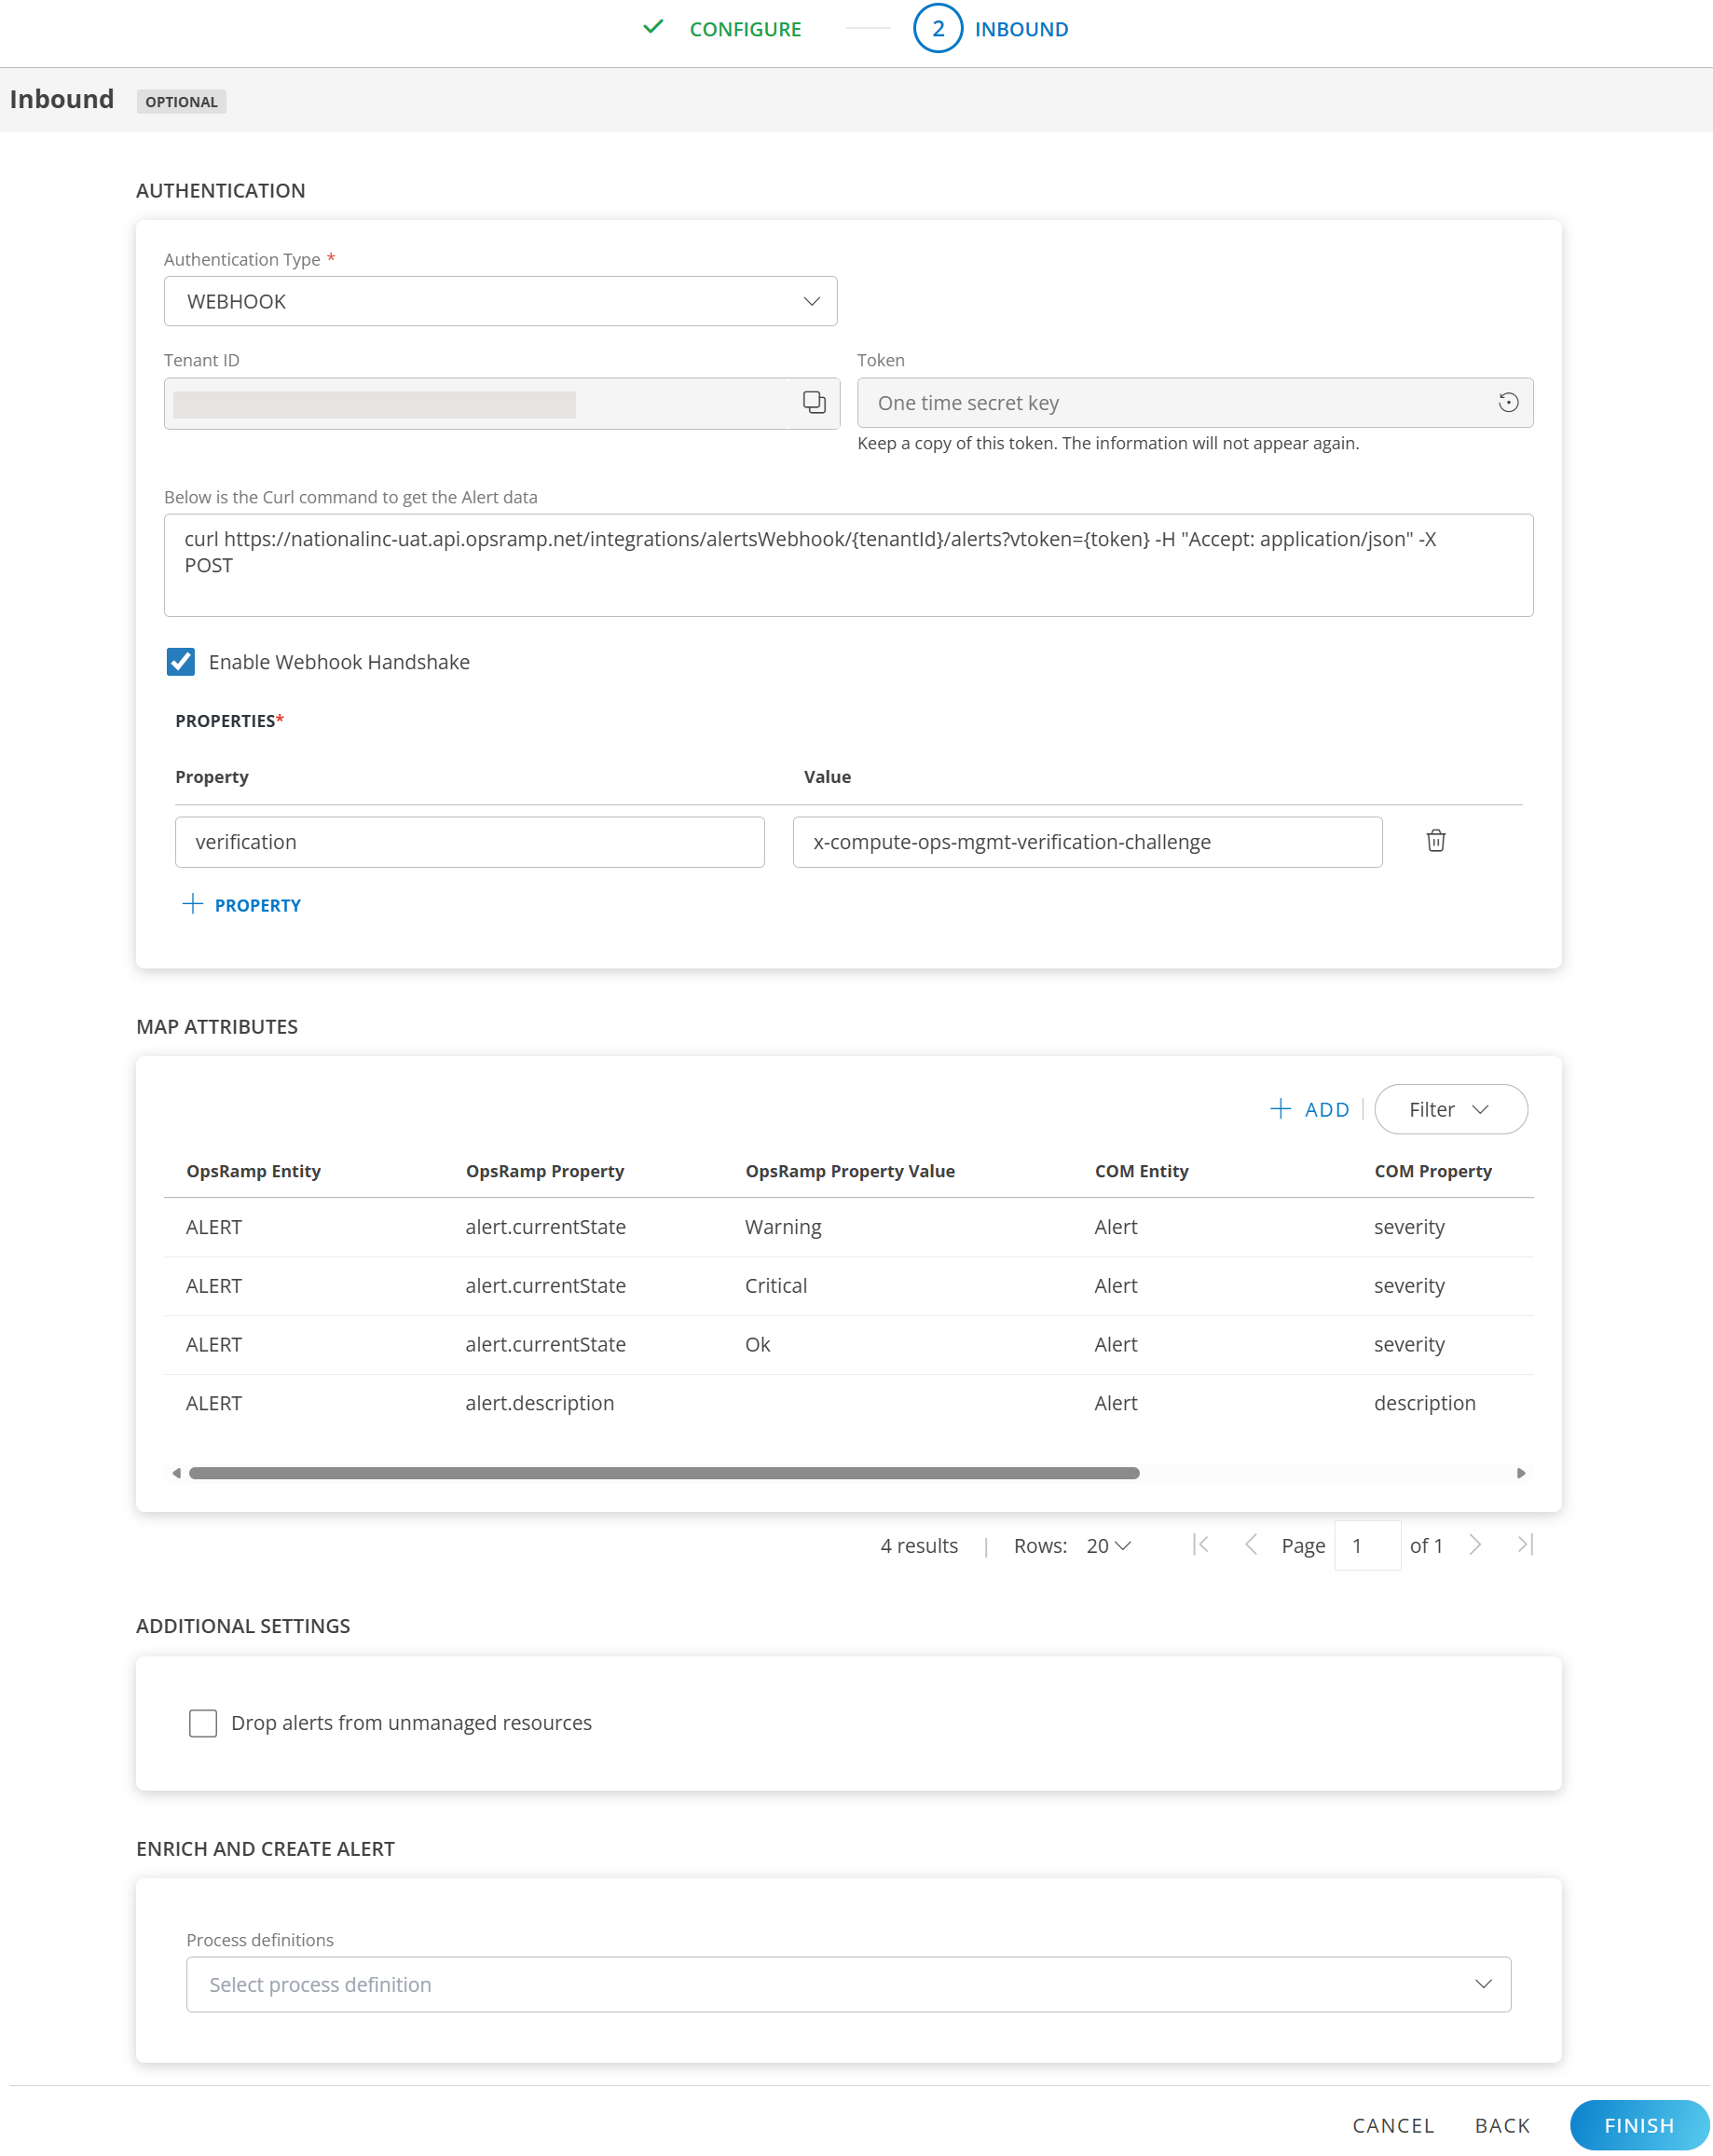
Click ADD MAP ATTRIBUTES. The mapped information is displayed in the MAP ATTRIBUTES section.
- Use the three dots menu to edit or remove the map attributes.
- Use Filter to filter the map attributes.
ADDITIONAL SETTINGS:
- Drop alerts from unmanaged resources: You can configure event ingestion integrations to post events only if the resources are managed by OpsRamp. For resources that are not managed, the events are dropped and not processed. Select the checkbox as per your requirements.
ENRICH AND CREATE ALERT: Select process definition from the dropdown.
Note: For the integration to enrich and create an alert, the process definition selected should have the Create Alert task configured.Click FINISH. The COM integration is installed and displayed under Installed Integrations.
Create a webhook on COM
You can create a webhook for COM using HPE developer portal using Postman or programmatically, with OpsRamp webhook URL as the destination URL.
See Create a Webhook for more details.
curl -i -X POST \
  https://us-west.api.greenlake.hpe.com/compute-ops-mgmt/v1beta1/webhooks \
  -H 'Authorization: Bearer <YOUR_JWT_HERE>' \
  -H 'Content-Type: application/json' \
  -d '{
    "name": "Server Webhook",
    "destination": "https://example.com/webhookDestination",
    "state": "DISABLED",
    "eventFilter": "type eq '\''compute-ops/server'\''",
    "headers": {
      "exampleHeader": "hlCiqcLeZVPOtJNzdGqF"
    }
  }'
Actions on Integration
You can perform actions like View Logs, Export, Edit, Assign Templates, and Uninstall on the integration.
- See Actions on Integration for more information.
View Logs
View Inbound logs from the View Logs option for the integration. You can view if the event was successful or not.
See View Logs for more information.
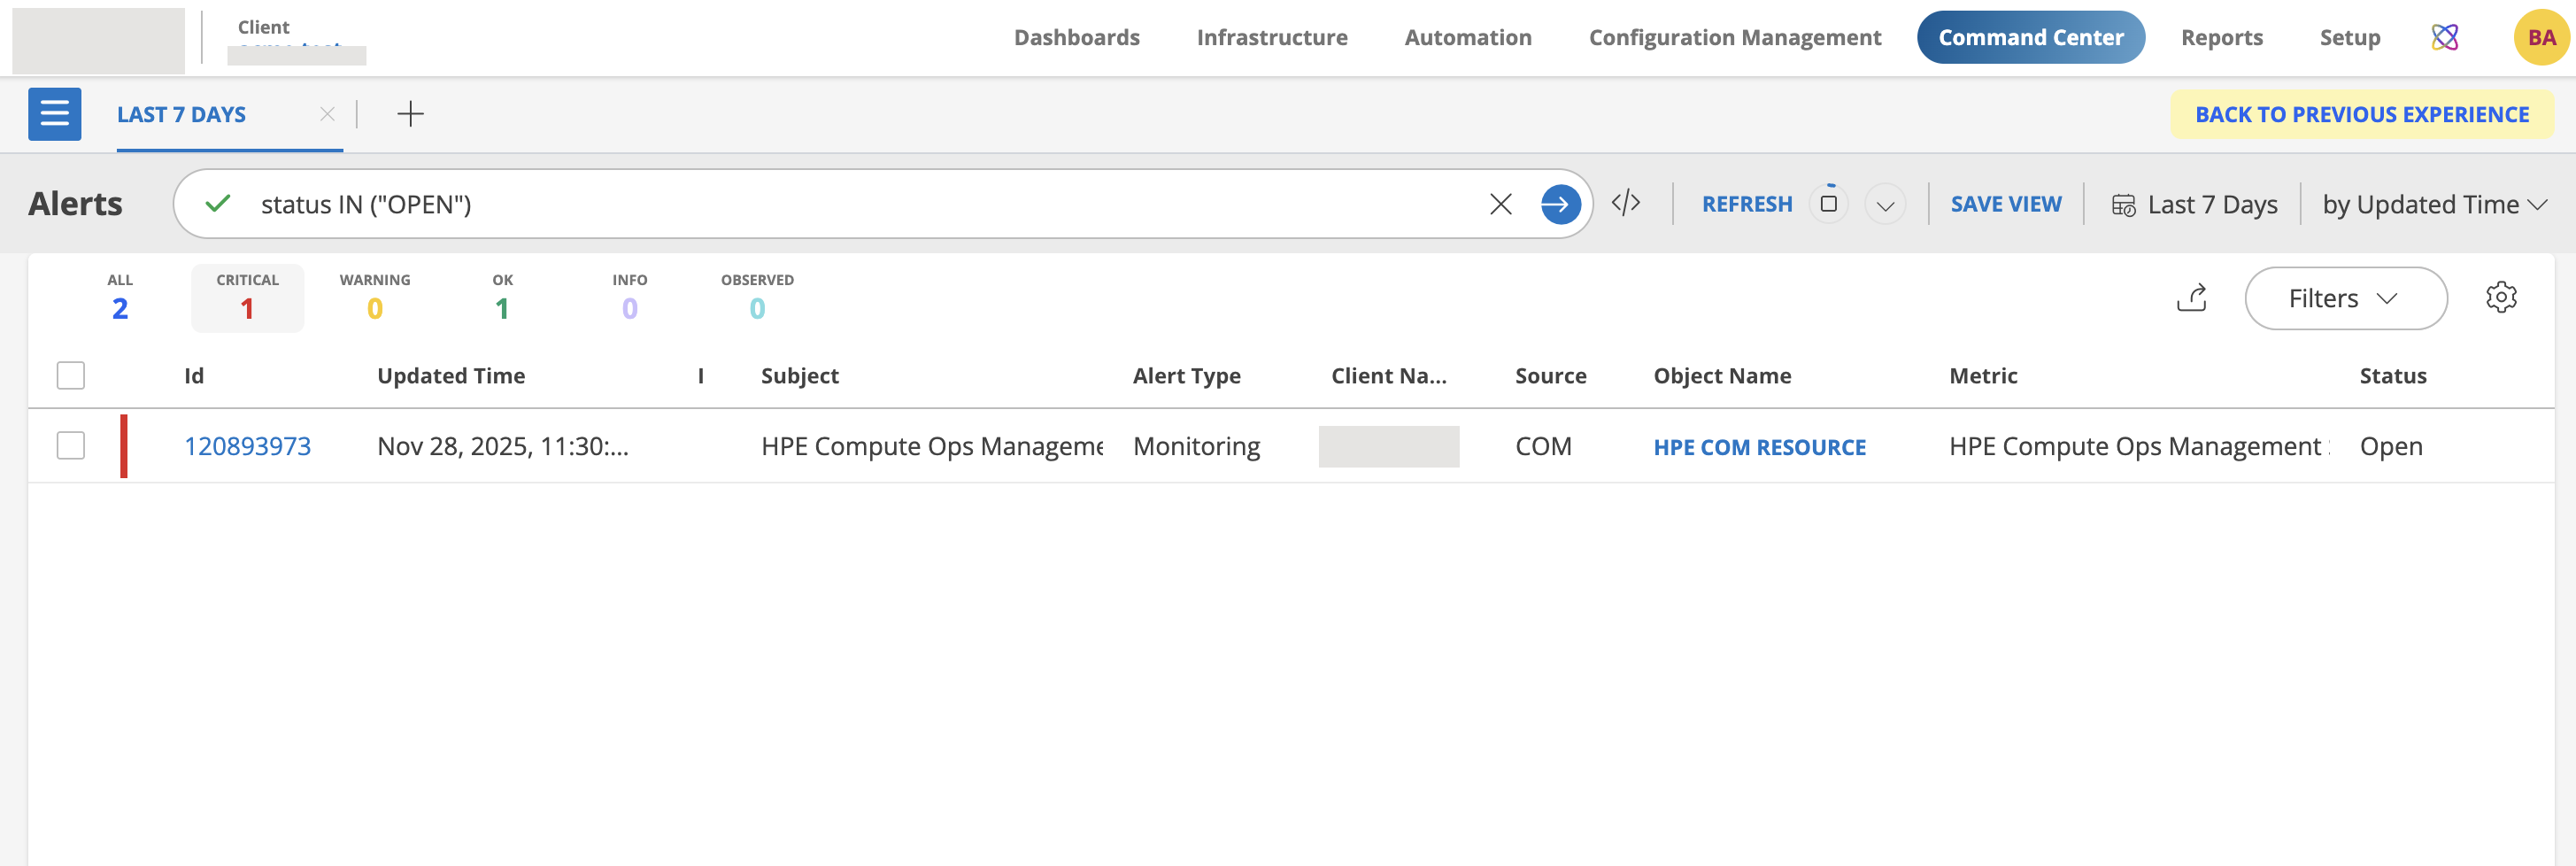
View Alerts
Once the alerts are received from COM into OpsRamp, you can check the same by navigating through this path:
- Command Center > Alerts
Validate
Validate the configurations using any API development tool, for example, POSTMAN.
Example COM Alert request payload
{
  "id": "e1ae85e8-5868-4e06-804b-77f7cc9cf83a",
  "serverId": "068743-J87+8899068743287061",
  "type": "compute-ops/alert",
  "severity": "CRITICAL",
  "messageId": "iLOEvents.6.1.FanFailed",
  "description": "The specified fault tolerant fan has failed.",
  "resolution": "Replace the failed fan.",
  "timestamp": "2025-06-11T18:59:04.660503Z",
  "createdAt": "2025-06-11T18:59:04.660503Z",
  "updatedAt": "2025-06-11T18:59:04.660503Z",
  "message": "Fan 2 has failed.",
  "category": "fans",
  "arguments": [
    "2"
  ],
  "originOfCondition": "/redfish/v1/Systems/21acf117-32c1-4c45-9d89-a18a36047be2",
  "generation": 1,
  "serviceEvent": true,
  "clearedAt": null,
  "alert_type": "hardware",
  "oem": null
}
Sample COM Server Request Payload
{
  "id": "042498-185+8899042498685890",
  "type": "compute-ops-mgmt/server",
  "platformFamily": "PROLIANT",
  "deviceClaimType": "UNKNOWN",
  "resourceUri": "/compute-ops-mgmt/v1/servers/042498-185+8899042498685890",
  "name": "8899042498685890",
  "createdAt": "2025-10-10T15:10:03.251630+00:00",
  "updatedAt": "2025-10-11T03:00:34.871676+00:00",
  "generation": 11,
  "hardware": {
    "serialNumber": "8899042498685890",
    "model": "ProLiant DL325 Gen10 Plus",
    "uuid": "87103165-ea04-46f9-915e-0012a23bd8c9",
    "productId": "042498-185",
    "manufacturer": "HPE",
    "powerState": "ON",
    "indicatorLed": "OFF",
    "memoryMb": null,
    "platform": null,
    "formFactor": null,
    "health": {
      "summary": "CRITICAL",
      "healthLED": "CRITICAL",
      "airFilter": "UNKNOWN",
      "fans": "CRITICAL",
      "fanRedundancy": "REDUNDANT",
      "liquidCooling": "NOT_PRESENT",
      "liquidCoolingRedundancy": "NOT_PRESENT",
      "memory": "OK",
      "network": "UNKNOWN",
      "powerSupplies": "OK",
      "powerSupplyRedundancy": "NOT_PRESENT",
      "processor": "OK",
      "storage": "OK",
      "temperature": "OK",
      "bios": "OK",
      "smartStorage": "NOT_PRESENT"
    },
    "bmc": {
      "mac": "B4:7A:F1:C2:6A:A4",
      "ip": "192.169.0.123",
      "hostname": "ILOMXQ1450J66.eml.lab",
      "license": null,
      "model": "iLO 5",
      "version": "iLO 5 v2.72",
      "userDefined": null
    }
  },
  "state": {
    "managed": true,
    "connected": false,
    "connectedModifiedAt": "2025-10-11T03:00:34.856005+00:00",
    "subscriptionState": "SUBSCRIBED",
    "subscriptionTier": "ENHANCED",
    "subscriptionKey": "ABCDEFGHIJK",
    "subscriptionExpiresAt": "2025-11-09T15:11:29.288876+00:00"
  },
  "firmwareInventory": [
    {
      "name": "iLO 5",
      "version": "2.72 Sept 4 2022",
      "deviceContext": "System Board"
    },
    {
      "name": "System ROM",
      "version": "A43 v1.10 (10/29/2019)",
      "deviceContext": "System Board"
    },
    {
      "name": "Intelligent Platform Abstraction Data",
      "version": "1.12.0 Build 13",
      "deviceContext": "System Board"
    },
    {
      "name": "System Programmable Logic Device",
      "version": "0x11",
      "deviceContext": "System Board"
    },
    {
      "name": "HPE Smart Array E208i-a SR Gen10",
      "version": "2.62",
      "deviceContext": "Storage Slot 12"
    },
    {
      "name": "Intel Eth Adptr I350T4 OCPv3",
      "version": "1.2529.0",
      "deviceContext": "OCP 3.0 Slot 10"
    },
    {
      "name": "Redundant System ROM",
      "version": "A43 v2.40 (02/23/2021)",
      "deviceContext": "System Board"
    },
    {
      "name": "Intelligent Provisioning",
      "version": "3.52.37",
      "deviceContext": "System Board"
    },
    {
      "name": "Drive",
      "version": "HPD2",
      "deviceContext": "Port=1I:Box=1:Bay=1"
    },
    {
      "name": "Drive",
      "version": "HPD2",
      "deviceContext": "Port=1I:Box=1:Bay=2"
    }
  ],
  "softwareInventory": [
    {
      "name": "ams.exe",
      "version": "2.10.0.0",
      "deviceContext": "agentless management service"
    },
    {
      "name": "MxG2hDO64.sys",
      "version": "9.15.1.224",
      "deviceContext": "Matrox G200eH Display Only Driver"
    },
    {
      "name": "sut.exe",
      "version": "2.9.3-3.linux",
      "deviceContext": "integrated smart update tools"
    },
    {
      "name": "necheschif.sys",
      "version": "4.6.0.0",
      "deviceContext": "ilo 5 channel interface driver"
    },
    {
      "name": "smartpqi.sys",
      "version": "106.166.0.1022",
      "deviceContext": "smartraid, smarthba pqi storport driver"
    },
    {
      "name": "nechesasr.sys",
      "version": "4.6.0.0",
      "deviceContext": "ilo 5 asr driver"
    },
    {
      "name": "hpepqiesrv.exe",
      "version": "1.2.1.64",
      "deviceContext": "hpe smart array sr event notification service"
    },
    {
      "name": "naplessp3.dll",
      "version": "3.0.0.0",
      "deviceContext": "identifiers for amd epyc processors versioning dll"
    },
    {
      "name": "e1r68x64.sys",
      "version": "12.18.9.1",
      "deviceContext": "intel(r) gigabit adapter ndis 6.x driver"
    },
    {
      "name": "igb.ko",
      "version": "5.3.5.3-1 (B)",
      "deviceContext": "HPE Intel igb Driver for Red Hat Enterprise Linux"
    }
  ],
  "lastFirmwareUpdate": null,
  "host": {
    "osName": "Microsoft Windows Server 2019 Standard",
    "osVersion": "10.0.17763",
    "hostname": "localhost",
    "osType": 57,
    "osDescription": "Hardware: AMD64 Family 23 Model 49 Stepping 0 AT/AT COMPATIBLE - Software: Windows Version 10.0 (Build 17763 Multiprocessor Free)"
  },
  "firmwareBundleUri": null,
  "tags": {},
  "biosFamily": "A43",
  "processorVendor": "AMD EPYC 7262 8-Core Processor                 ",
  "autoIloFwUpdate": true,
  "serverGeneration": "GEN_10",
  "lastFullInventoryCollectionAt": "2025-10-10T15:10:45.226886Z",
  "lastServerLogCollectionAt": null,
  "lastFullInventoryCollectionPowerState": "On",
  "connectionType": "DIRECT",
  "oneview": null,
  "appliance": {
    "applianceUri": null,
    "applianceId": null
  }
}
GET alert verification challenge through Postman
- Enter the OpsRamp destination webhook URL.
- Change the method to GET.
- Add the mentioned headers ‘Content-Type: application/json’, ‘Accept: application/json’, and ‘x-compute-ops-mgmt-verification-challenge: COM'
You will get the Response JSON as below:
“verification”: “COM”
POST alert through Postman
- Enter the OpsRamp destination webhook URL.
- Change the method to POST.
- Add the mentioned headers ‘Content-Type: application/json’ and ‘Accept: application/json’.
- Enter the JSON request payload in the body section (alert payload / server payload)
- Navigate to OpsRamp Command Center and view the alert.