Introduction
Dell EMC PowerProtect Cyber Recovery focuses on the protection and recovery pillars that are referenced in many well-known cybersecurity frameworks. This solution is a combination of professional services and technology that provides the following key elements:
- Planning and design
- Isolation and replication
- Vault analytics
- Recovery
The Cyber Recovery solution provides management tools and the technology that performs the actual data recovery. It automates the creation of the restore points that are used for recovery or security analytics. Dell Implementation Services provide Cyber Recovery vault design and implementation. Dell Advisory Services can design an effective recovery strategy. Organizations can dramatically reduce their surface of attack from inside and outside threats by removing the cyber attack recovery environment from the production network. The only required connection is a data path for periodically synchronizing the data, which is brought online only for data synchronization. This logical air gap provides another layer of defense by reducing the surface of attack. The Cyber Recovery software automates the recovery procedure for the NetWorker and PowerProtect Data Manager applications.
OpsRamp integrates with Cyber Recovery Manager through REST APIs.
Prerequisites
- OpsRamp Classic Gateway 12.0.1 and above.
- NextGen gateway 13.0.0 and above.
- Ensure that “adapter integrations” add-on is enabled in client configuration. Once enabled you can see Dell Cyber Recovery Manager integration under Setup > Integrations > Adapter section
Hierarchy of Dell CyberRecovery Manager resources
Dell CyberRecovery Manager
— Dell CyberRecovery Manager Jobs
Supported Metrics
Click here to view the supported metrics
| Metric Name | Display Name | Metric Label | Units | Description |
|---|---|---|---|---|
| dell_cyber_recovery_manager_Status | Dell Cyber Recovery Manager Status | Availability | Gives the Dell Cyber Recovery Manager Status. Possible values: Running(1),Others(0). | |
| dell_cyber_recovery_manager_vault_Status | Dell Cyber Recovery Manager Vault Status | Availability | Gives the Dell Cyber Recovery Manager Vault Status. Possible values: Locked(0),Unlocked(1). | |
| dell_cyber_recovery_manager_job_Status | Dell Cyber Recovery Manager Job Status | Availability | Gives the latest status of Dell Cyber Recovery Manager Jobs. Possible values: Canceled(0),Running(1),Warning(2),Critical(3),Success(4). | |
| dell_cyber_recovery_manager_job_Progress | Dell Cyber Recovery Manager Job Progress | Performance | % | Gives the progress of Dell Cyber Recovery Manager Jobs |
| dell_cyber_recovery_manager_job_ElapsedTime | Dell Cyber Recovery Manager Job Elapsed Time | Performance | m | Gives the elapsed time of Dell Cyber Recovery Manager Jobs |
| dell_cyber_recovery_manager_resource_APIStats | Dell CyberRecovery Manager Resource API Statistics | Usage | Provides the number of API calls made within the frequency and resources | |
| dell_cyber_recovery_manager_event_Statistics | Dell CyberRecovery Manager Event Statistics | Provides Dell CyberRecovery Manager Event Statistics |
Default Monitoring Configurations
Dell Cyber Recovery Manager has default Global Device Management Policies, Global Templates, Global Monitors and Global Metrics in OpsRamp. You can customize these default monitoring configurations as per your business use cases by cloning respective Global Templates and Global Device Management Policies. We recommend doing this activity before installing the application to avoid noise alerts and data.
Default Global Device Management Policies
You can find the Device Management Policy for each Native Type at Setup > Resources > Device Management Policies. Search with suggested name in global scope. Each Device Management Policy follows below naming convention:
{appName nativeType - version}Ex: dell-cyber-recovery-manager Dell Cyber Recovery Manager - 2 (i.e, appName = dell-cyber-recovery-manager, nativeType = Dell Cyber Recovery Manager, version = 2)
Default Global Templates
You can find the Global Templates for each Native Type at Setup > Monitoring > Templates. Search with suggested names in global scope. Each template follows below naming convention:
{appName nativeType 'Template' - version}Ex: dell-cyber-recovery-manager Dell Cyber Recovery Manager Template - 2 (i.e, appName = dell-cyber-recovery-manager, nativeType = Dell Cyber Recovery Manager, version = 2)
Default Global Monitors
You can find the Global Monitors for each Native Type at Setup > Monitoring > Monitors. Search with suggested name in global scope. Each Monitors follows below naming convention:
{monitorKey appName nativeType - version}
Ex: Dell Cyber Recovery Manager Monitor dell-cyber-recovery-manager Dell Cyber Recovery Manager 2 (i.e, monitorKey = Dell Cyber Recovery Manager Monitor, appName = dell-cyber-recovery-manager, nativeType = Dell Cyber Recovery Manager, version = 2)
Application Migration
Check for the gateway version as a prerequisite step - classic gateway-12.0.1 and above.
Notes:- You only have to follow these steps when you want to migrate from sdk 1.0 to sdk 2.0.
- For first time installation below steps are not required.
- Application name should be the same.
- Disable all installed integrations configurations for that application. This is to make sure no discovery and monitoring requests are processed.
- Install and Add the configuration to that sdk 2.0 application.
- During the migration from SDK 1.0 to SDK 2.0, ensure that you uncheck the Bypass Resource Reconciliation checkbox.
Note: refer to Configure and Install the Dell Cyber Recovery Manager Integration & View the Dell Cyber Recovery Manager Details sections of this document.
Once all discoveries are completed with the sdk 2.0 applicaion, follow any one of the approaches.
- Direct uninstallation of the sdk1.0 adaptor application through the uninstall API with skipDeleteResources=true in the post request
End-Point: https://{{host}}/api/v2/tenants/{tenantId}/integrations/installed/{installedIntgId}
Request Body:
{
    "uninstallReason": "Test",
    "skipDeleteResources": true
}
(OR)
- Delete the configuration one by one through the Delete adaptor config API with the request parameter as skipDeleteResources=true
End-Point:
https://{{host}}/api/v2/tenants/{tenantId}/integrations/installed/config/{configId}?skipDeleteResources=true.
- Finally, uninstall the adaptor application through API with skipDeleteResources=true in the post request.
End-Point:
https://{{host}}/api/v2/tenants/{tenantId}/integrations/installed/{installedIntgId}
Request Body:
{
    "uninstallReason": "Test",
    "skipDeleteResources": true
}
Configure and Install the Dell Cyber Recovery Manager Integration
- From All Clients, select a client.
- Navigate to Setup > Account.
- Select the Integrations tab.
- The Installed Integrations page, where all the installed integrations are displayed. Click + ADD on the Installed Integrations page.
- If you do not have any installed applications, you will be navigated to the Available Integrations page. The Available Integrations page displays all the available applications along with the newly created application with the version.
Note: Search for the application using the search option available. Alternatively, use the All Categories option to search. - Click ADD on the Dell Cyber Recovery Manager tile.
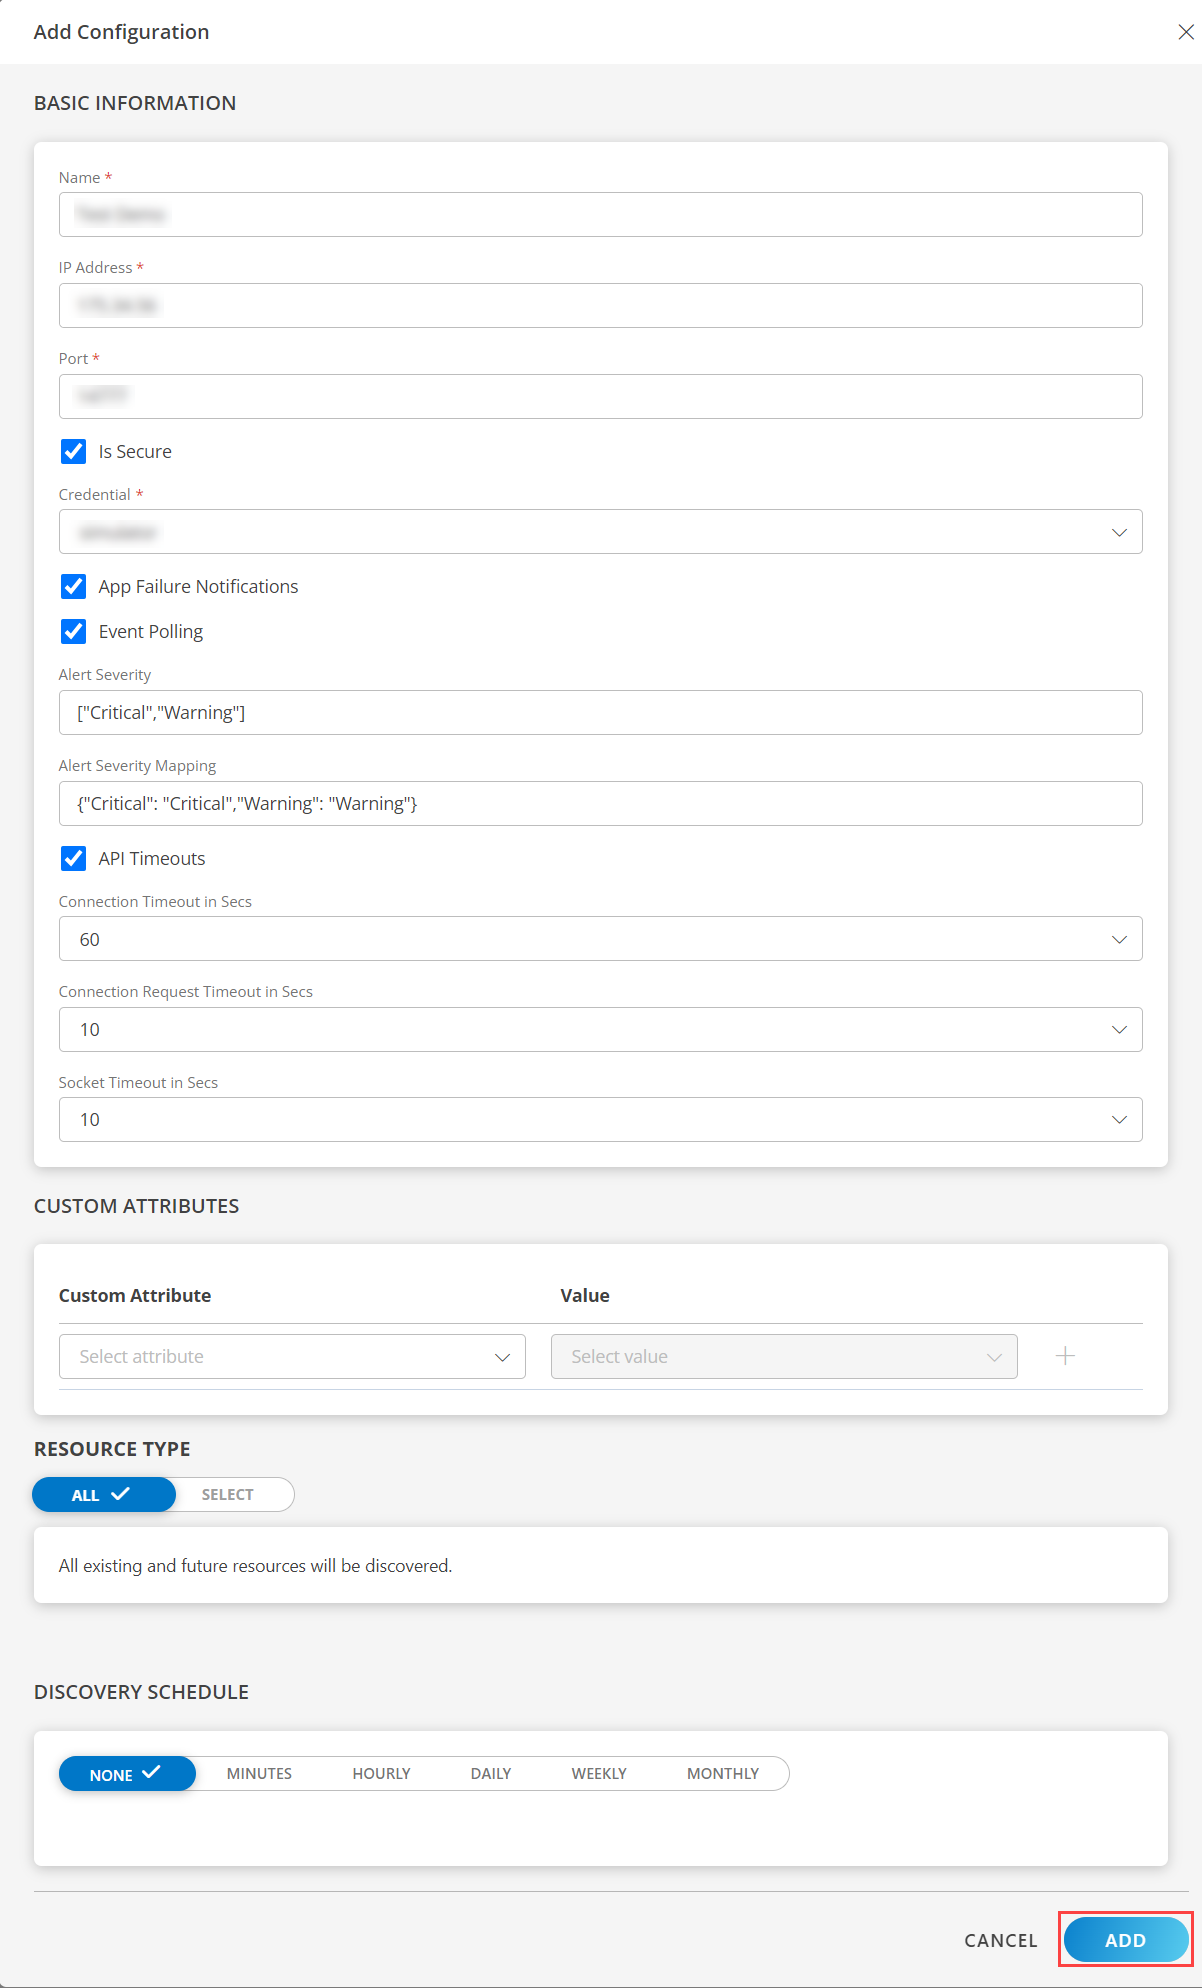
- From the Configurations page, click + ADD. The Add Configuration page appears.
- Enter the following BASIC INFORMATION:
| Functionality | Description |
|---|---|
| Name | Enter the name for the configuration. |
| Ip Address | Enter the Ip Address. |
| Port | Port number. |
| Credential | Select the Credential from the drop-down list. Notes:
|
Notes:
By default the Is Secure checkbox is selected.
Select the following:
- App Failure Notifications: if turned on, you will be notified in case of an application failure that is, Connectivity Exception, Authentication Exception.
- Event Polling: enables integrating third party alerts into OpsRamp using further configurations.
- Below are the default values set for:
- Alert Severity: Provides alerts severity and gets integrated out of all possible alerts.
- Default Values: Critical, Warning.
- Possible Values: Critical, Warning.
- Alert Severity Mapping: Provides alert severity mapping configuration. Default values for Alert Severity Mapping configuration are {“Critical”: “Critical”,“Warning”: “Warning”}.
- Alert Severity: Provides alerts severity and gets integrated out of all possible alerts.
- Below are the default values set for:
- API Timeouts: These are the maximum API Timeouts that the application can use to connect and get responses from the end device.
- Connection Timeout in Secs: a time period in which a client should establish a connection with a server.
Note: By default, 60 is selected. - Connection Request Timeout in Secs: a time period required to process an HTTP call: from sending a request to receiving a response.
Note: By default, 10 is selected. - Socket Timeout in Secs: a maximum time of inactivity between two data packets when exchanging data with a server.
Note: By default, 10 is selected.
- Connection Timeout in Secs: a time period in which a client should establish a connection with a server.
- Select the below mentioned Custom Attribute:
| Functionality | Description |
|---|---|
| Custom Attribute | Select the custom attribute from the drop down list box. |
| Value | Select the value from the drop down list box. |
Note: The custom attribute that you add here will be assigned to all the resources that are created by the integration. You can add a maximum of five custom attributes (key and value pair).
In the RESOURCE TYPE section, select:
- ALL: All the existing and future resources will be discovered.
- SELECT: You can select one or multiple resources to be discovered.
In the DISCOVERY SCHEDULE section, select Recurrence Pattern to add one of the following patterns:
- Minutes
- Hourly
- Daily
- Weekly
- Monthly
Click ADD.
Now the configuration is saved and displayed on the configurations page after you save it.
Note: From the same page, you may Edit and Remove the created configuration.
Under the ADVANCED SETTINGS, Select the Bypass Resource Reconciliation option, if you wish to bypass resource reconciliation when encountering the same resources discovered by multiple applications.
Note: If two different applications provide identical discovery attributes, two separate resources will be generated with those respective attributes from the individual discoveries.
Click NEXT.
(Optional) Click +ADD to create a new collector. You can either use the pre-populated name or give the name to your collector.
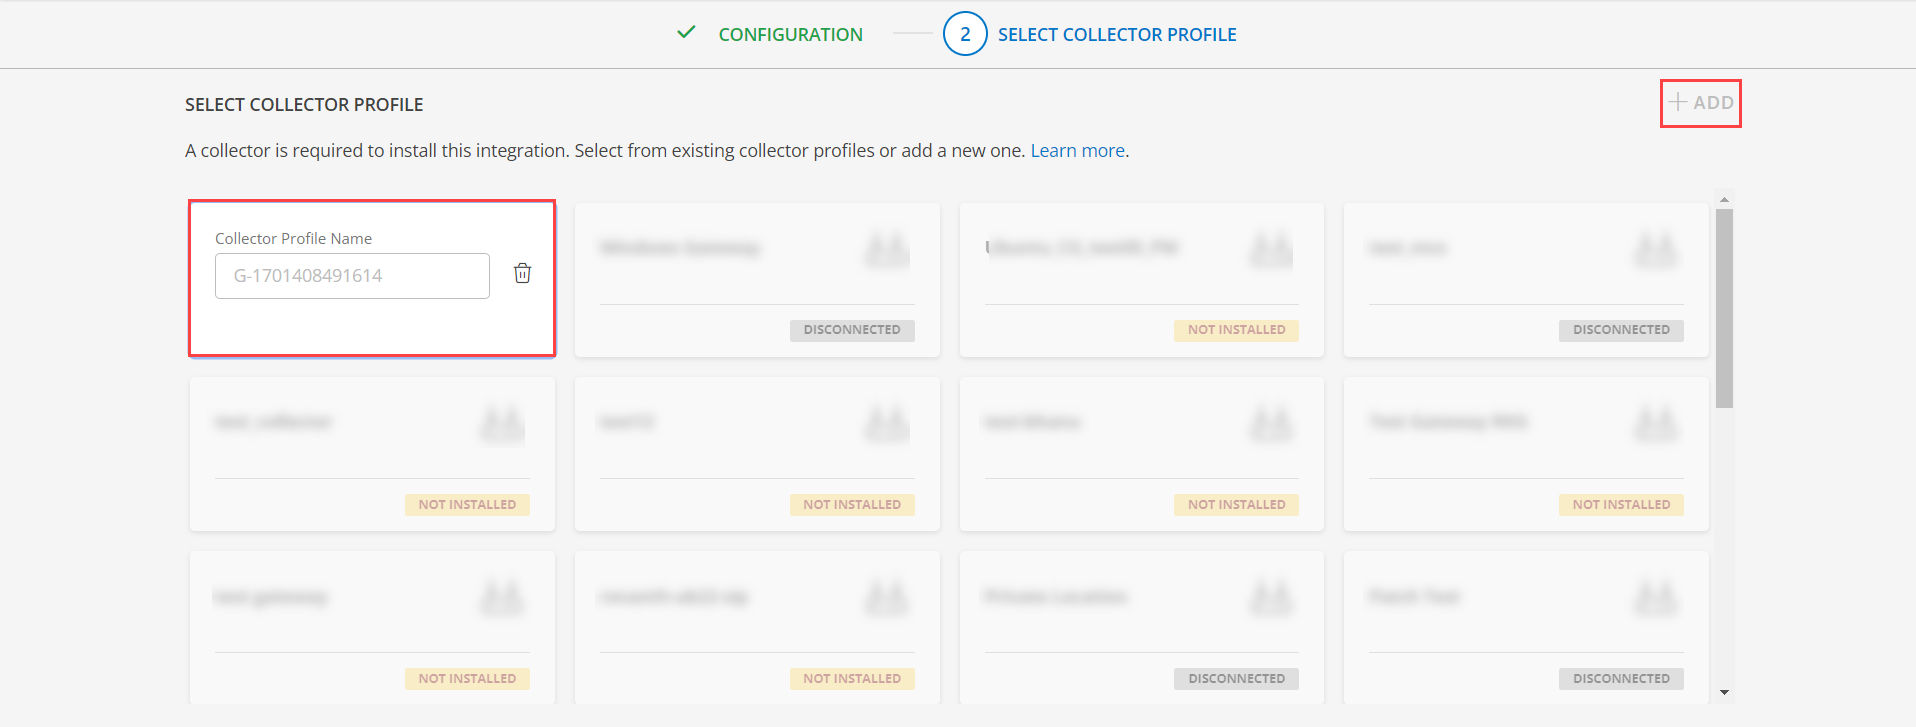
- Select an existing registered profile.
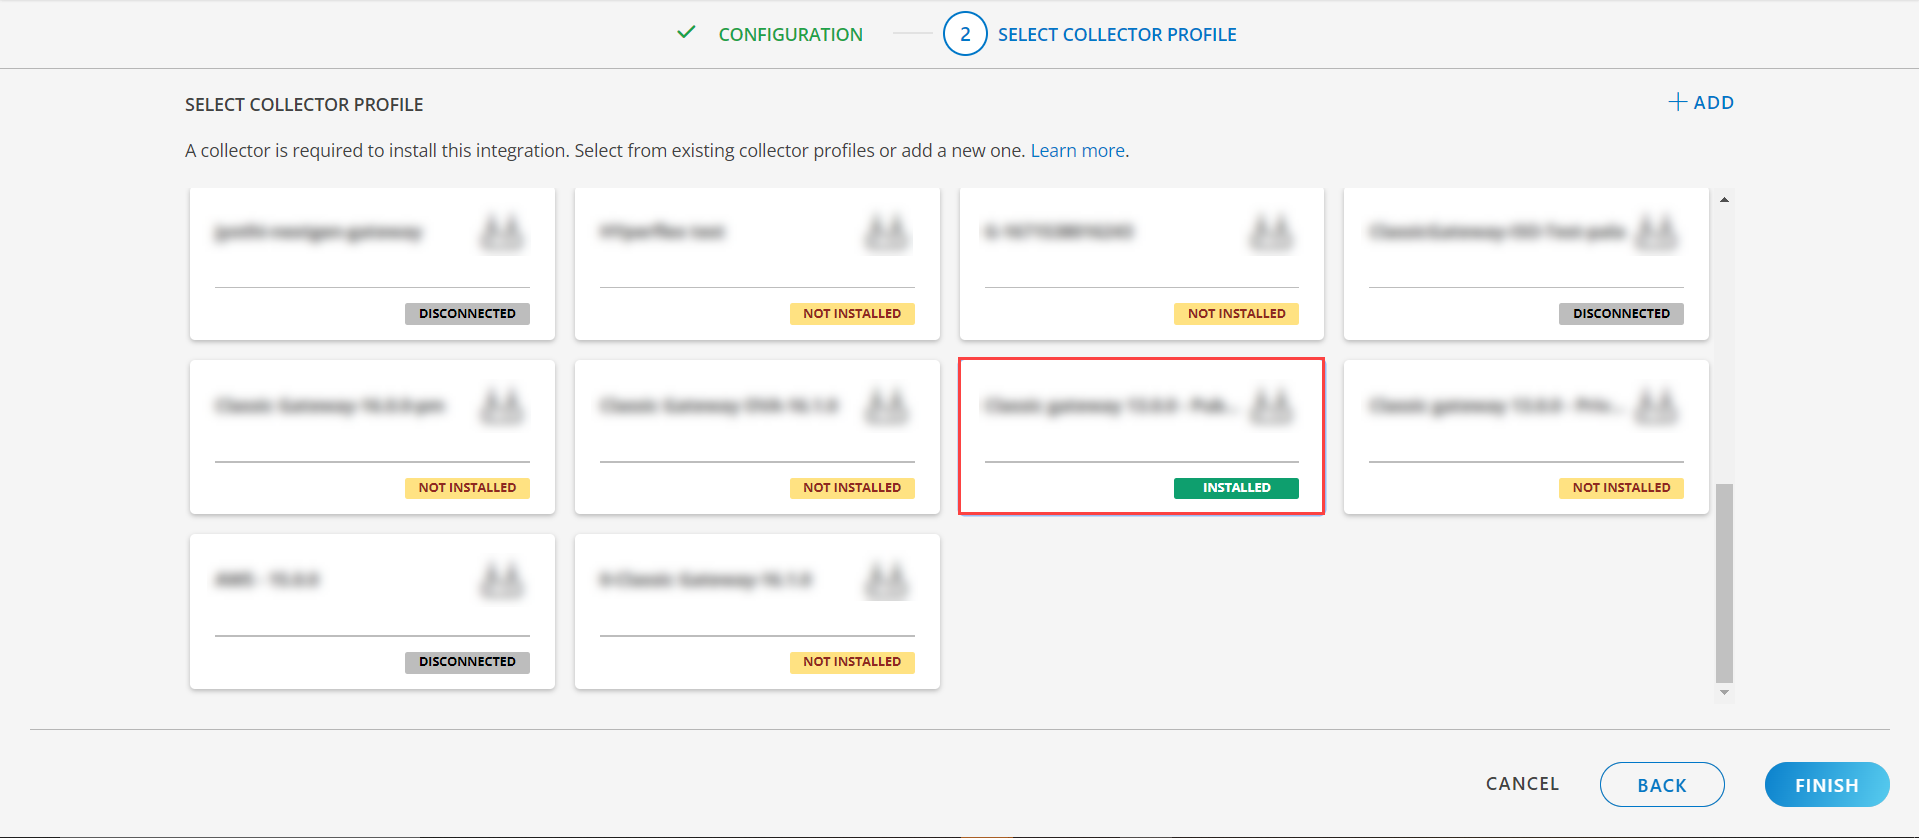
- Click FINISH.
The integration is installed and displayed on the INSTALLED INTEGRATION page. Use the search field to find the installed integration.
Modify the Configuration
See Modify an Installed Integration or Application article.
Note: Select Dell Cyber Recovery Manager.
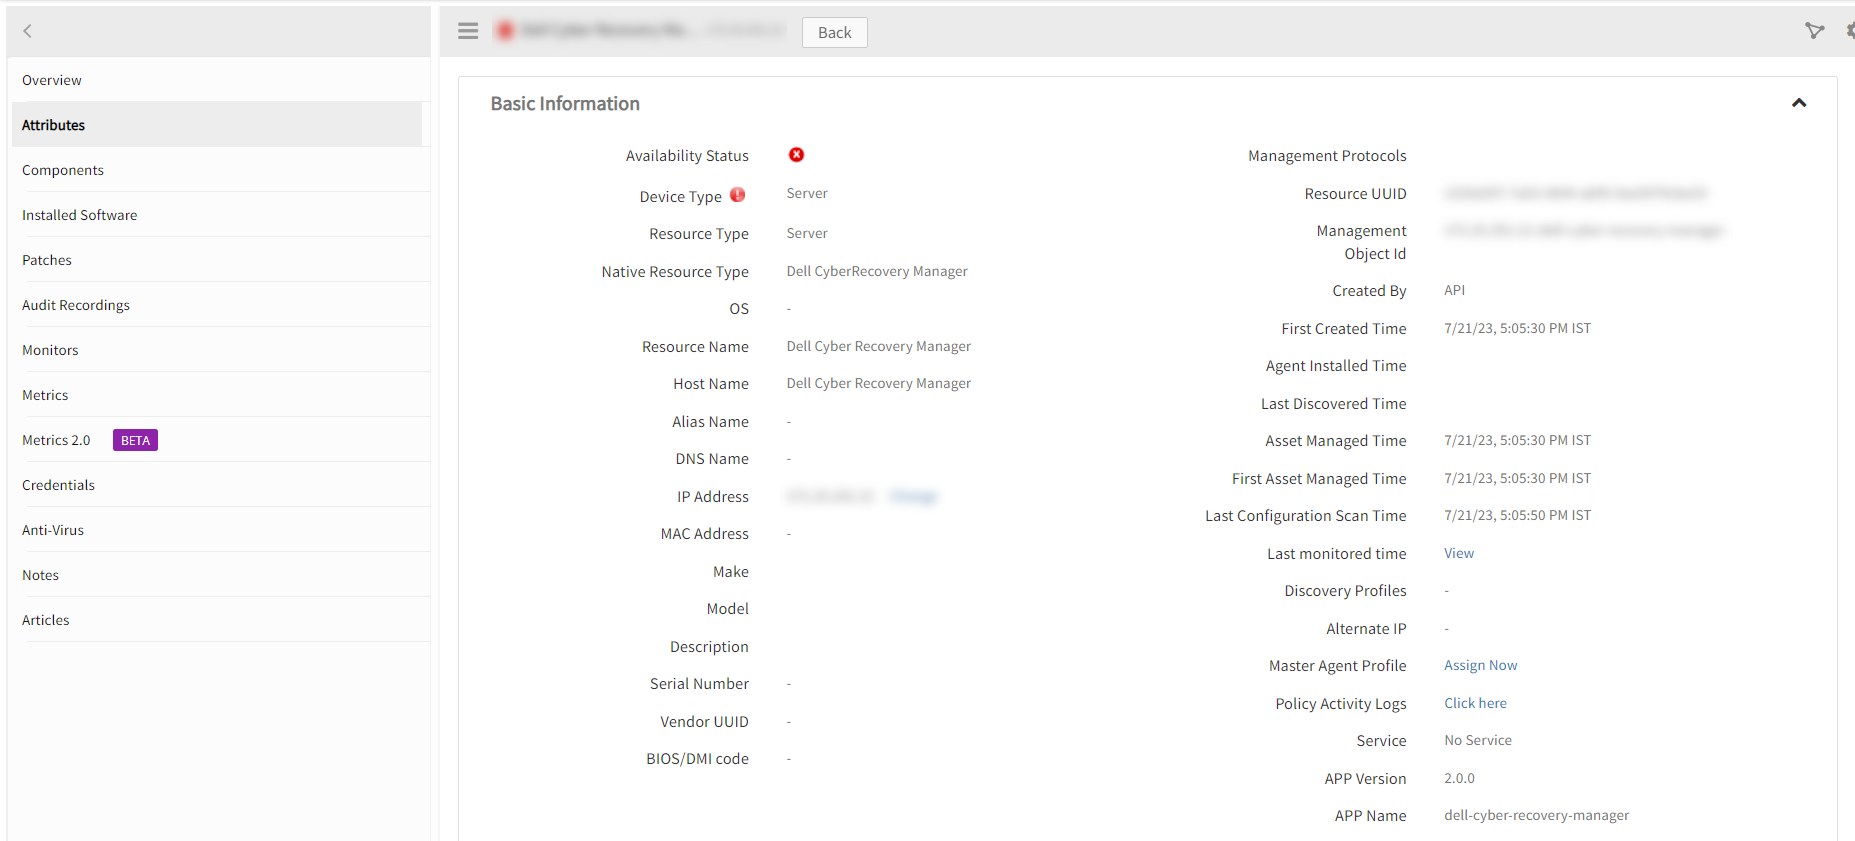
View the Dell Cyber Recovery Manager Details
The Dell Cyber Recovery Manager integration is displayed in the Infrastructure > Resources > Server. You can navigate to the Attributes tab to view the discovery details and Metrics tab to view the metric details for Dell Cyber Recovery Manager.
View Resource Metrics
To confirm Dell CyberRecovery Manager monitoring, review the following:
- Metric graphs: A graph is plotted for each metric that is enabled in the configuration.
- Alerts: Alerts are generated for metrics that are configured as defined for integration.

Resource Filter Input Keys
dell-cyber-recovery-manager app resources are filtered and discovered based on below keys.
Note: You can filter the resources with the discoverable keys only.
Click here to view the Supported Input Keys
| Resource Type | Keys |
|---|---|
| All Types | resourceName |
| hostName | |
| aliasName | |
| dnsName | |
| ipAddress | |
| macAddress | |
| os | |
| make | |
| model | |
| serialNumber |
Supported Alert Custom Macros
Customize the alert subject and description with below macros then it will generate alert based on customisation.
Supported macros keys:
Click here to view the alert subject and description with macros
${resource.name}
${resource.ip}
${resource.mac}
${resource.aliasname}
${resource.os}
${resource.type}
${resource.dnsname}
${resource.alternateip}
${resource.make}
${resource.model}
${resource.serialnumber}
${resource.systemId}
${Custome Attributes in the resource}
${parent.resource.name}
Risks, Limitations & Assumptions
- Application can handle Critical/Recovery failure notifications for below two cases when user enables App Failure Notifications in configuration
- Connectivity Exception
- Authentication Exception
- Application will send any duplicate/repeat failure alert notification for every 6 hours.
- Application cannot control monitoring pause/resume actions based on above alerts. Metrics can be used to monitor the resources and can generate alerts based on the threshold values.
- dell-cyber-recovery-manager Event/Alert polling will be started only if the user enables Event/Alert Polling in configuration.
Notes:- Here Event/Alert polling support is given for dell-cyber-recovery-manager Alarms only. When a status value which presents in the Event/Alert Cleared Status field occurs, OpsRamp has provided an Ok alert accordingly. Otherwise, OpsRamp has provided an alert based on Event/Alert Severity Filter & Event/Alert Severity Mappings of Event/Alert Polling configurations.
- Possible dell-cyber-recovery-manager status values are CRITICAL, WARNING.
- Default/Possible values of Event/Alert Severity Filter configuration are CRITICAL, WARNING.
- OpsRamp has given default mappings to map dell-cyber-recovery-manager Severity with OpsRamp Severities as part of Event/Alert Severity Mapping configuration.
- Users can modify them as per their use-case at any point of time from the application configuration page. Possible OpsRamp Severities are Critical, Warning, Ok, Info.
- Component level thresholds can be configured on each resource level.
- No support of showing activity log and applied time.
- No support for the option to get Latest snapshot metric.