| Supported Versions |
|---|
| No Specific version |
Application Version and Upgrade Details
| Application Version | Bug fixes / Enhancements |
|---|---|
| 2.0.1 | The DNS Response application were experiencing issues with empty record responses impacting metric resolution time. However, response times are displayed on the metric graph when the record has not been resolved by the DNS server. |
| 2.0.0 | Patch update with MS / NS / TXT / AAAA records as default metrics. |
| 1.0.1 | Initial resource discovery and monitoring implementations. |
Introduction
DNS (Domain Name System) is a service that translates human-readable web addresses (e.g., app.example.com) into computer-readable IP addresses
(e.g., 192.1.1.1) and stores them in a hierarchical address database.
The IP address enables the browser to locate the server with the requested content. The pairing of the hostname and the IP address is called a namespace. Monitoring your DNS records helps you insure that the DNS continues to route traffic properly to your websites, services, and electronic communications.
Components of DNS
The individual records of a DNS are called Resource Records (RR) and the individual parts of a DNS database are called zones. Within these zones are several server and record types. In order to successfully monitor DNS, it is important to be familiar with what each component does in the larger system.
How does DNS work
The process of using a hostname (e.g., app.example.com) to get an IP address (e.g., 192.1.1.1) is called resolving. Resolving a hostname requires four different DNS server types. So these four different DNS servers work together to get you to the content you need:
- DNS Recursor
- Root Name Server
- TLD Nameserver
- Authoritative Nameserver
Let us quickly look at these server types and what they do.
DNS Recursor: The recursor server receives queries from client machines through applications like web browsers and checks for the resolving IP address in its cache. This server is also responsible for making any additional requests to satisfy the client’s DNS query. Recursor servers have no authority over record information.
Root Name Server: The root server takes up the job when a DNS Recursor cannot find the relevant address in its cache. It exists at the top of the DNS hierarchy in a space known as the root zone. Queries reaching the root zone are redirected to the correct zone by responding to the recursor with the IP address of the Top-Level Domain (TLD) nameserver that should handle the query. The internet consists of 13 root zone servers.
TLD Nameserver: The top-level domain server (TLD) handles the next step in the search for a specific IP address. It categorizes domain names and provides the recursor server with the relevant authoritative nameserver’s IP address that it should check.
Authoritative Nameserver: The authoritative nameserver has information for specific hostnames, such as example.com. It resolves the hostname to its corresponding IP address and sends that address back to the recursor server, where it is then passed to the client’s browser. The browser then accesses the site using the IP address.
DNS Record Types
There are 40 different DNS record types, all of which include multiple fields that specify information about the domain. The following are some of the most commonly used DNS record types:
Address Mapping record (A Record): Also known as a DNS host record, stores a hostname and its corresponding IPv4 address.
IP Version 6 Address record (AAAA Record): Stores a hostname and its corresponding IPv6 address.
Canonical Name record (CNAME Record): It can be used to alias a hostname to another hostname. When a DNS client requests a record that contains a CNAME, which points to another hostname, the DNS resolution process is repeated with the new hostname.
Mail exchanger record (MX Record): It specifies an SMTP email server for the domain, used to route outgoing emails to an email server.
Name Server records (NS Record): It specifies that a DNS Zone, such as “example.com” is delegated to a specific Authoritative Name Server, and provides the address of the name server.
Reverse-lookup Pointer records (PTR Record): It allows a DNS resolver to provide an IP address and receive a hostname (reverse DNS lookup).
Certificate record (CERT Record): It stores encryption certificates—PKIX, SPKI, PGP, and so on.
Service Location (SRV Record): The service record gives the host and port for a service such as instant messaging.
Text Record (TXT Record): These records are plain text entries that you may use for notes. They are important for holding domain owners accountable for how they use domains. It is also one way to protect your domain from being used to send spam.
Start of Authority (SOA Record): Your SOA record has a serial number that the system updates each time a change happens anywhere on your DNS entry. Knowing a change has been made can help you prevent a possible attack. This record appears at the beginning of a DNS zone file, and indicates the Authoritative Name Server for the current DNS zone, contact details for the domain administrator, domain serial number, and information on how frequently DNS information for this zone should be refreshed.
Monitoring your DNS entries should be at the top of your priority list. To keep an eye on your DNS consider monitoring some of them like IP address(es), SOA Record, MX record and SRV record, NS record and root servers.
What does DNS response probe do:
A particular host or domain is resolved as expected without any delay. It queries your Domain Name Server (DNS) and monitors the response time from the server.
Prerequisites
- OpsRamp Classic Gateway 14.0.0 and above.
- OpsRamp Nextgen Gateway 14.0.0 and above.
Note: OpsRamp recommends using the latest Gateway version for full coverage of recent bug fixes, enhancements, etc.
Application Migration
Check for the gateway version as a prerequisite step - classic gateway-12.0.1 and above.
Notes:- You only have to follow these steps when you want to migrate from sdk 1.0 to sdk 2.0.
- For the first time installation below steps are not required.
Disable all configurations associated with sdk 1.0 adaptor integration application.
Install and Add the configuration to that sdk 2.0 application.
Note: refer to Configure and Install the DNS Integration & View the DNS Details sections of this document.Once all discoveries are completed with the sdk 2.0 application, follow any one of the approaches.
- Direct uninstallation of the sdk 1.0 adaptor application through the uninstall API with skipDeleteResources=true in the post request
End-Point:https://{{host}}/api/v2/tenants/{tenantId}/integrations/installed/{installedIntgId}
Request Body:{ "uninstallReason": "Test", "skipDeleteResources": true }
(OR) - Delete the configuration one by one through the Delete adaptor config API with the request parameter as skipDeleteResources=true
End-Point:https://{{host}}/api/v2/tenants/{tenantId}/integrations/installed/config/{configId}?skipDeleteResources=true. - Finally, uninstall the adaptor application through API with skipDeleteResources=true in the post request.
End-Point:https://{{host}}/api/v2/tenants/{tenantId}/integrations/installed/{installedIntgId}
Request Body:{ "uninstallReason": "Test", "skipDeleteResources": true }
- Direct uninstallation of the sdk 1.0 adaptor application through the uninstall API with skipDeleteResources=true in the post request
Supported Metrics
Click here to view the supported metrics
| Native Type | Metric Name | Metric Display Name | Units | Application Version | Description |
|---|---|---|---|---|---|
| DNS Host | dns_response_time_A_Record | DNS A Record Response Time | ms | 1.0.1 | Provides DNS A Record response time in milliseconds. |
| dns_response_time_A_Record_Reverse_LookUp | DNS A Record Reverse LookUp Response Time | ms | 1.0.1 | Provides DNS A Record Reverse LookUp response time in milliseconds. | |
| dns_response_time_AAAA_Record | DNS AAAA Record Response Time | ms | 1.0.1 | Provides DNS AAAA Record response time in milliseconds | |
| dns_response_time_AAAA_Record_Reverse_LookUp | DNS AAAA Record Reverse LookUp Response Time | ms | 1.0.1 | Provides DNS AAAA Record Reverse LookUp response time in milliseconds. | |
| dns_response_time_MX_Record | DNS MX Record Response Time | ms | 1.0.1 | Provides DNS MX Record response time in milliseconds. | |
| dns_response_time_NS_Record | DNS NS Record Response Time | ms | 1.0.1 | Provides DNS NS Record response time in milliseconds. | |
| dns_response_time_TXT_Record | DNS TXT Record Response Time | ms | 1.0.1 | Provides DNS TXT Record response time in milliseconds |
Default Monitoring Configurations
DNS response probe has default Global Device Management Policies, Global Templates, Global Monitors and Global Metrics in OpsRamp. You can customize these default monitoring configurations as per your business use cases by cloning respective Global Templates and Global Device Management Policies. OpsRamp recommends doing this activity before installing the application to avoid noise alerts and data.
Default Global Device Management Policies
OpsRamp has a Global Device Management Policy for dns-response-probe. You can find those Device Management Policies at Setup > Resources > Device Management Policies, search with suggested names in global scope. Each Device Management Policy follows below naming convention:
{appName nativeType - version}Ex: dns-response-probe DNS Host - 1 (i.e., appName = dns-response-probe, nativeType = DNS Host, version = 1)
Default Global Templates
OpsRamp has a Global template for dns-response-probe. You can find those templates at Setup > Monitoring > Templates, search with suggested names in global scope. Each template follows below naming convention:
{appName nativeType 'Template' - version}Ex: dns-response-probe DNS Host Template - 1 (i.e., appName = dns-response-probe, nativeType = DNS Host, version = 1)
Default Global Monitors
OpsRamp has a Global Monitors for each Native Type which has monitoring support. You can find those monitors at Setup > Monitoring > Monitors, search with suggested names in global scope. Each Monitors follows below naming convention:
{monitorKey appName nativeType - version}Ex: DNS Host Monitor dns-response-probe DNS Host 1 (i.e., monitorKey = DNS Host Monitor, appName = dell-power-scale, nativeType = DNS Host, version = 1)
Configure and Install the DNS Integration
- From All Clients, select a client.
- Go to Setup > Account.
- Select the Integrations and Apps tab.
- The Installed Integrations page, where all the installed applications are displayed. If there are no installed applications, it will navigate to the Available Integrations and Apps page.
- Click + ADD on the Installed Integrations page. The Available Integrations and Apps page displays all the available applications along with the newly created application with the version.
- Search for the application using the search option available. Alternatively, use the All Categories option to search.
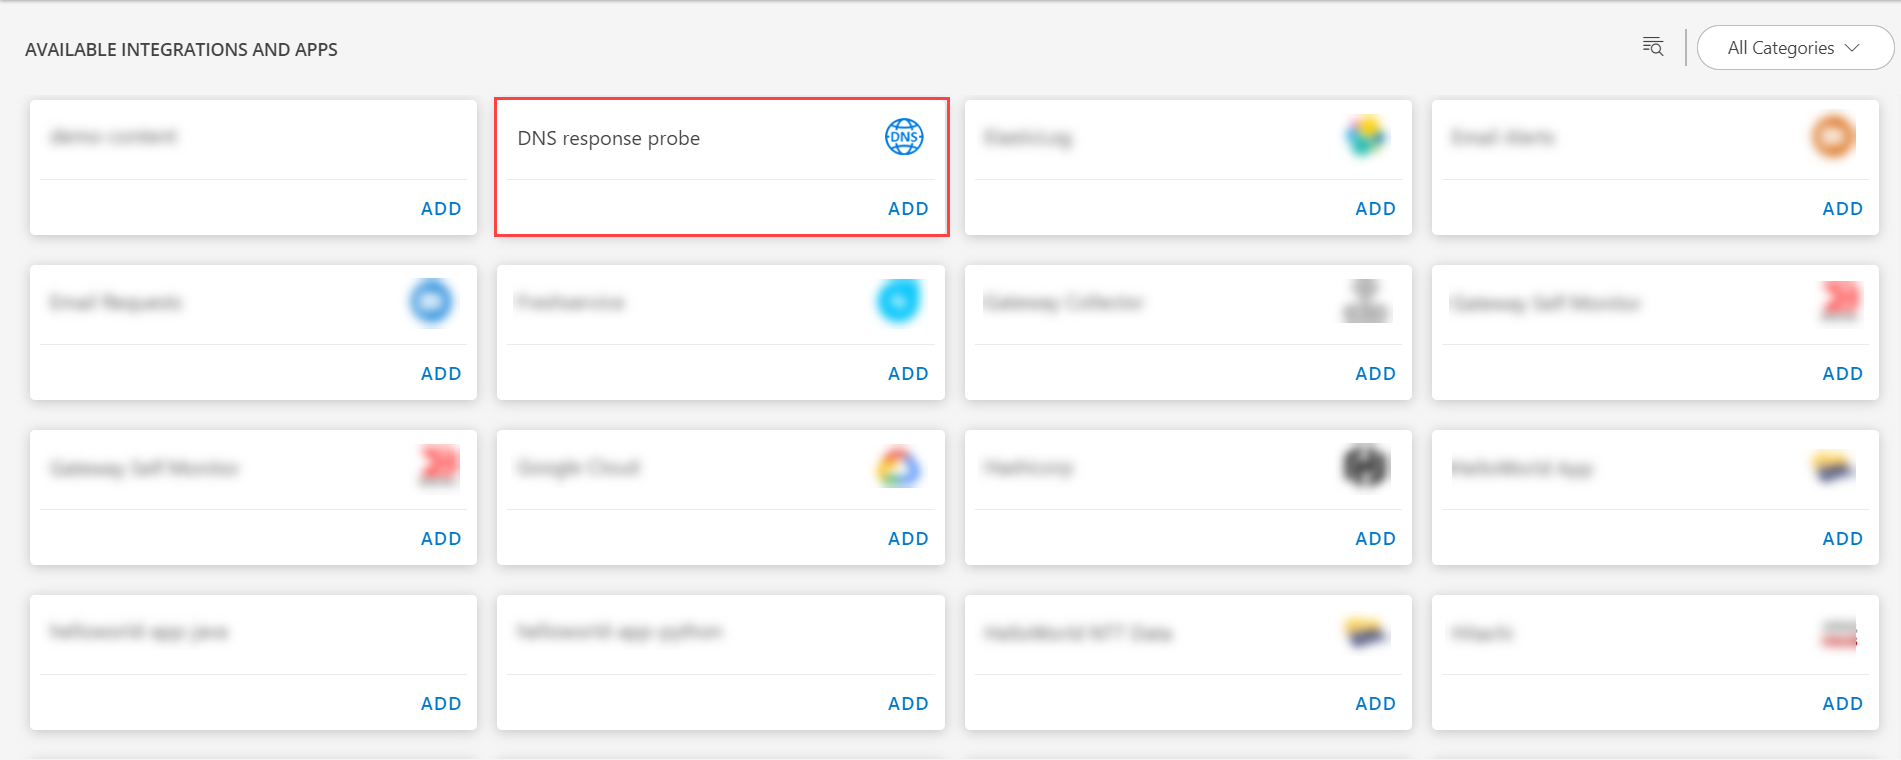
- Click ADD in the DNS response probe application.
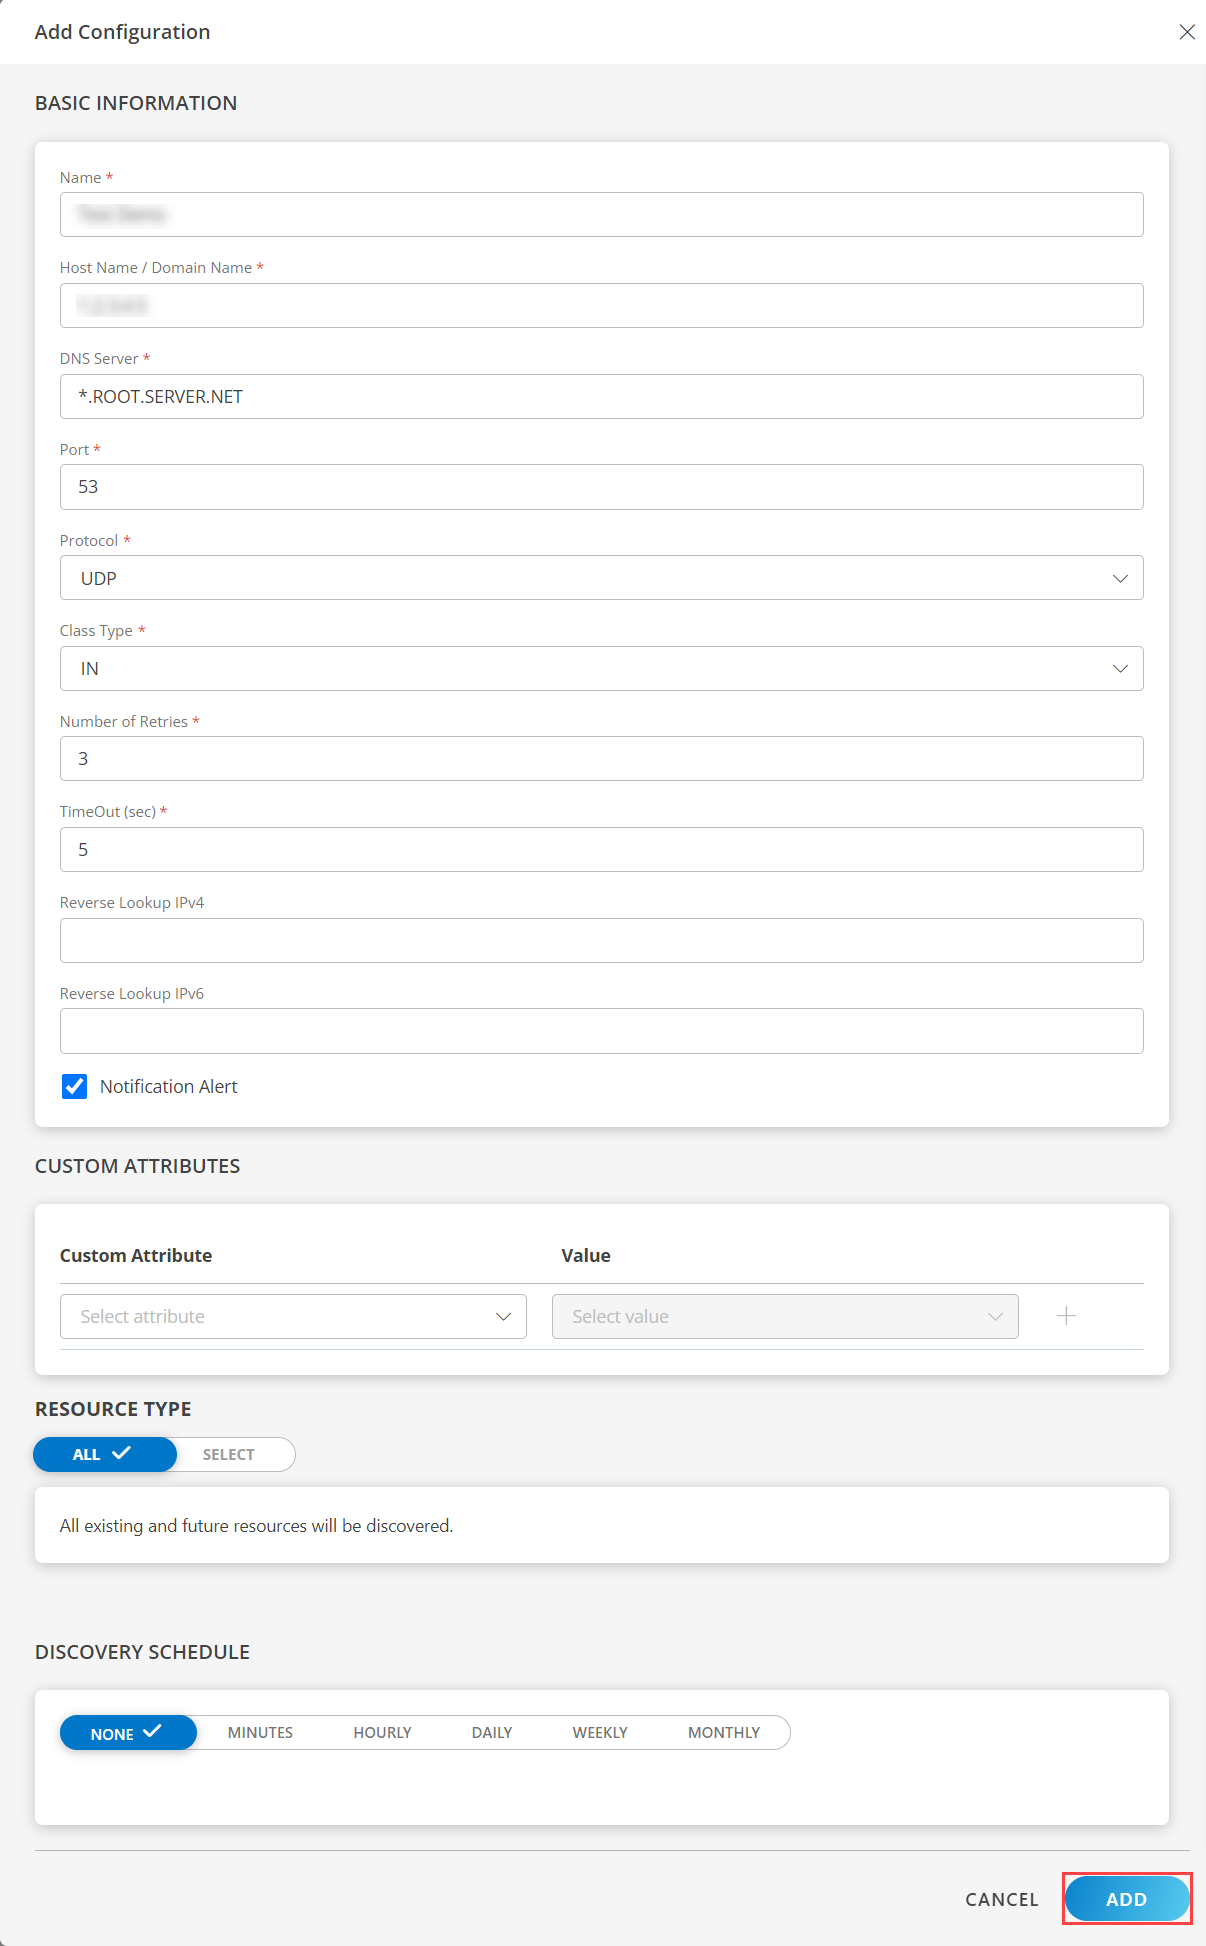
- In the Configurations page, click + ADD. The Add Configuration page appears.
- Enter the below mentioned BASIC INFORMATION:
| Functionality | Description |
|---|---|
| Name | Enter the name for the configuration. |
| Host Name / Domain Name | host name / domain name of the DNS Server. |
| DNS Server | DNS Server information. Note: By default *.ROOT.SERVER.NET is provided. |
| Port | Port Note: Default port value is 53. |
| Protocol | Select the protocol from the dropdown. You can either choose:
|
| Class Type | Select the class type from the dropdown. You can either choose:
|
| Number of Retries | Enter the number of retries. Note: By default 3 is the default value. |
| TimeOut (sec) | Enter the timeout information. Note: By default 5 is the default timeout value. |
| Reverse Lookup IPv4 | Enter the reverse lookup IPv4 value. |
| Reverse Lookup IPv6 | Enter the reverse lookup IPv6 value. |
Note: Select the Notification Alert checkbox to be notified in case of Critical/Recovery failure alert for Connectivity, Authentication Exceptions.
- Select the below mentioned Custom Attribute:
| Functionality | Description |
|---|---|
| Custom Attribute | Select the custom attribute from the drop down list box. |
| Value | Select the value from the drop down list box. |
Note: The custom attribute that you add here will be assigned to all the resources that are created by the integration. You can add a maximum of five custom attributes (key and value pair).
- In the RESOURCE TYPE section, select:
- ALL: All the existing and future resources will be discovered.
- SELECT: You can select one or multiple resources to be discovered.
- In the DISCOVERY SCHEDULE section, select Recurrence Pattern to add one of the following patterns:
- Minutes
- Hourly
- Daily
- Weekly
- Monthly
- Click ADD.
Now the configuration is saved and displayed on the configurations page after you save it. From the same page, you may Edit and Remove the created configuration.
Under the ADVANCED SETTINGS, Select the Bypass Resource Reconciliation option, if you wish to bypass resource reconciliation when encountering the same resources discovered by multiple applications.
Note: If two different applications provide identical discovery attributes, two separate resources will be generated with those respective attributes from the individual discoveries.
Click NEXT.
(Optional) Click +ADD to create a new collector by providing a name or use the pre-populated name.
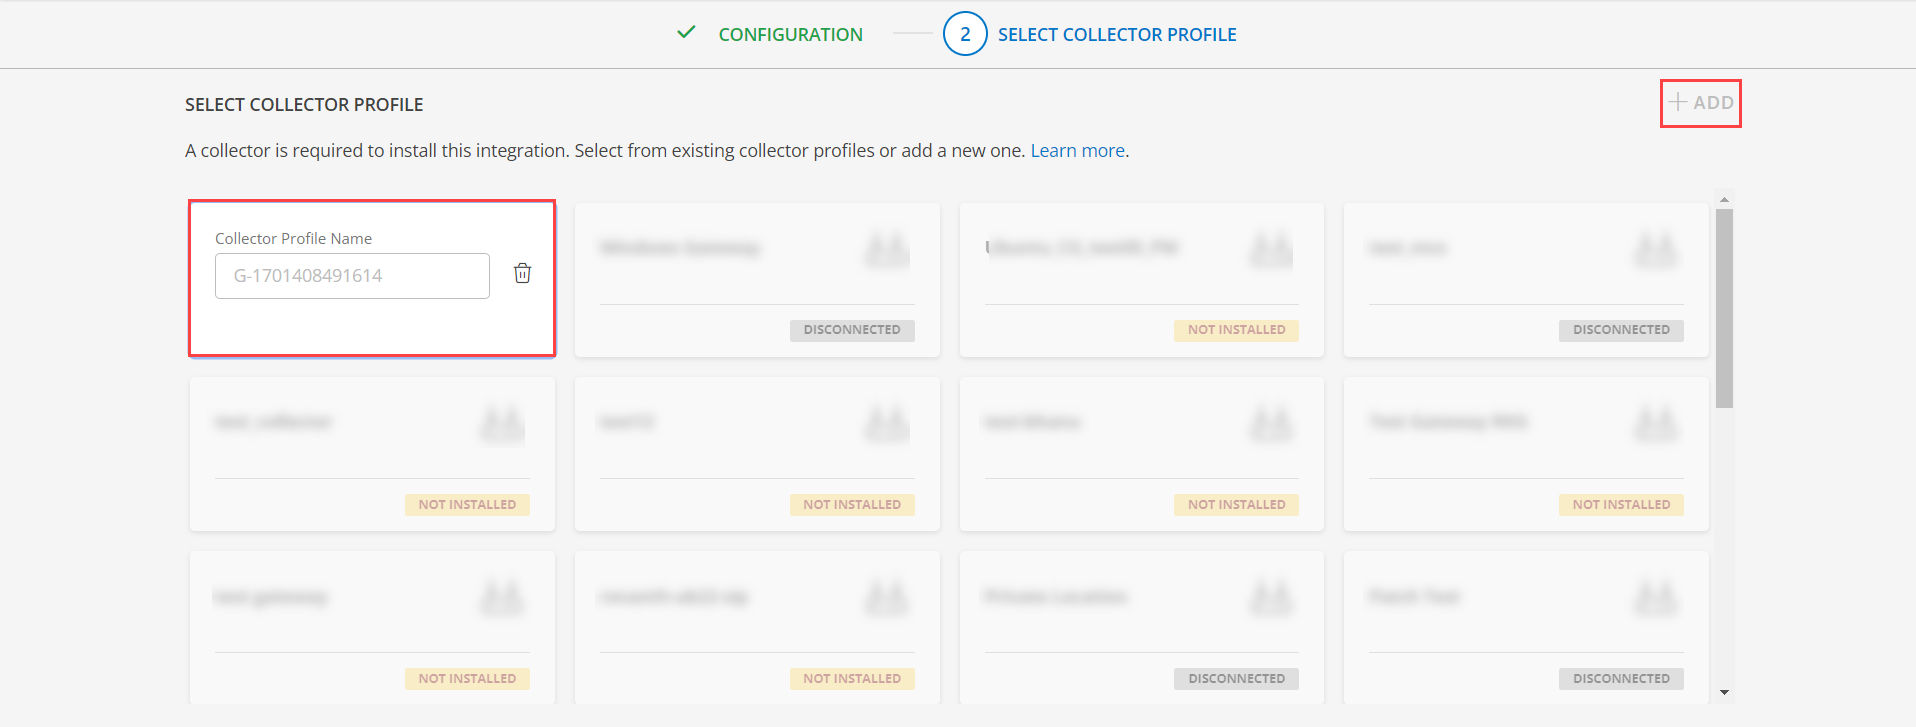
- Select an existing registered profile.
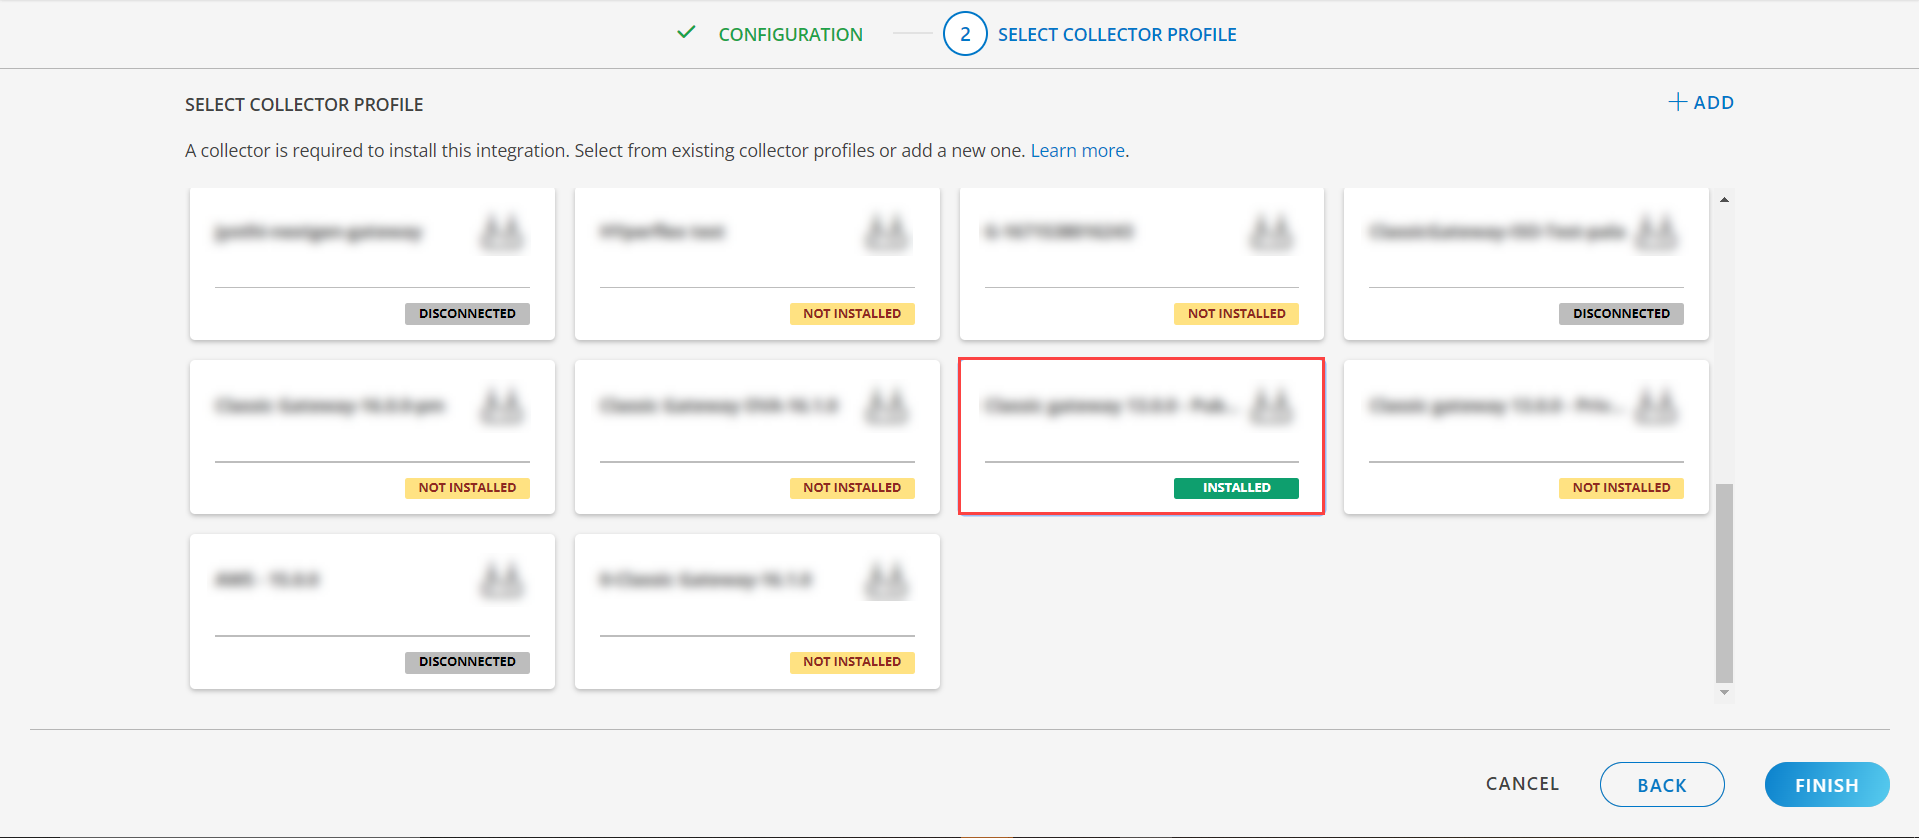
- Click FINISH.
The application is installed and displayed on the INSTALLED INTEGRATION page. Use the search field to find the installed integration.
Modify the Configuration
See Modify an Installed Integration or Application article.
Note: Select the DNS response probe application.
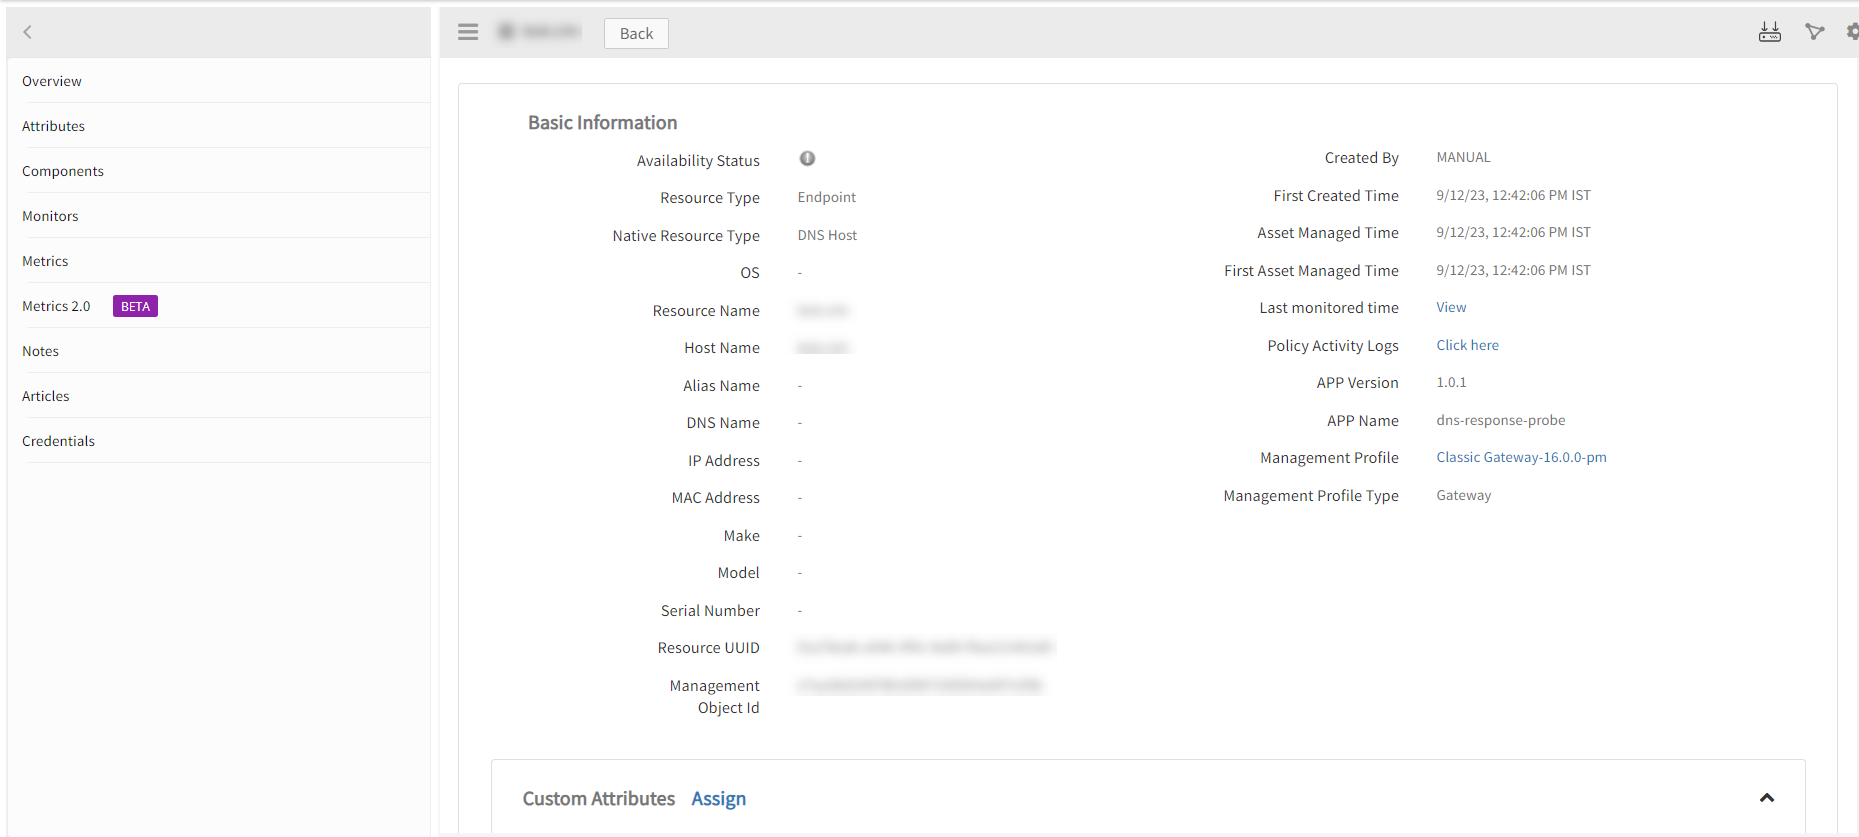
View the DNS Details
The DNS integration is displayed in the Infrastructure > Resources > Endpoint. You can navigate to the Attributes tab to view the discovery details, and Metrics tab to view the metric details for DNS integration.

Note: By default, we provide A record metrics. You may also add additional metrics, apart from A records, by cloning the global template and using it.
Resource Filter Input Keys
DNS response probe resources are filtered and discovered based on few resource attributes.
Click here to view the Supported Input Keys
| Resource Type | Supported Input Keys |
|---|---|
| All Types | resourceName |
| hostName | |
| moId |
Supported Alert Custom Macros
Customize the alert subject and description with below macros then it will generate alerts based on customisation. Supported macros keys:
Click here to view the alert subject and description with macros
${resource.name}
${Custom attributes on the resource}
Risks, Limitations & Assumptions
- Application can handle Critical/Recovery failure alert notifications for below cases when user enables Notification Alerts in configuration:
- Connectivity Exception
- Application will send a critical alert for the very first poll when it encounters the above issues, and the subsequent alert will be a recovery alert whenever the application does not come across the above issues in subsequent polls.
- Application cannot control monitoring pause/resume actions based on the above alerts
- Platform has support to enable/disable configuration. So, when a particular notification is generated then the customer can act using UI/Commands.
- Encrypted Host Name is used as a signature (MoId). Hence, if a user modifies an already provided Host Name, the old resource will get deleted and a new resource will be created with an edited Host Name/Domain Name.
- Instead of giving additional configurations for SDK 1.0, can define ipv4 and ipv6 lookup details directly in configuration itself.
- No support of showing activity log and applied time.
- The minimum supported version for the option to get the latest snapshot metric is Nextgen-14.0.0.
- Application is not compatible with Cluster Gateway.
- This application supports both Classic Gateway and NextGen Gateway.