You can ingest Events, Alarms, and CloudTrail data by configuring Amazon Simple Queue Service (SQS) and Simple Notification Service (SNS). Amazon Simple Notification Service (SNS) works with Amazon SQS to provide a powerful messaging solution for building cloud applications that are easy to scale.
Configure Amazon SNS and Amazon SQS
This guide assists in discovering all your AWS resources. Upon completion, make sure to conclude by proceeding to the Collect Metrics section to initiate the collection of metrics from the identified resources.
Step 1: Create an Amazon SNS topic
- Log into your AWS management console.
- Create an SNS topic. See Getting started with Amazon SNS for more details.The topic Name, ARN, Display name (optional), and Topic owner AWS account ID are displayed in the Details section.
AWS events
If the Amazon CloudWatch rules or Amazon SNS topics are created through automation, add the following code snippet to your policy because this is not included in the default policy. When a CloudWatch rule is created manually, AWS automatically adds this snippet to the SNS policy.
{
   "Sid": "AWSEvents_RULE-NAME_IdRANDOM-NUMBER-STRING",
   "Effect": "Allow",
   "Principal": {
     "Service": "events.amazonaws.com"
   },
   "Action": "sns:Publish",
   "Resource": "SNS-TOPIC-ARN"
 }
Amazon CloudTrail
If the Amazon CloudTrail or SNS topics are created through automation, add the following snippet to your policy because this is not included by default. AWS automatically adds this snippet to the SNS policy when an SNS is added manually to a trail in the AWS console.
{
      "Sid": "AWSCloudTrailSNSPolicyRANDOM-NUMBER-STRING",
      "Effect": "Allow",
      "Principal": {
        "Service": "cloudtrail.amazonaws.com"
      },
      "Action": "SNS:Publish",
      "Resource": "SNS-TOPIC-ARN"
    }
Step 2: Create a queue in Amazon SQS
- Navigate to Amazon SQS in the AWS console.
- Create a queue. See creating a queue for more details.
- Configure an Access policy as defined in the given table according to the service.
- Amazon SQS creates the queue and displays the queue details page. The queue details such as ARN, URL, and type are displayed in the Details section.
- Subscribe to the Amazon SNS topic created in step 1.
- Copy the Amazon SQS URL to the clipboard or a text editor such as Notepad. The Amazon SNS topic and Amazon SQS URL must be unique for Amazon CloudWatch Alarm, CloudWatch Event, and CloudTrail.
Access Policy under the Permissions tab.
| Services | Permissions |
|---|---|
| AWS Events | Actions:
|
| Amazon CloudTrail Events | Actions:
|
| AssumeRole/External ID | SQS:
|
Configure Amazon CloudTrail
AWS CloudTrail generates events when there is a change such as launching or termination of an instance. Actions taken by a user, role, or an AWS service are recorded as events in CloudTrail. These events are captured through the CloudTrail SQS URL to create events.
Prerequisites
- Create an Amazon S3 bucket where all log files can be stored.
- Create an Amazon SNS topic.
- Create an Amazon SQS subscription and link it to the Amazon SNS topic.
Steps
- Log in to your AWS management console.
- Navigate to Amazon CloudTrail.
- On the Dashboard, click Create Trail. See AWS documentation on Creating a trail
- While creating the trail, under Storage location, click Advanced.
- Set Send SNS notification for every log file delivery to Yes.
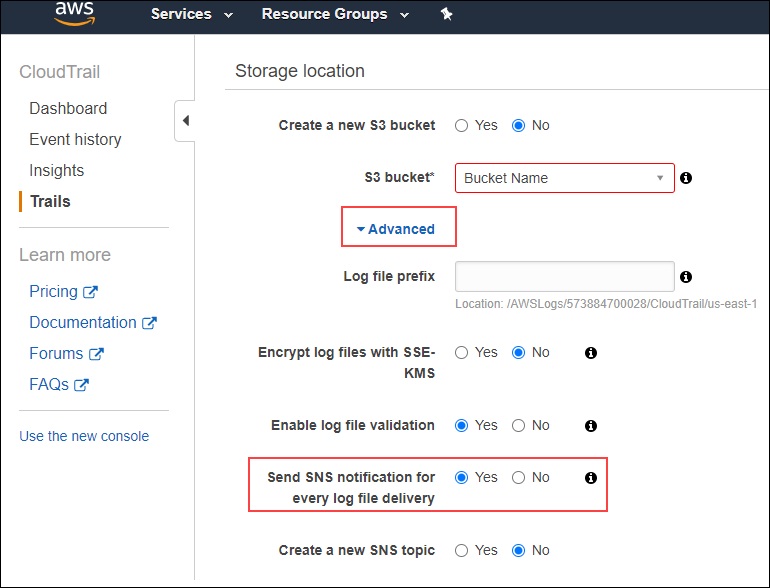
Select the Amazon SNS topic and click Create Trail.
The SNS topic should be unique to the trail created. Use the Amazon SQS URL associated with the Amazon SNS topic to configure Amazon CloudTrail while creating or updating the AWS integration in OpsRamp.
Amazon CloudTrail is now configured to send events to OpsRamp.
Configure Amazon CloudWatch alarms
Amazon CloudWatch monitors your AWS services and the applications you run on AWS in real-time. You can use CloudWatch Alarms to collect and track metrics. You can define alarms to send notifications or automatically make changes to the resources you are monitoring when a threshold is breached.
Prerequisites
- Create a unique SNS topic to CloudWatch Alarm.
- Create a unique SQS subscription and link to the SNS topic.
Steps
- Log in to your AWS management console.
- Navigate to Amazon CloudWatch.
- Click Create Alarm. To set up CloudWatch alarm, see How to create a CloudWatch Alarm Based on a Static Threshold.
- Specify the metric conditions and click Next.
- From the Configure Actions page, select the In Alarm (The metric or expression is outside of the defined threshold) option.
- Select an Amazon SNS topic created earlier to send notification for CloudWatch alarms.
- Click Add notification.
- Select the OK (The metric or expression is within the defined threshold) option.
- Select an SNS topic and click Next.
Choose the same SNS topic for both the options of notifications.
- Enter a unique name for the alarm and a description (optional).
- Click Next. A preview page opens displaying the configuration details of the alarm.
- Click Create alarm.
Amazon CloudWatch Alarm is now configured to send notifications to OpsRamp.