Introduction
This document provides step-by-step instructions on connecting your Observability product to Amazon Web Services (AWS) using the parent account with access to child (member) AWS accounts. This integration allows you to access and monitor your AWS resources from within OpsRamp securely.
With this integration, you can use your own AWS account as a trusted entity to obtain data from child accounts, instead of an OpsRamp account acting as a trusted entity, to obtain your AWS data.
Prerequisites
Ensure you have the necessary IAM permissions to create IAM roles and policies in AWS.
Note
In AWS, not all regions are enabled by default; some regions need to be manually enabled to access data from them. For IAM, it will function once the region is enabled in the account. However, for Assume Role, the customer must also enable a setting in the master account by navigating to IAM > Account Settings > Security Token Service (STS) and setting Global endpoint to All AWS Regions to access data from child accounts with manually enabled regions.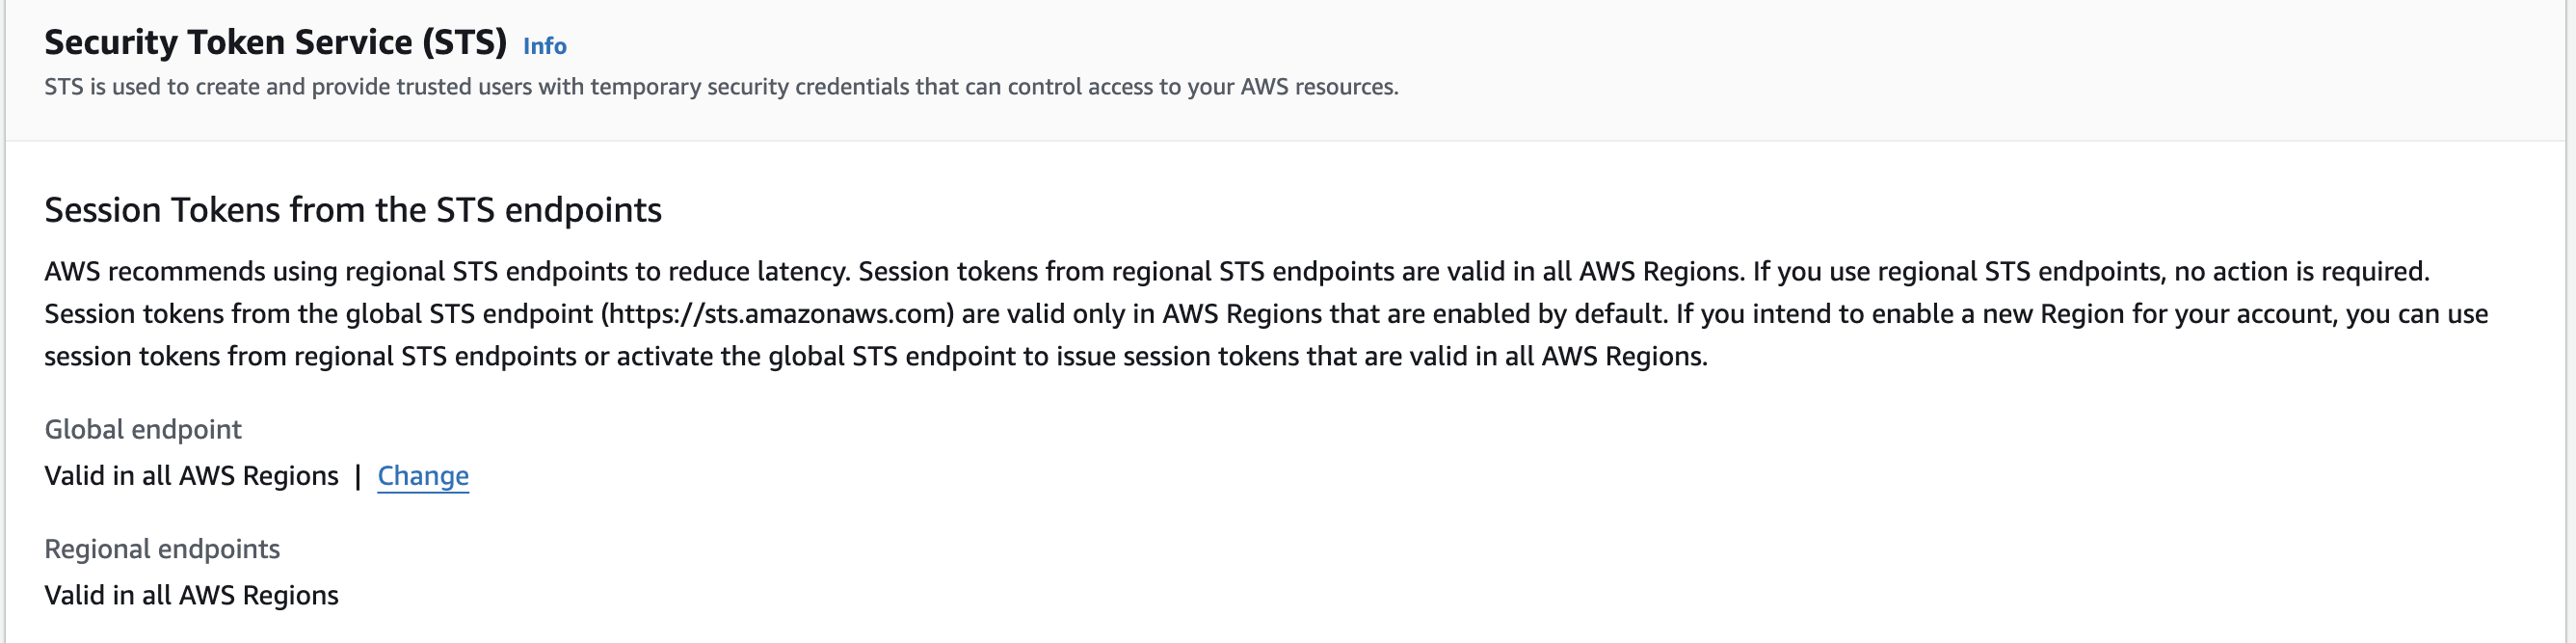
Make sure you have the following permissions to install the AWS integration:
“organizations:ListAccounts”“sts:AssumeRole”
AWS configuration
Step 1: Configure IAM Policy in AWS
Log in to your AWS Management Console.
Navigate to the IAM (Identity and Access Management) service.
Click Policies in the left-hand navigation pane.
Click Create Policy.

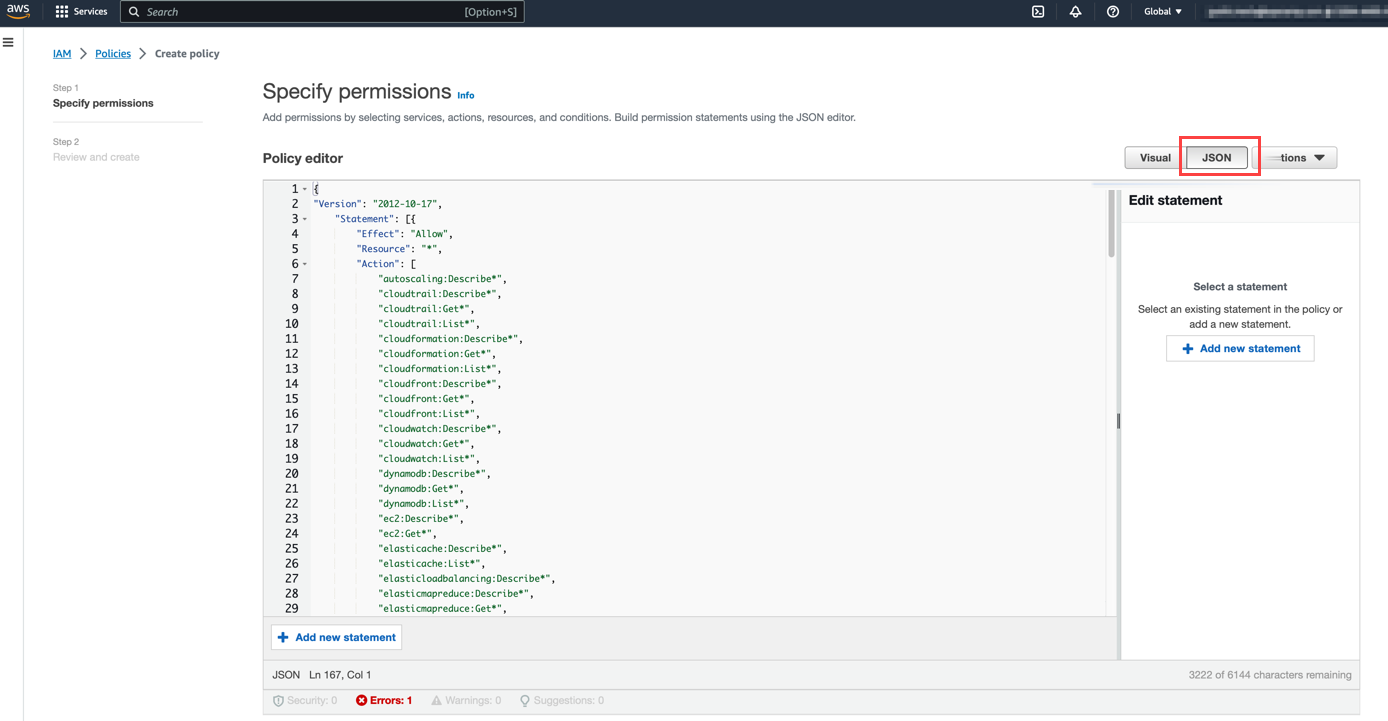
From the Create Policy page under Specify permissions, select JSON editor, and paste the following code:Note: To add more permissions, see Permissions for AWS Resource Discovery for more details about the permissions required for discovering AWS resources.
   {
    "Version": "2012-10-17",
    "Statement": [
        {
            "Sid": "VisualEditor0",
            "Effect": "Allow",
            "Action": [
                "mediapackage:DescribeOriginEndpoint",
                "mediapackage:DescribeHarvestJob",
                "opsworks:DescribeStacks",
                "opsworks:DescribeLayers",
                "opsworks:DescribeInstances",
                "opsworks:ListTags",
                "s3:ListAllMyBuckets"
            ],
            "Resource": "*"
        }
    ]
  }
Click Next.
In the Review and create page, you need to provide a name for the policy.

Click Save.
Step 2: Configure IAM User in AWS
Navigate to the IAM (Identity and Access Management) service.
Click Users in the left-hand navigation pane.
Click Create User.

Provide a name and click Next.

The recommended method of setting permissions for a user is through a user group in AWS. Choose to Add user to group and create or select an existing group. The group should have the IAM policy created earlier attached to it.

Click Next.
Click Create User.

Find the user created and click the user from the Users page.
Click the Create access key.

Choose the Third-party service option.

Click Next.
Save the Access Key and Secret Access Key. As an alternative, you can download the CSV file to access the secret keys.

You can now set up the AWS integration within OpsRamp using the secret keys.
Step 3: Set up AWS Integration in OpsRamp
Log in to the OpsRamp portal.
Navigate to Setup > Account.
On the ACCOUNT DETAILS page, select Integrations and Apps.

The INSTALLED INTEGRATIONS page is displayed with all the installed applications.

Note: If there are no installed applications, it will navigate to the AVAILABLE INTEGRATIONS AND APPS page.
Click + ADD on the INSTALLED INTEGRATIONS page. The AVAILABLE INTEGRATIONS AND APPS page displays all the available applications along with the newly created application.Note: You can even search for the application using the search option available. Also, you can use the All Categories option to search.
Click ADD in the AWS application.

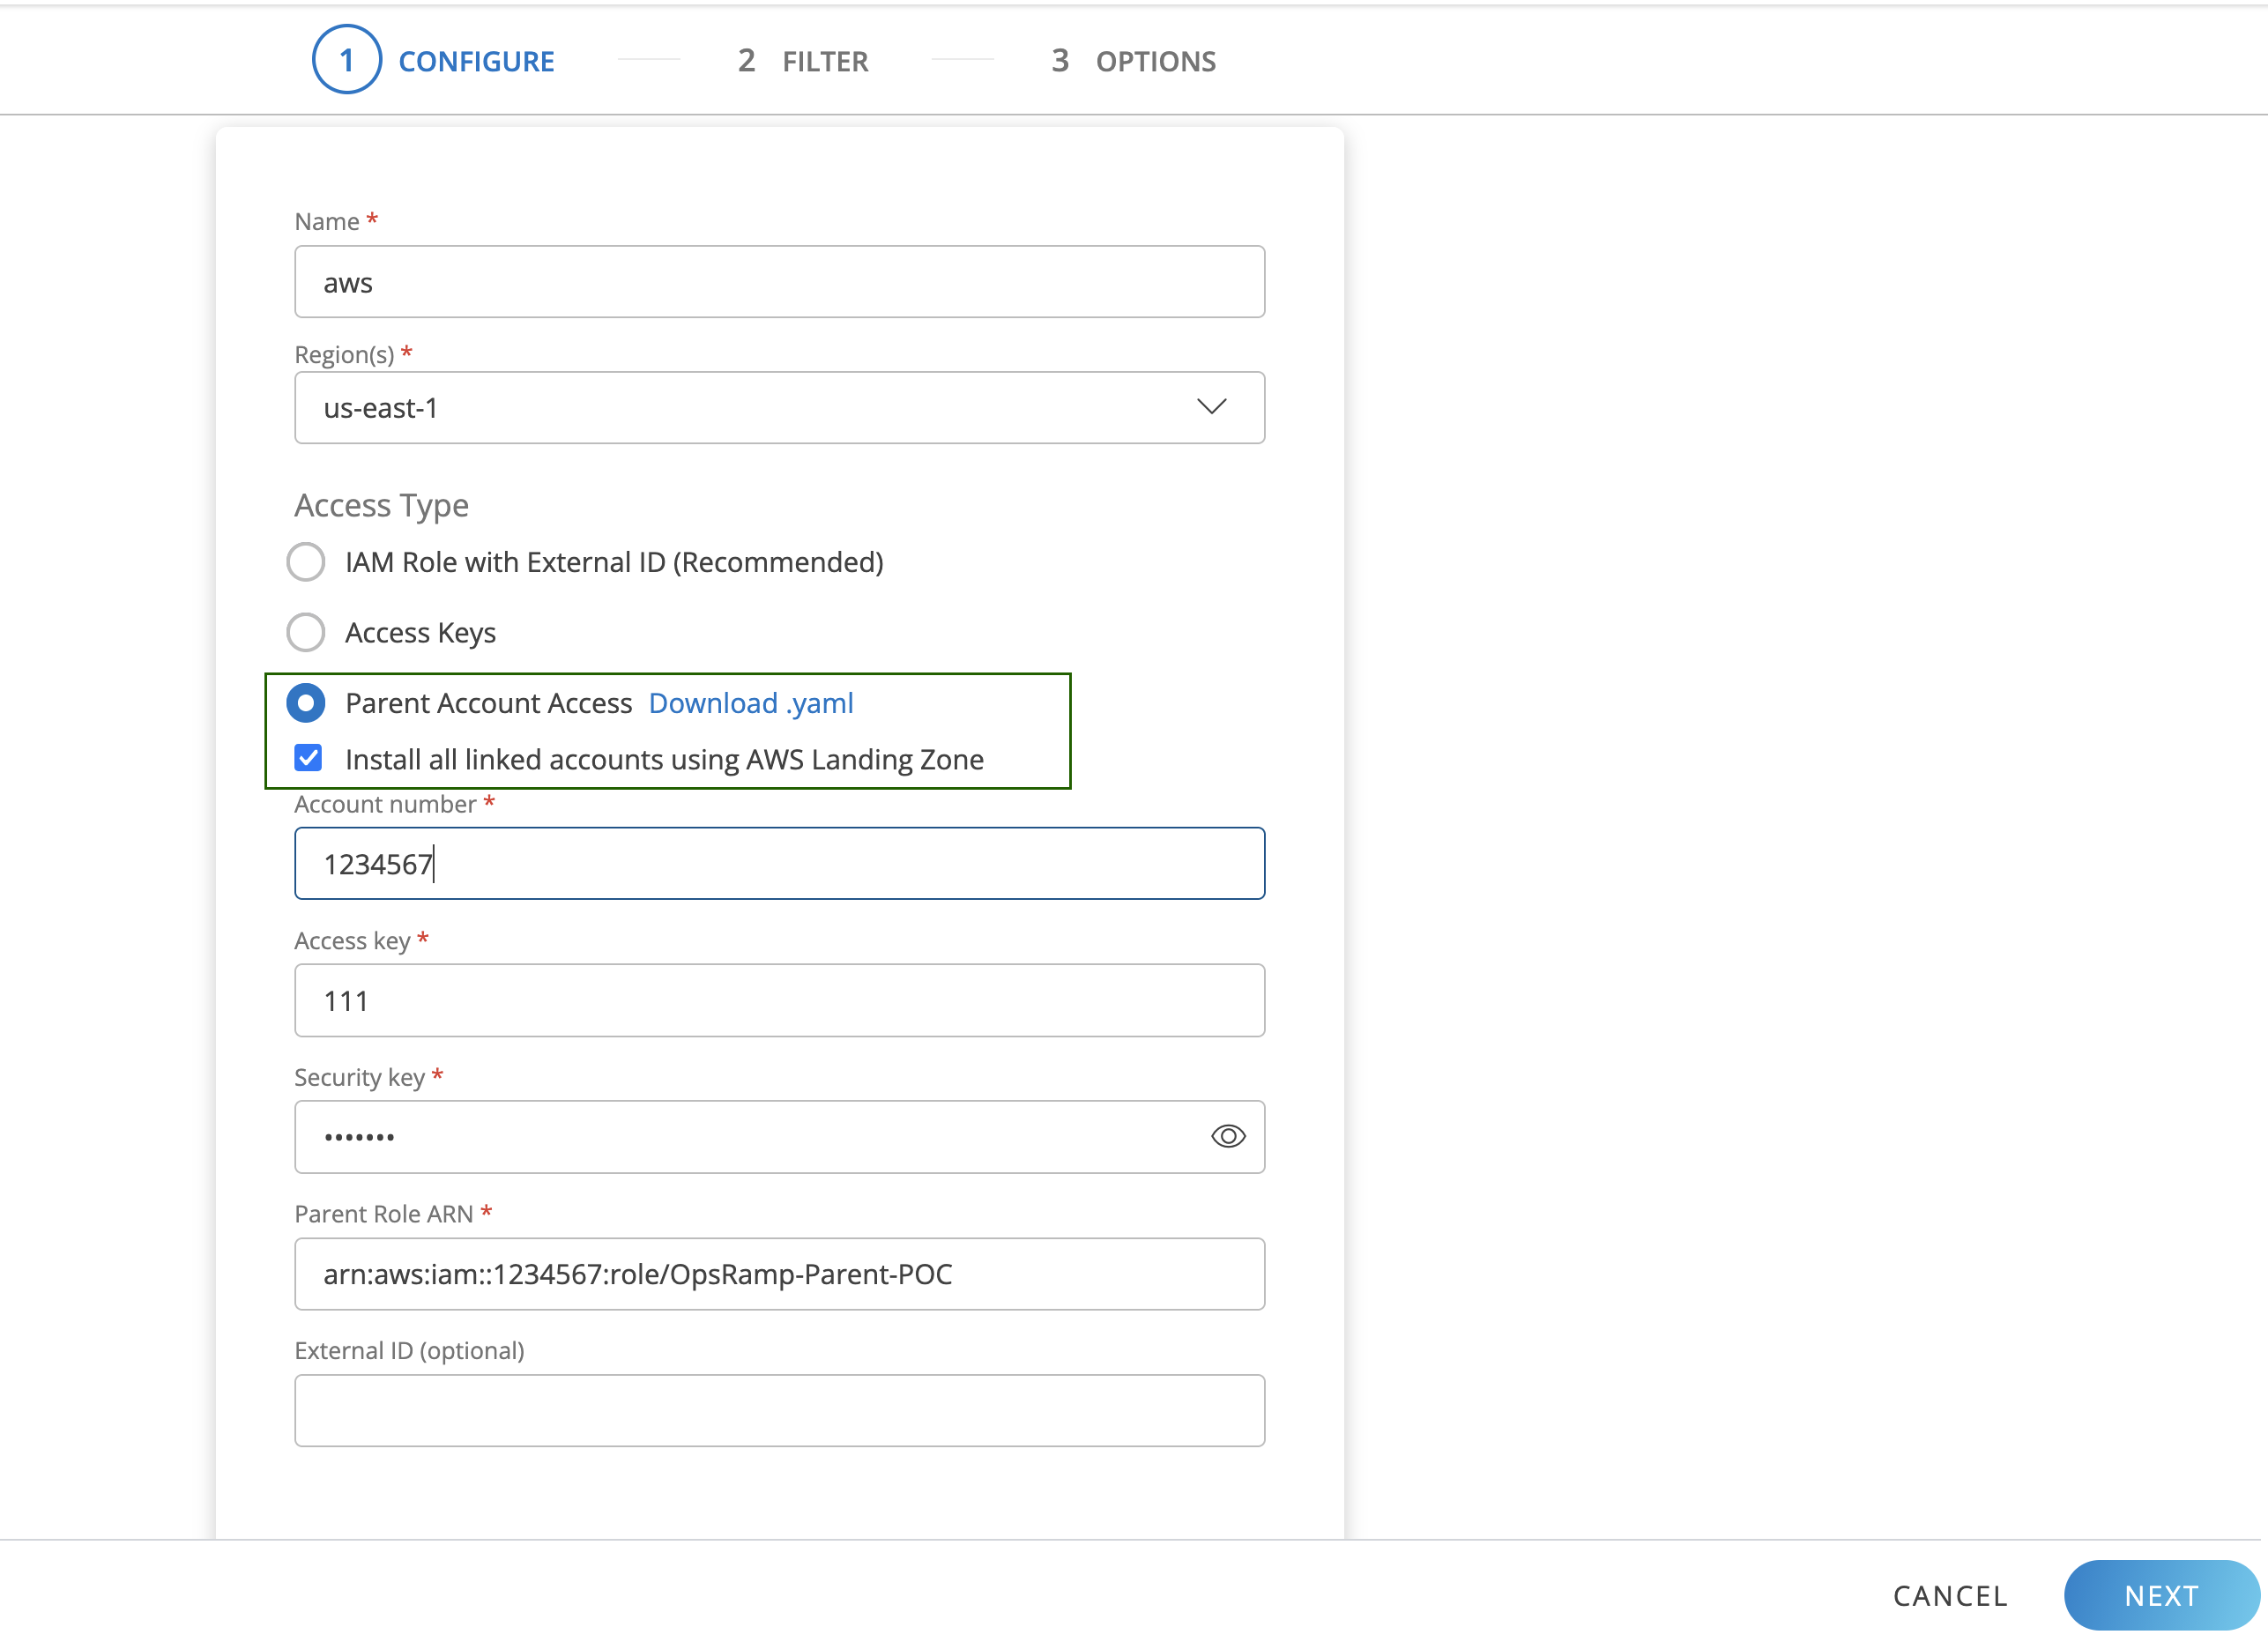
In the ADD AWS page, enter the account information:

| Functionality | Description |
|---|---|
| Name | (required) Enter the name for the integration. |
| Region | (required) Select the AWS region from the drop-down list. The services that belong to the selected regions are onboarded. You can select multiple regions to onboard the services.If you select two regions A and B, and if you are not authorized to access region B, onboarding fails for both regions A and B. |
| Access type | (required) Select Parent Account Access. |
| Account number | (required) Enter the AWS Account Number (which can be found in the top right of your AWS console). |
| Access Key | (required) Enter the access key you received during Step 2: Configure IAM User in AWS. |
| Security Key | (required) Enter the security key you received during Step 2: Configure IAM User in AWS. |
As per the requirement, you can now do one of the following:
One Child Account (Manual Setup): If you want to link a single AWS child account:
- In the OpsRamp console, select AWS Type as Parent Account Access.
- Do not check the box labeled Install all linked accounts using AWS Landing Zone.
- From the AWS Console, create a role in the child account (see Step 3: Configure IAM Role in AWS for more details).
- In OpsRamp, enter the following for the child account:
- AWS Account Number
- Access Key
- Secret Key
- Role ARN
- You may enter an optional external ID. The external ID entered in OpsRamp must be the same as the external ID entered during role creation in the AWS console.
- You will have to create multiple instances of the AWS integration for every child account you would like to link. Enter an external ID (optional).
Multiple Child Accounts (Landing Zone Setup): If you want to link multiple child accounts using a parent (master) account:
- In the OpsRamp console, select AWS Type as Parent Account Access.
- Check the box labeled Install all linked accounts using AWS Landing Zone.
- When this option is enabled, you can either:
- Install all linked child accounts, or
- Install only selected child accounts by applying filters in the Filters section.
- When this option is enabled, you can either:
- In OpsRamp, provide the following credentials from the parent (master) account:
- AWS Account Number
- Access Key
- Secret Key
- Role ARN
- You may enter an optional external ID. The external ID entered in OpsRamp must be the same as the external ID entered during role creation in the AWS console.
- In each child account, create a role that:
- Trusts the parent account’s role.
- Has the same role name as the one used in the parent account.
Ensure the trust relationship includes the correct ARN of the parent role, and permissions are appropriately set.
Filters Configuration
The Filters page includes two sections:
- Resources: Select the discovery profile that will be inherited by child accounts during installation.
- Accounts:
- Controls which child accounts are discovered and managed.
- If All is selected, all child accounts under the parent account are discovered.
- If Selected is chosen, child accounts can be filtered and selected for installation using Account ID, Display Name, or Tags.

During parent account installation or a parent account rescan, only the child accounts that match the configured filter policy are installed in OpsRamp. The account filter can be updated at any time, followed by a rescan to apply the changes.
Note: This section supports only adding child accounts. Updating or deleting child accounts is not supported.
Permissions Required: To filter child accounts based on tags, the IAM role in the parent account must include the
organizations:ListTagsForResourcepermission in its policy.Click Next.
Navigate to the Filter screen.
From the Filter Criteria type, select Smart Filters.
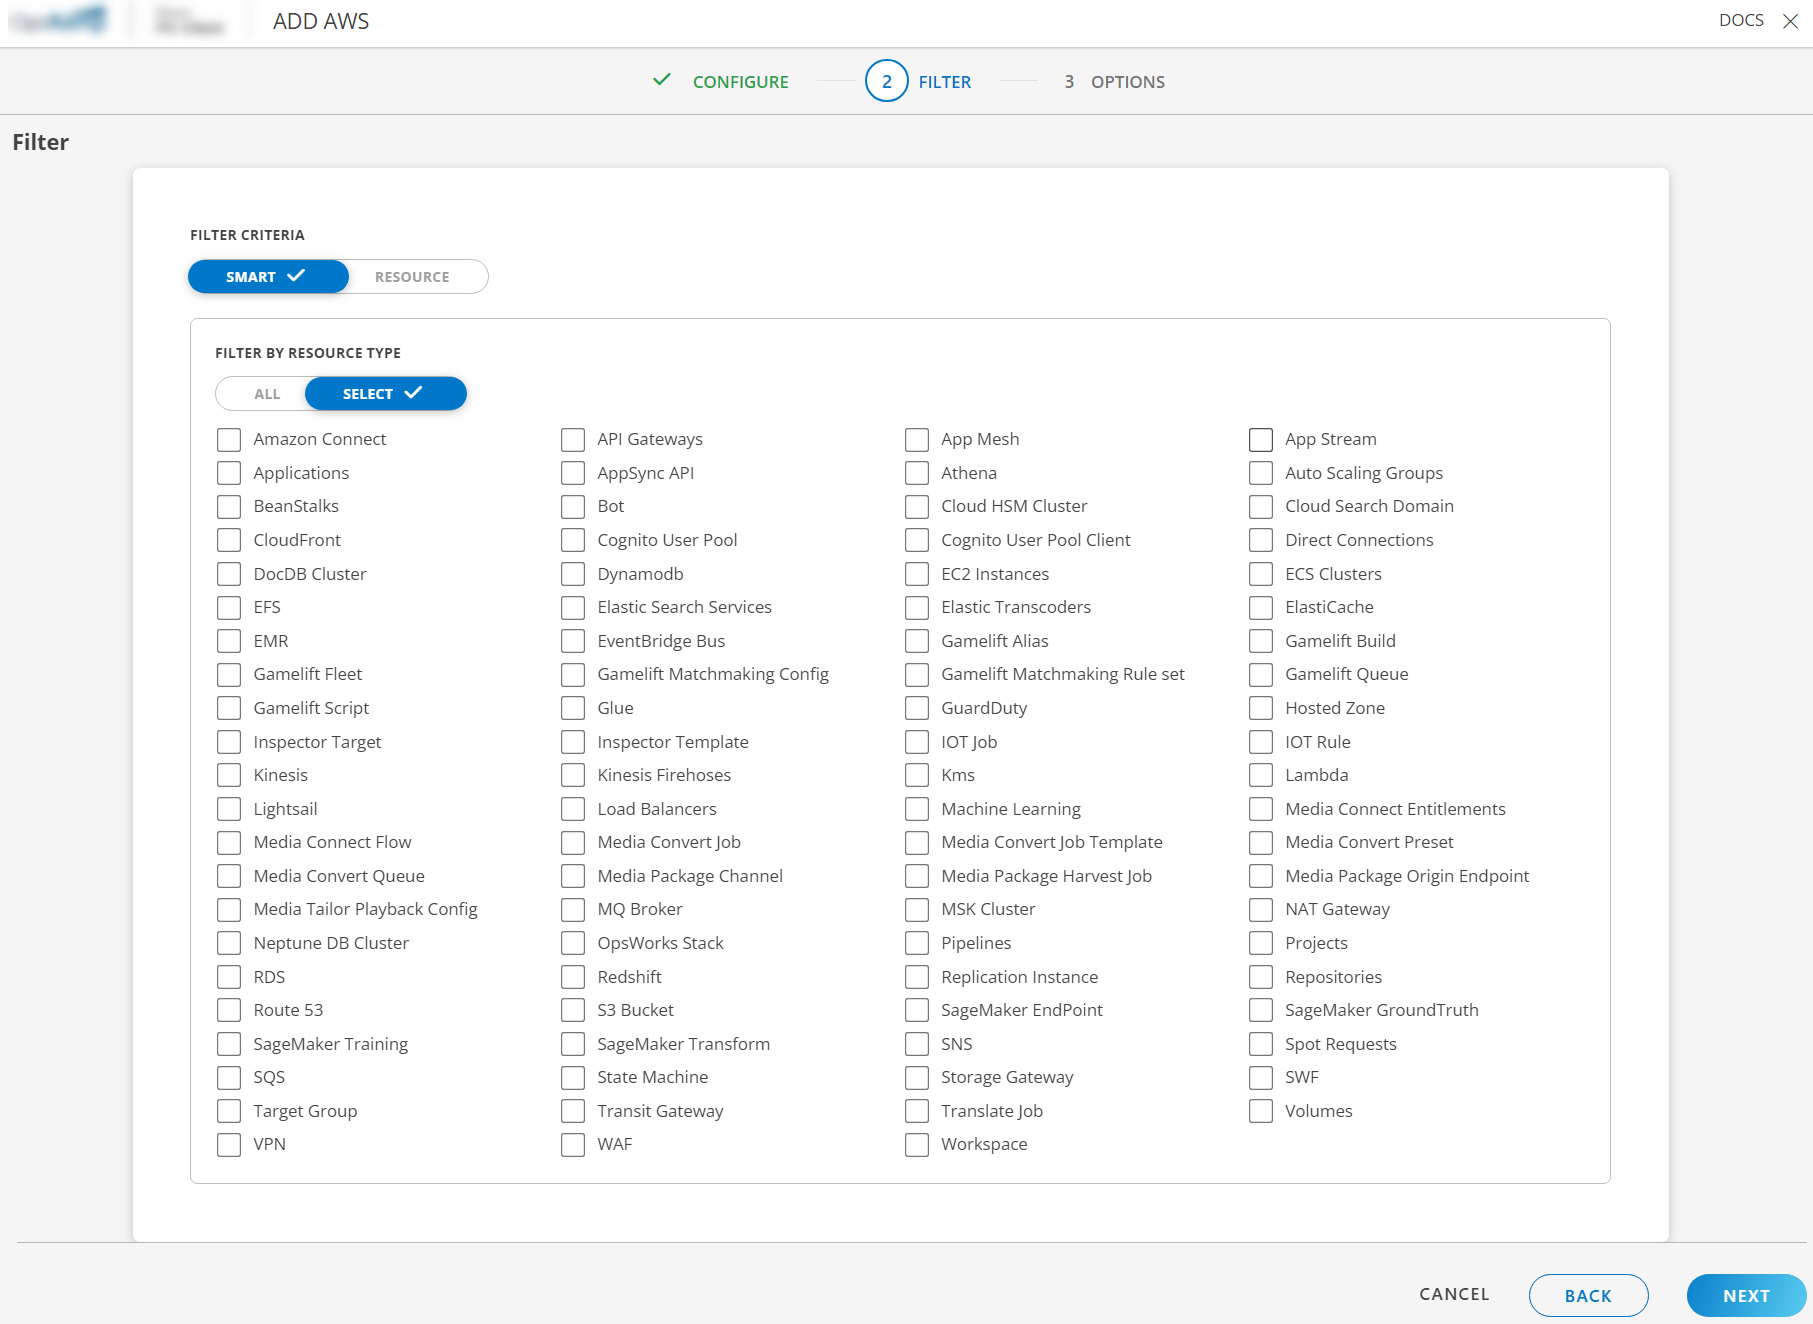
You can choose All resources or choose specific resources to discover from your AWS account. If you would like to select specific resources, check the checkboxes, and select the resources you need.
Click Next.
On the last screen, check Manage Device such that all the discovered resources are in a managed state and choose a discovery schedule (this runs periodically to discover new resources).

See the Appendix for more information about other AWS integration options.
Click Finish.The integration is completed.
Once the integration is completed, you should see your devices being discovered. Navigate to Infrastructure > Search or Infrastructure > Resources to see the discovered resources.
Note: It might take up to 5 minutes to see your resources.
Remove resources
When editing the AWS integration, you can choose whether to keep or remove agent-installed resources. If you edit an instance of the integration and removes a resource type from being discovered, previously discovered resources of that type will now be automatically removed from OpsRamp.
Collect Metrics
Now that you have discovered your AWS resources, you can now start collecting the metrics. See Collect Metrics for more details.
Appendix
If you want to collect logs from AWS, navigate to Infrastructure > Logs and if enabled, follow the steps mentioned in the Log Management.
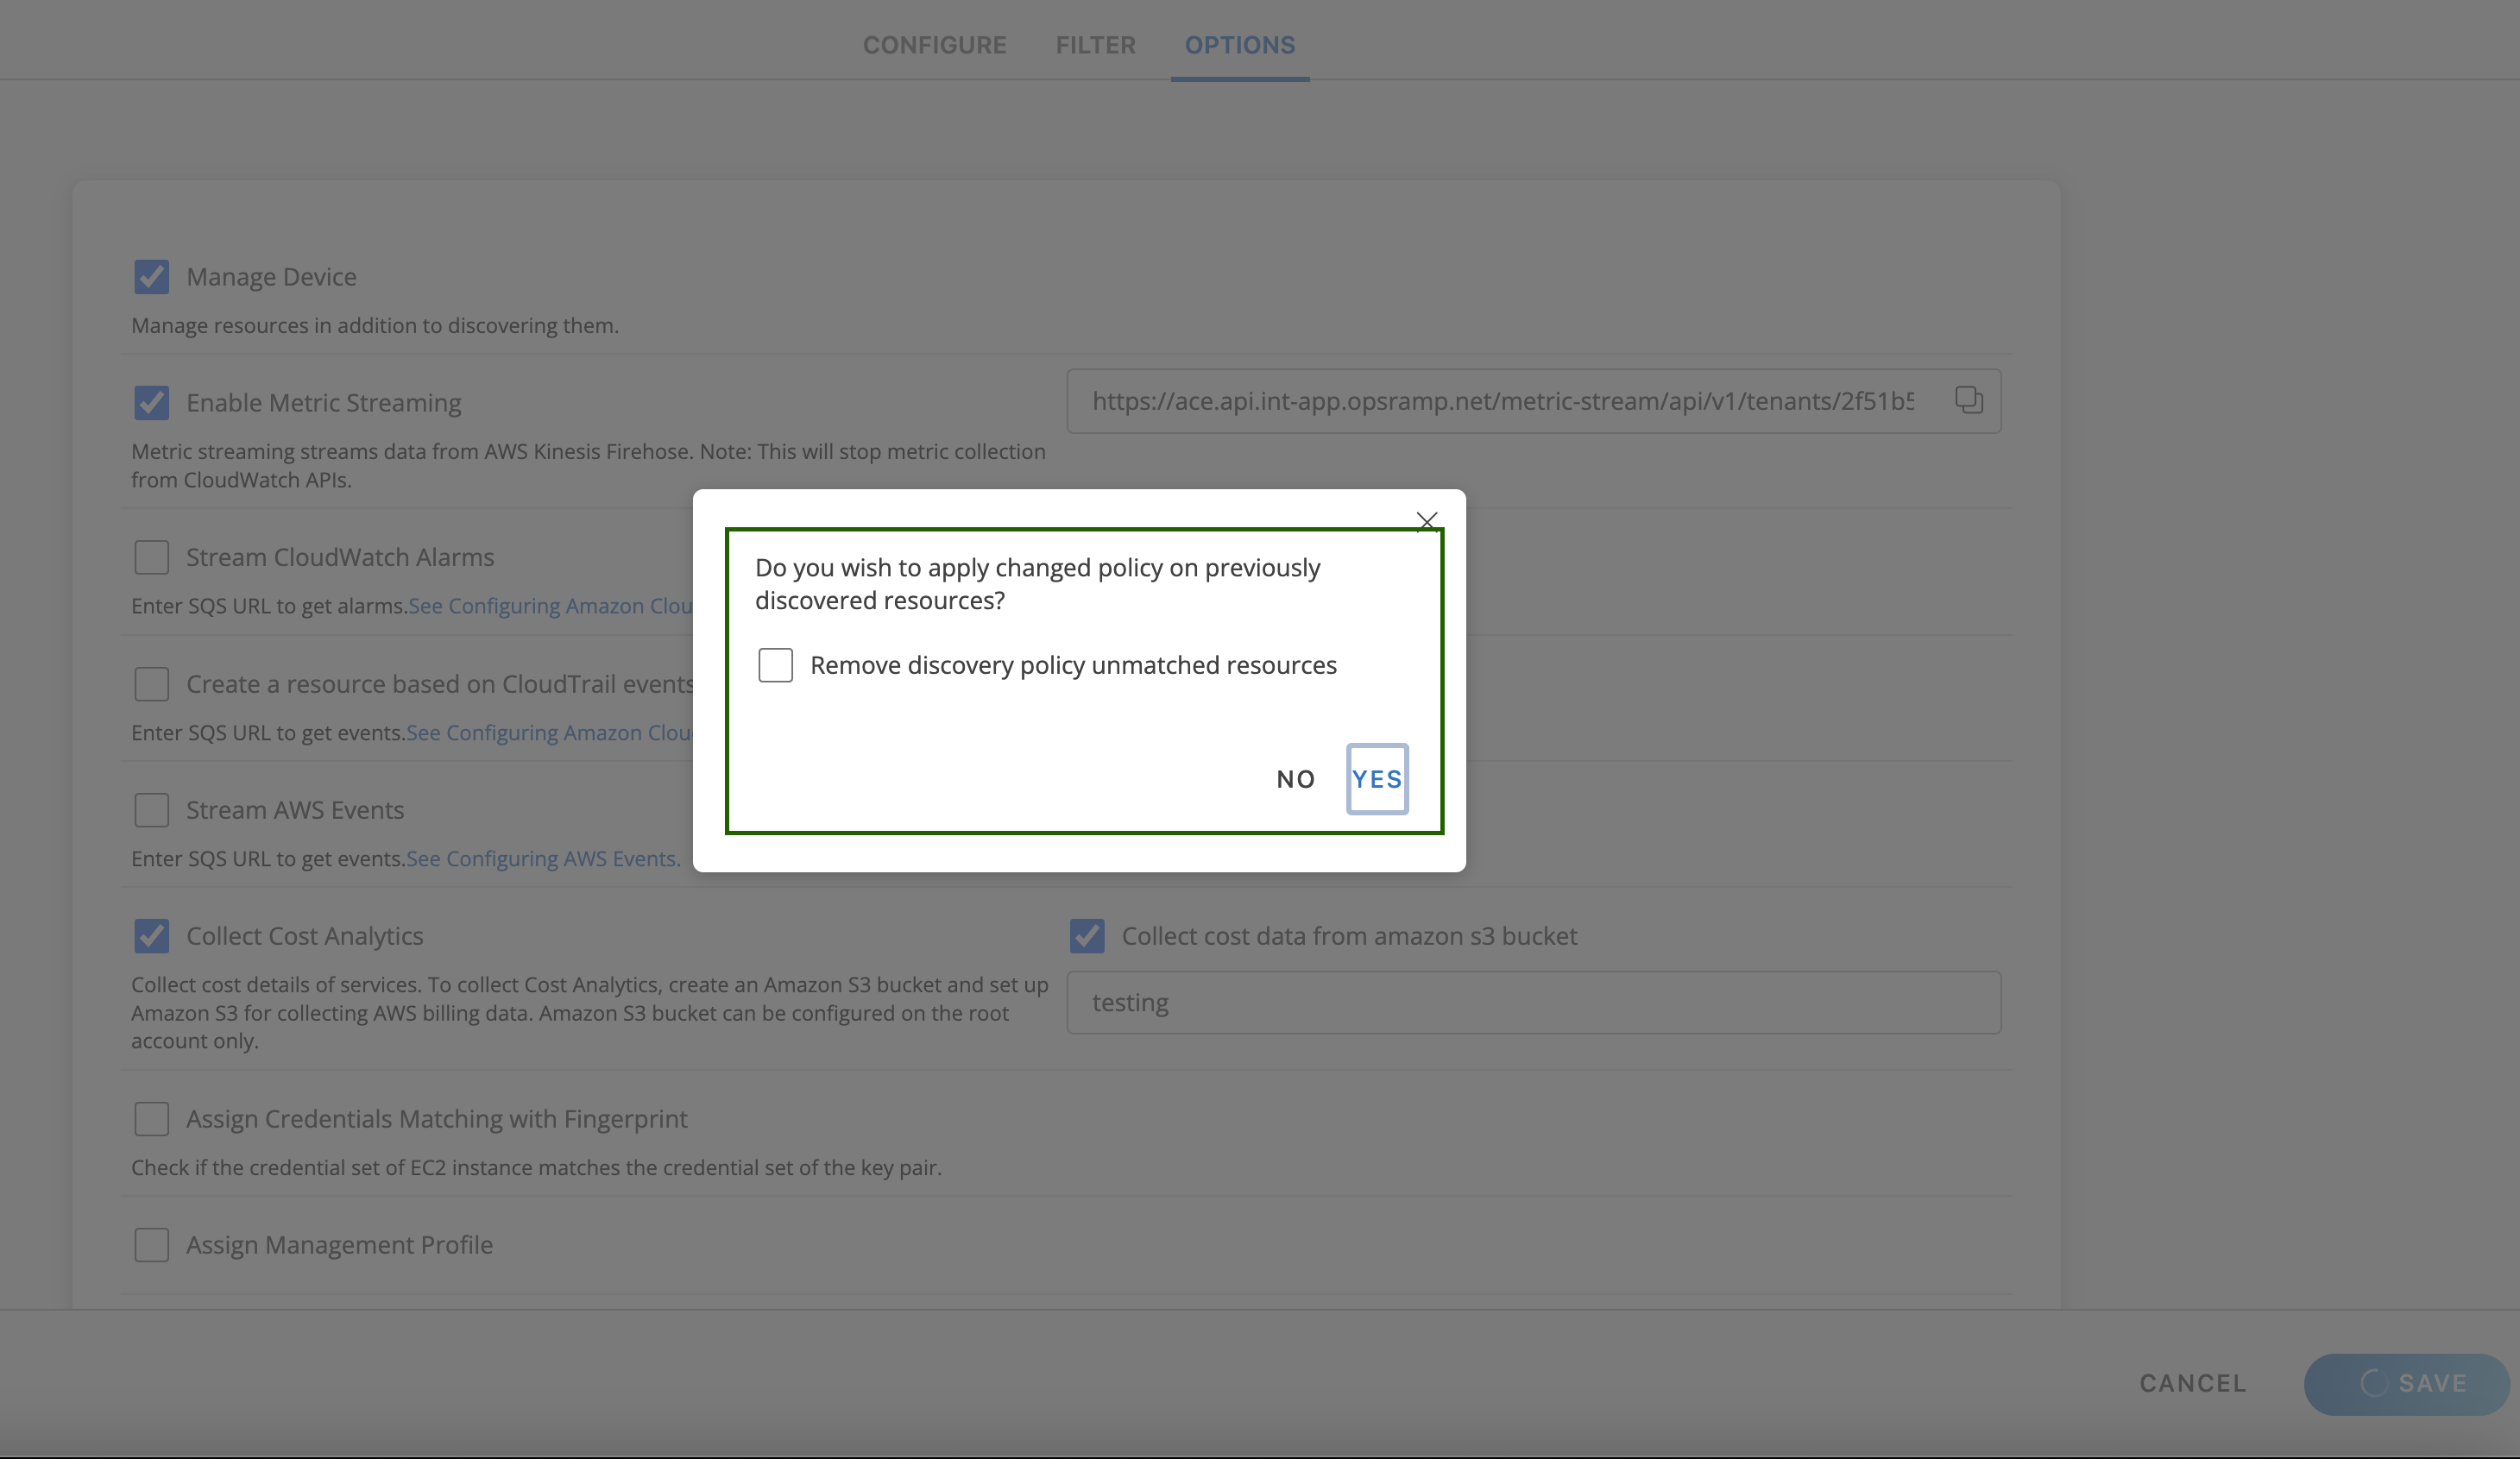
AWS Integration Options:
- Manage Device: Discover the AWS services in a managed state.
- Enable Metric Streaming: Enable metric streaming from Kinesis Firehose. Note: this will stop metric collection from CloudWatch APIs.
- Stream CloudWatch Alarms: Enter the SQS URL to get alarms. See configuring Amazon CloudWatch alarms.
- Ingest unsupported AWS resource alarms: Process all Amazon CloudWatch alarms and AWS services not supported by OpsRamp.
- Create a resource based on CloudTrail events stream: Enter the SQS URL to get events. See Configuring Amazon CloudTrail.
- Stream AWS Events: Enter the SQS URL to get events. See configuring AWS Events.
- Collect Cost Analytics: Collect project cost details of the services utilized. To collect Cost Analytics, create an Amazon S3 bucket and set up Amazon S3 for collecting AWS billing data. Amazon S3 bucket can be configured on the root account only.
- Assign Credentials Matching with Fingerprint: Check if the credential set of the EC2 instance matches the credential set of the key pair.
- Assign Gateway Management Profile: Select the gateway management profile from the drop-down list.
Integrate AWS using the CloudFormation template
See CloudFormation template process for more details.