Introduction
Azure Tenant Integration installs all Azure Cloud subscriptions associated with a tenant as integrations in OpsRamp under the same client where the tenant integration is set up. To install all subscriptions for the tenant, users must provide the Tenant ID, Client ID, and Client Secret as input to the Azure Tenant Integration.
The Azure tenant integration provides you several key benefits:
- Centralized Management: All Azure Cloud subscriptions under a tenant are integrated into OpsRamp under a single client, allowing for easier and more centralized management of resources.
- Simplified Operations: With all subscriptions automatically integrated, users can streamline their operations, reducing the need for manual configuration and oversight across multiple subscriptions.
- Enhanced Visibility: Users gain comprehensive visibility into all their Azure resources within OpsRamp, enabling better monitoring, management, and decision-making.
- Security and Compliance: By using the Tenant ID, Client ID, and Client Secret, users ensure secure integration, maintaining the confidentiality and integrity of their Azure subscriptions.
Prerequisites
Configuration in Azure cloud
Step 1: Create a New Application in App Registrations
Log in to the Azure Portal.
Search for App registrations and click New registration.

Provide a name for the application.
Under Supported account types, select Accounts in any organizational directory (Any Microsoft Entra ID tenant - Multitenant).

Click Register.
Once the app is registered, navigate to the Overview page. Copy the Directory (tenant) ID to use as the Tenant ID, and the Application (client) ID to use as the Client ID during installation in OpsRamp portal.

Navigate to Certificates & Secrets click New client secret to create a new secret key. Copy the Value to use as the Secret Key during installation in OpsRamp portal.

Step 2: Add Reader Role to the Application Created Earlier
After registering the app, follow below steps:
Search for Subscriptions in the Azure Portal and select the relevant subscription.
Click Access control (IAM).
Click +ADD and then select Add role assignment from the drop-down list.

Choose the Reader role and click Next.
Under Members, click + Select members, and choose the app you wish to assign the role to.

Once selected, click Review + assign.
Note
Make sure to assign the Reader role to all subscriptions you want to integrate with OpsRamp through Azure Tenant Integration.OpsRamp configuration
- Navigate to the Setup > Account.
- On the ACCOUNT DETAILS page, select Integrations.
- The INSTALLED INTEGRATIONS page is displayed with all the installed applications.
Note
If there are no installed applications, it will navigate to the AVAILABLE INTEGRATIONS AND APPS page.Click + ADD on the INSTALLED INTEGRATIONS page. The AVAILABLE INTEGRATIONS AND APPS page displays all the available applications along with the newly created application.
Note
You can even search for the application using the search option available. Also, you can use the All Categories option to search.Click ADD in the Azure application.

In the ADD AZURE page, select Type as Tenant to install Azure Tenant Integration.
Enter the account information:
| Functionality | Description |
|---|---|
| Tenant ID | (required) Enter the client ID that was generated during |
| Client ID | (required) Enter the client ID that was generated during |
| Secret Key | (required) Enter the secret key. Use the Value generated during Create a New Application in App Registrations as Secret Key. |
| Environment | (required) Choose Azure. |
Click NEXT.
In the Resources section, you can select the discovery profile that will be applied to subscriptions during installation.
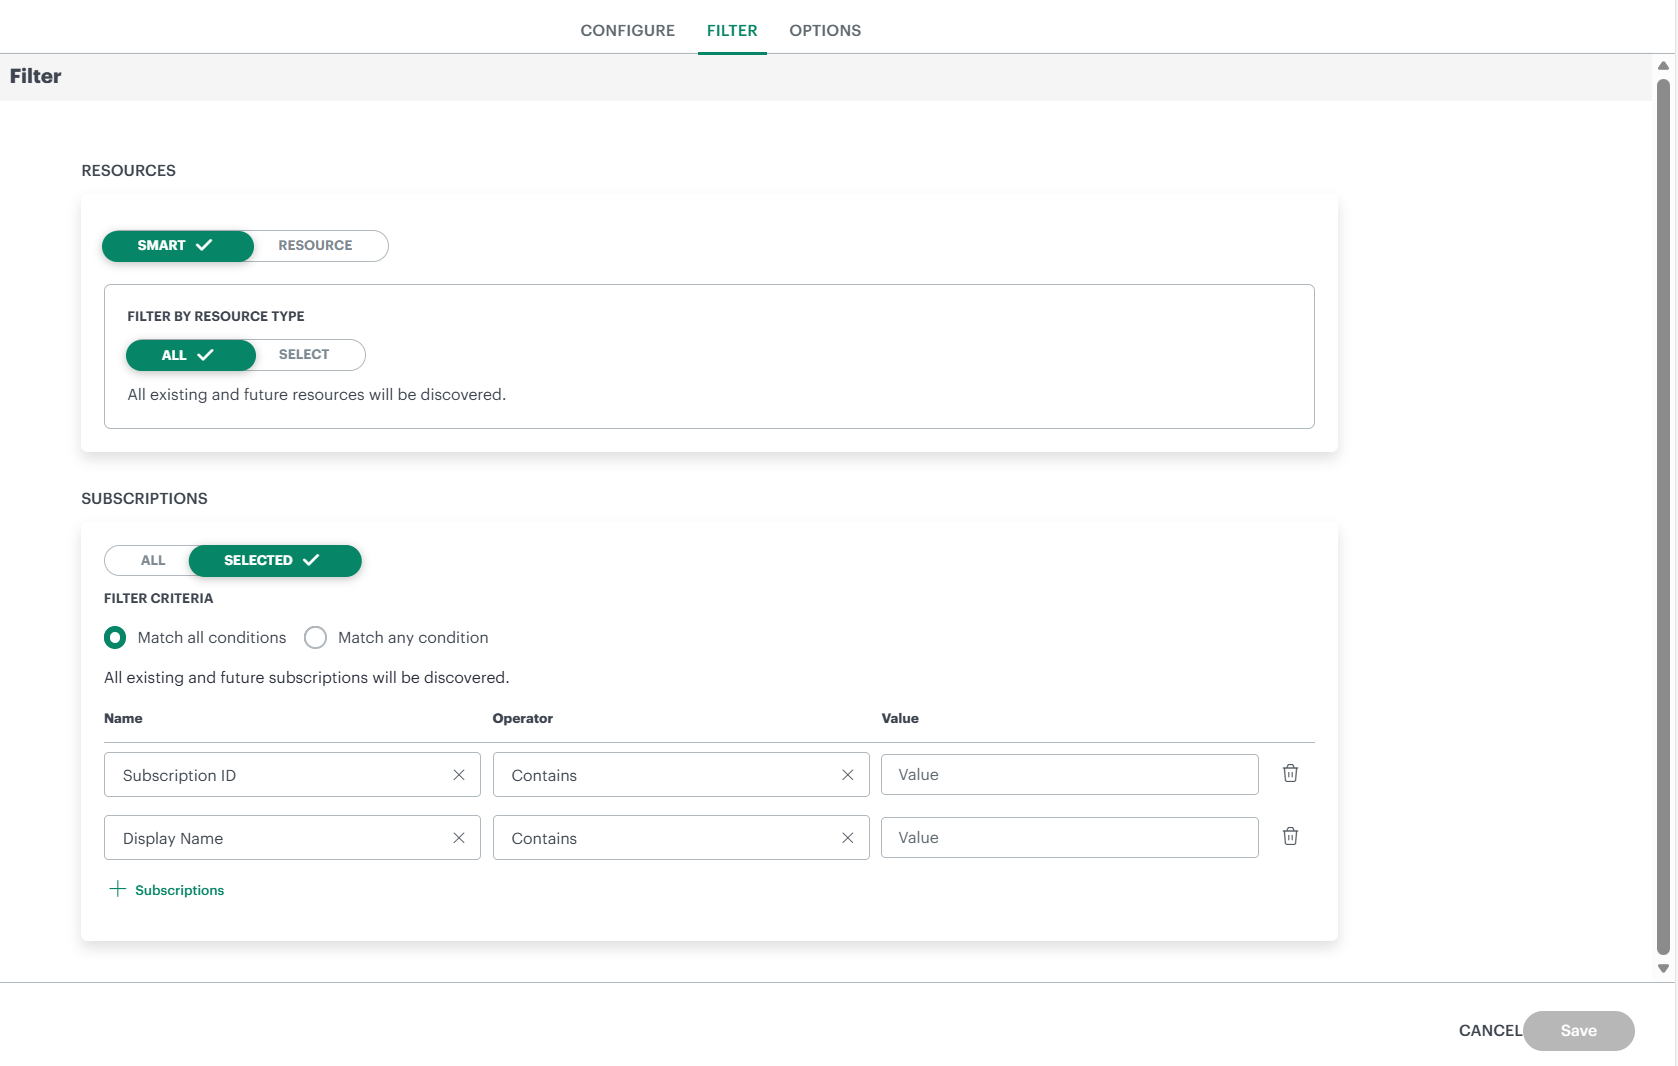
The Subscriptions section controls which Azure subscriptions are discovered and managed.
- If All is selected, all subscriptions under the tenant are discovered.
- If Selected is chosen, you can filter and select specific subscriptions for installation or update using Subscription ID, Display Name, or Tags.
During Azure tenant installation or a tenant rescan, only the subscriptions that match the configured filter policy are installed or updated in OpsRamp. The subscription filter can be modified at any time, followed by a rescan to apply the changes.
Note
This section supports only adding or updating subscriptions. Deleting subscriptions is not supported.Click Next.
Select the actions to be performed on the resources.
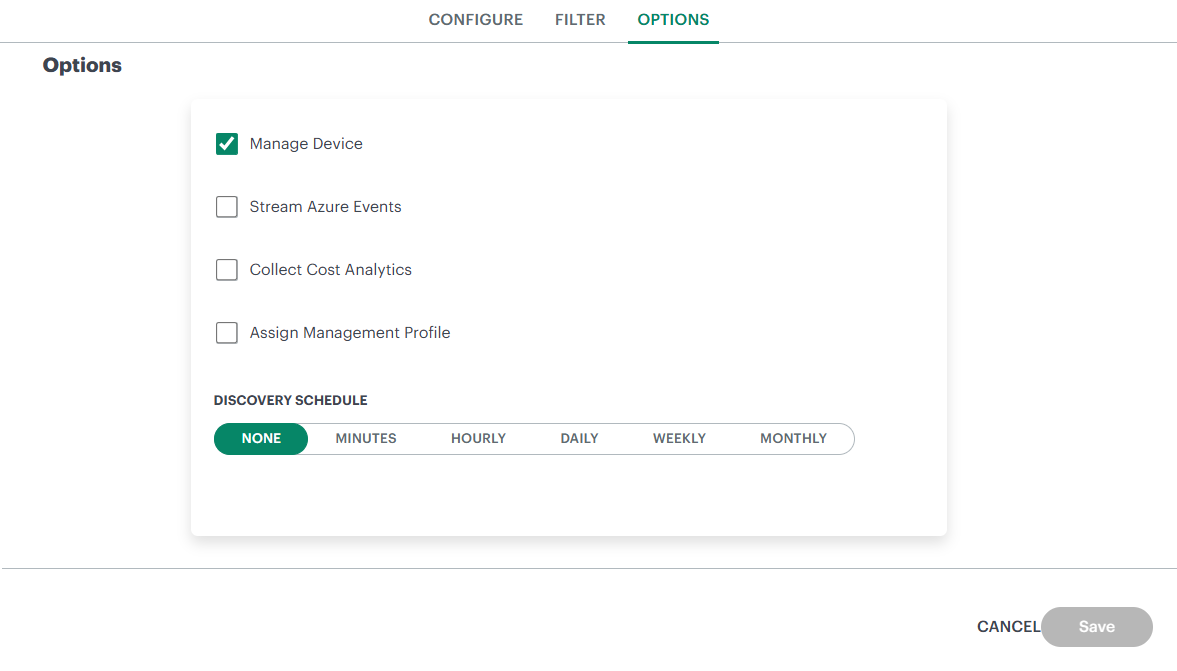
- Manage Device: Select this option such that all the discovered resources are in a managed state.
- Stream Azure Events: Provide Azure connection string-primary key. See instructions for configuring the connection string.
- Collect Cost Analytics: Select this option to collect project cost details resources utilized.
- Assign Management Profile: Select a gateway management profile from the drop-down list.
Select the Discovery Schedule option to schedule a discovery and define the preferred Recurrence pattern.
Note
The filters, options, and discovery schedule configured during tenant integration installation will be applied to the installation of child accounts.Click FINISH. The Azure app is installed.
Note
- When you install Azure Tenant Integration, all subscriptions under the tenant will be integrated into the client. During the installation, all child integrations will inherit the properties of the Azure Tenant Integration, including the Discovery profile, Actions (limited to Manage Device), Discovery Schedule, and Credentials. After installation, you can update the Discovery profile, Actions, Credentials, and Discovery Schedule individually as needed.
- If you update the tenant integration, only the provided credentials (such as Client ID, Secret, and environment) will be updated for the child integrations; the Discovery profile and Actions will remain unchanged. Additionally, only subscriptions that have access to these credentials will be updated.
- If you add subscriptions in Azure after installing the tenant-level integration, they will be automatically added to OpsRamp upon performing a rescan. See Automated Tenant-Level Discovery for more details.However, if subscriptions are removed from Azure, they must be manually removed from OpsRamp.
Uninstall an Azure Tenant Integration
You can now uninstall an Azure Tenant integration through a simplified process that gives you better control over removing linked child accounts and retaining agent-installed resources.
To uninstall an Azure tenant integration:
From the Installed Integrations page, select the Azure Tenant integration you want to uninstall.
Click the three-dot icon on the right-hand side.
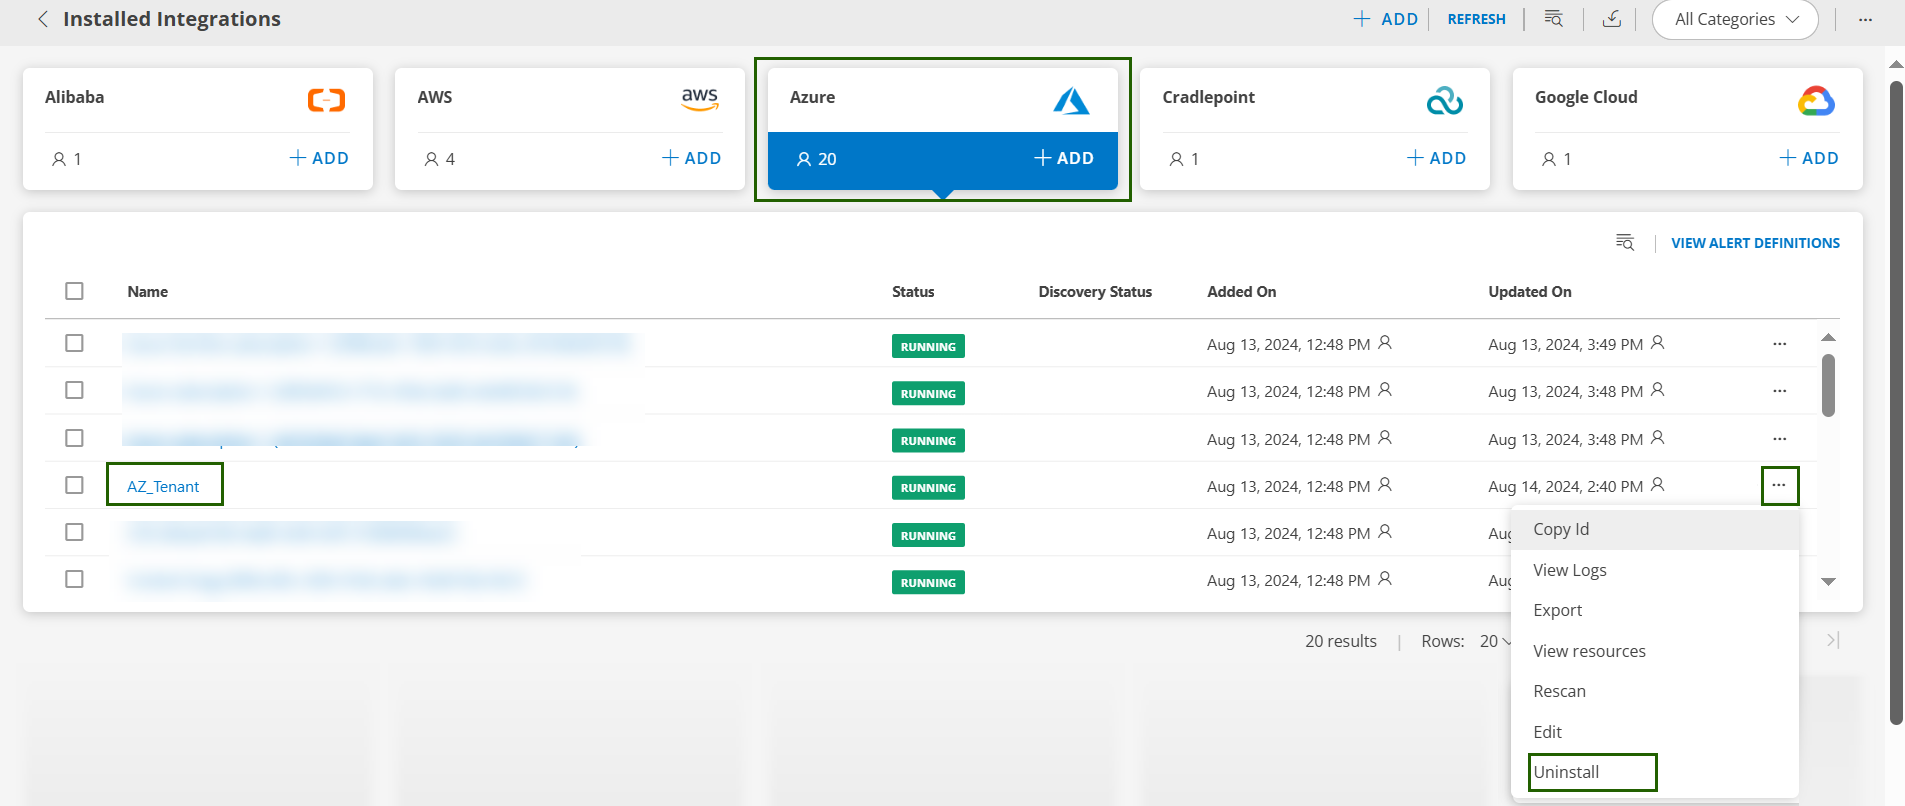
From the dropdown, select Uninstall.The Uninstall Integration page screen is displayed.
On the Uninstall Integration Page, select the Remove linked child accounts along with this integration checkbox if you want to uninstall all child integrations associated with the tenant.
Once this option is selected, the Keep agent installed resources checkbox will appear. Enable this if you want to retain the resources installed by agent.
Note
- When deleting an Azure Integration via the API, set the
deleteAssociatedChildAccountsfield totrue. If this field is omitted or set tofalse, the associated child integrations (subscriptions) will not be deleted by default. - To retain agent-installed resources during deletion, set the
keepAgentInstalledResourcesfield totrue. If not specified, it defaults tofalse, and the agent-installed resources will be removed. - This behavior is specific to the tenant-level integration and does not apply when uninstalling individual child accounts.
- To retain agents for specific child integrations, you must uninstall each child account individually and select the Keep agent installed option during that process.

- When deleting an Azure Integration via the API, set the
Enter a reason and click UNINSTALL.
Automated Tenant-Level Discovery
You can automatically discover newly added Azure subscriptions in OpsRamp through the Azure Tenant integration. When you perform a manual rescan or configure a scheduled discovery, any new subscriptions added under your Azure Tenant are automatically detected and onboarded into OpsRamp.
Note
This automated discovery only applies to new subscription additions. Subscriptions removed from the Azure Tenant are not automatically deleted from OpsRamp.To auto discover:
From the Installed Integrations page, choose the Azure tenant integration you want to rescan.
Click the three-dot icon on the right-hand side.

From the dropdown, select Rescan.OpsRamp scans your linked Azure tenant for new subscriptions and automatically adds them to the integration.