| Supported Versions |
|---|
| Brocade Network Advisor 14.4.2 |
| BNA REST API - 14.4.2 |
Introduction
Brocade Network Advisor (BNA) provides comprehensive management for Fibre Channel and IP storage networks including Brocade-specific solutions including third-party vendors as well.
As a BNA administrator, you can:
- Get a comprehensive view of the managed inventory.
- Collect availability and performance metrics of managed resources (Fabrics, switches, and ports).
- Collect uptime status across all discovered resources and generate alerts on specific switches or ports based on configured thresholds.
- Classify and report all switches whose CPU & memory utilization breaches configured thresholds.
- Based on configured thresholds, collect availability & uptime status across all discovered resources and be alerted on specific switches/ports.
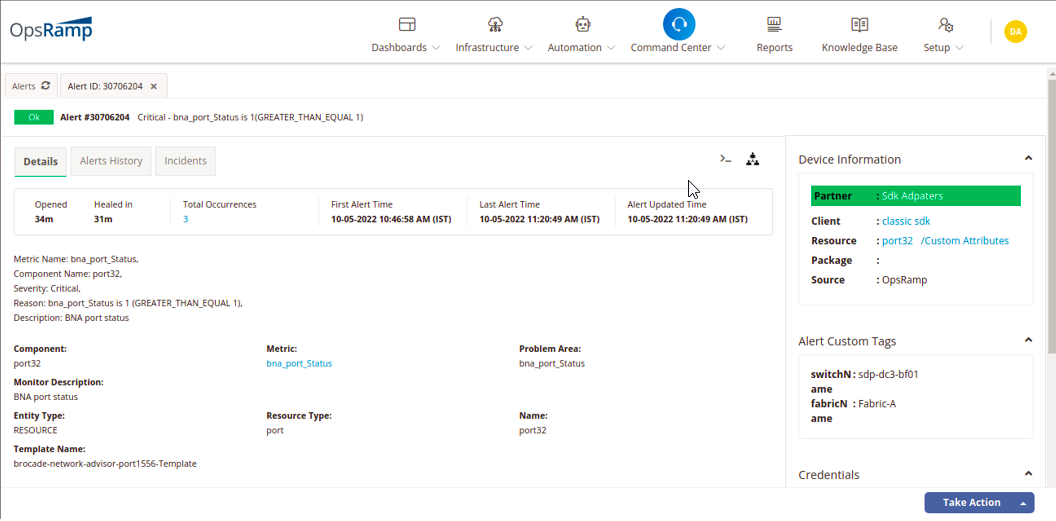
- BNA generates a set of events from underlying devices and reports into the BNA console. OpsRamp integration ingest these events on a periodic poll and generate corresponding alerts. These alerts are posted on the resources that are created in OpsRamp.
- At Least one alert should be created, in order to see the tags in alert escalation policy.
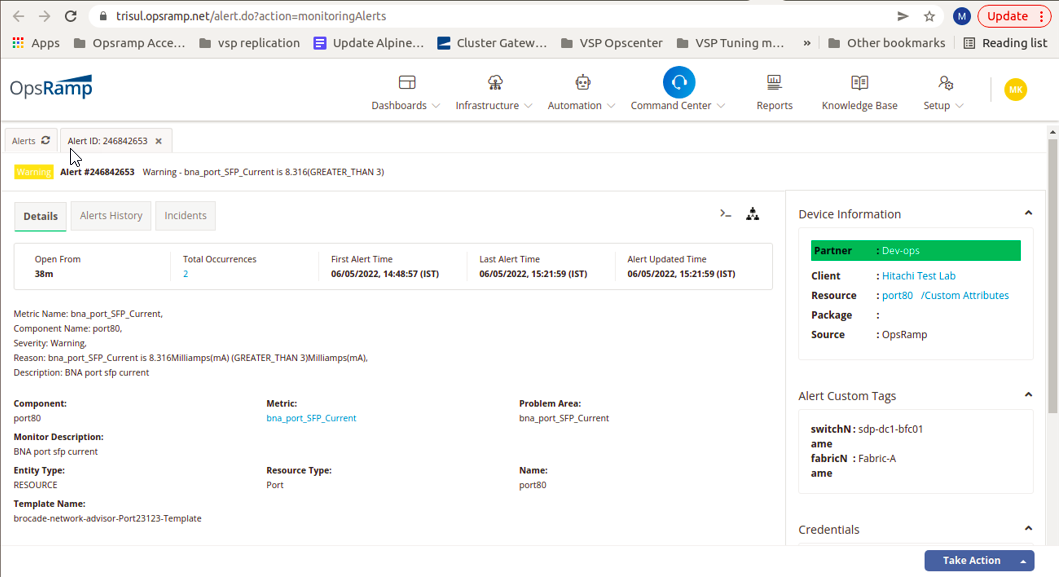
- While generating Alerts on port related metrics with the help labels, BNA provides Switch and Fabric details.
Below are some of the Broadcom device series supported by BNA.
- Brocade Gen 6 Fibre Channel platforms
- Brocade Gen 5 Fibre Channel platforms
- Brocade DCX® Backbone family
- Brocade VDX switches
- Emulex adapters
- QLogic adapters
Supported Metrics
Click here to view the supported metrics
| Component | Metric Name | Metric Display Name | Units |
|---|---|---|---|
| Switch | bna_switch_OperationalStatus | BNA Switch status | - |
| bna_switch_State | BNA Switch state | - | |
| bna_switch_memory_Utilization | BNA Switch memory utilization | - | |
| bna_switch_cpu_Utilization | BNA Switch CPU utilization | percent | |
| bna_switch_Temperature | BNA Switch Temperature | centigrade | |
| bna_switch_FanSpeed | BNA Switch Fan speed | revolutions per minute | |
| bna_switch_SystemUpTime | BNA Switch Up time | seconds | |
| bna_switch_PortNotInUse | BNA Switch port not in use | count | |
| Port | bna_port_Status | BNA port status | - |
| bna_port_State | BNA port state | - | |
| bna_port_RX_Utilization | BNA port RX utilization | percent | |
| bna_port_TX_Utilization | BNA port TX utilization | percent | |
| bna_port_Traffic | BNA port traffic | megabytes/second | |
| bna_port_TX_Traffic | BNA port TX Traffic | megabytes/second | |
| bna_port_CrcErrors | BNA port crc errors | errors/second | |
| bna_port_RX_Link_Resets | BNA port RX Link resets | errors/second | |
| bna_port_TX_Link_Resets | BNA port TX Link resets | errors/second | |
| bna_port_SignalLosses | BNA port Signal losses | errors/second | |
| bna_port_SyncLosses | BNA port sync losses | errors/second | |
| bna_port_LinkFailures | BNA port link failures | errors/second | |
| bna_port_SequenceErrors | BNA port sequence errors | errors/second | |
| bna_port_InvalidTransactions | BNA port invalid transactions | errors/second | |
| bna_port_C3Discards | BNA port c3discards | errors/second | |
| bna_port_TX_C3Discards_TimeOut | BNA port c3discards TX timeout | errors/second | |
| bna_port_RX_C3Discards_TimeOut | BNA port c3discards RX timeout | errors per second | |
| bna_port_C3Discards_UnReachable | BNA port c3discards Un Reachable | errors per second | |
| bna_port_C3Discards_Others | BNA port c3discards Others | errors/second | |
| bna_port_EncodeErrorOut | BNA port encode error out | errors/second | |
| bna_port_TX_SFP_Power | BNA port sfp power | - | |
| bna_port_RX_SFP_Power | BNA port sfp rx power | - | |
| bna_port_SFP_Voltage | BNA port sfp voltage | - | |
| bna_port_SFP_Current | BNA port sfp current | - | |
| bna_port_SFP_Temperature | BNA port sfp temperature | centigrade | |
| bna_port_Invalid_OrderedSets | BNA port invalid ordered sets | errors/second | |
| bna_port_bb_credit_Zero | BNA port bb credit zero | errors/second | |
| bna_port_TruncatedFrames | BNA port truncated frames | errors/second |
OpsRamp configuration
Install the integration
- From All Clients, select a client.
- Navigate to Setup > Account.
- Select the Integrations and Apps tab.
- The Installed Integrations page, where all the installed applications are displayed. If there are no installed applications, it will navigate to the Available Integrations and Apps page.
- Click + ADD on the Installed Integrations page. The Available Integrations and Apps page displays all the available applications along with the newly created application with the version.
Note: Search for the application using the search option available. Alternatively, use the All Categories option to search. - Click ADD on the Brocade Network Advisor tile.
- From Install Brocade Network Advisor Integration, enter the following details:
- Name: Name of the integration.
- Upload Logo: Brocade Network Advisor device logo.
- Gateway Profile: Select a gateway management profile to associate with the client.
- Click Install.
The BROCADE-NETWORK-ADVISOR INTEGRATION page displays the installed integration under the CONFIGURATION section.
Configure the integration
From CONFIGURATION, click + Add.
In the Create Adapter Configuration page, enter the following details:
- Name: Configuration name.
- Protocol:
- HTTPS: Secure connection.
- HTTP: If the connection is not secure.
- BNA IP Address: Target device IP address.
From the Credentials section, select Custom and enter the target device Username and Password.
From Resource Types & Metrics, select the metrics and Availability.
The Resource Types & Metrics section displays the target device resource type such as Brocade Network Advisor.From the Metrics section select the metrics you want.
Use Import to import metrics to OpsRamp and Export to save metric details locally.In the Discovery Schedule section, select a Recurrence Pattern to add one of the following:
- Hourly
- Daily
- Weekly
- Monthly
In the Monitoring Schedule section, select the target device monitoring frequency.
The default frequency is 30 minutes.Click Save.
After saving the integration, Brocade Network Advisor resources are discovered and monitoring is enabled as specified by the configured metric criteria.
View the Brocade Network Advisor details
The Brocade Network Advisor is successfully integrated and displayed in the Infrastructure > Server category. The server selection further categorizes the resources as Fabrics, Switches, and Port sections.
Note: The current available BNA lab contains a total of 386 ports across 4 switches. Discovery time and resource creation will vary based on total discoverable objects.
Resource Model Representation
| BNA Domain Object | OpsRamp Resource Type | Comment |
|---|---|---|
| Fabric | Fabric | A generic resource type to represent fabrics needs to be created. |
| Port | Network Port | Not Available |
| BNA Server | Server | Available (Resource Type: Server) |
| Switch | Switch | Available (Path: Network Device >> Switch) |
| OpsRamp Resources (Target) | Relationship | OpsRamp Resources (Source) |
|---|---|---|
| Switch | Member-Of | Fabric |
| Port | Depends-On | Fabric |
| Fabric | Depends-On | BNA Server |
| Switch | Depends-On | BNA Server |
| Port | Depends-On | BNA Server |
| Port | Component-Of | Switch |
Resource Attribute Mapping
| BNA Domain Object | BNA Domain Attribute | OpsRamp Resource |
|---|---|---|
| Switch | Name | resourceName |
| IP Address | ipAddress | |
| Product Type | resourceType | |
| Description | ||
| Vendor | make | |
| Model | model | |
| Serial # | serialNumber | |
| Factory Serial # | ||
| TypeEx: 16Gb 96 FC Ports Fabric Switch | ||
| Firmware | ||
| Discovery Status | ||
| StateState: Online | ||
| StatusStatus: Healthy - monitoring metric | ||
| Port Count | ||
| FabricFabric ID to which this switch is associated with. To be managed through relationships | ||
| WWNA World Wide Name (WWN) or World Wide Identifier (WWID) is a unique identifier used in storage technologies | moid | |
| Port | Port | resourceType |
| name | resourceName | |
| key | moid | |
| vendor | make | |
| modelNumber | model | |
| serial # | serialNumber | |
| Fabric | fabric | resourceType |
| name | resourceName | |
| key | moid | |
| vendor | make | |
| modelNumber | model | |
| serial # | serialNumber |
Purpose of Brocade Error Dumping Hosts
The templates for Brocade Error Dumping enable OpsRamp to extract an error dump from a Brocade Switch and store it on a host (Windows or Linux server). The error dump contains diagnostic information that OpsRamp uses to monitor the Brocade switches.
Where are the Brocade Error Templates configured
The templates are configured on any Linux or Windows servers that have network access to the Brocade Switches being monitored. It is a pre-requisite though that these servers have the OpsRamp agent installed.
Preparation of Linux or Windows servers that will host error dumps from Brocade Switches
Linux
- Template Name: Brocade ErrDump Monitor – Linux
- Prerequisites:
- This monitor works on python 3 version.
- yaml and paramiko python modules
- Linux machine should be able to access the target Brocade switch.
- Need to provide yaml file path as command line argument
- Need to place the yaml file on Linux machine:
- Default Path Installation: /opt/opsramp/agent/log/prevstate/brocade_errdump.yaml
- Custom Path Installation: {custom_dir}/opsramp/agent/log/prevstate/brocade_errdump.yaml
Windows
- Template Name: Brocade ErrDump Monitor – Windows
- Prerequisites:
- This monitor works on python 3 version.
- yaml and paramiko python modules
- Windows machine should be able to access the target Brocade switch.
- Need to provide yaml file path as command line argument.
- Need to place the yaml file on Windows machine:
- Default Path Installation: C:\Program Files (x86)\OpsRamp\Agent\log\prevstate\brocade_errdump.yaml
- Custom Path Installation: {custom_dir}\OpsRamp\Agent\log\prevstate\brocade_errdump.yaml
Risks, Limitations & Assumptions
- The availability is shown unknown for few resources even if it is enabled on the respective resource metrics. This is because of the presence of multiple native type resources under the same resource type.
- Availability metric selection is mandatory while adding the adapter configuration.