The Tenant Management feature allows Service Providers (SPs), Managed Service Providers (MSPs) and clients to manage configurations and accounts effectively. It provides a single interface to define specific policies and settings tailored uniquely to the unique needs of the tenant. The feature allows for implementation of password policies to ensure strong security, add-ons for extended functionalities, options for secured remote access, log management to receive quick insights.
Following is a quick overview of the functionalities in the section:
Account: Allows you to view and update your Account information such as Name, Account ID, Notification Email, Country, Timezone, City, State and other relevant information.
Add-Ons: Allows you to select packages and add-ons, for advancing monitoring, as per your specific operational requirements.
Security: Allows you to configure strict password policies and settings for improved security to prevent unauthorized access and breaches.
Advanced Settings: Allows you to have control over availability, log management, NOC (Network Operation Centers) for alert management, integration settings, and remote access management.
Branding: Allows you to customize your platform with logos, themes, and colors according to your organization’s requirements.
Following are the permissions required to perform various tasks.
Type of user
Permission
User action
SP User
MSP_Manage
Edit Account, Add-Ons, Security, and Advanced Settings sections for an MSP.
MSP user
Administration
Edit Account, Add-Ons, Security, and Advanced Settings sections for self.
SP User or MSP user
Client_Manage/Client_Edit and Device_View.
Edit Account, Add-Ons, Security, and Advanced Settings sections for a client.
SP User
Administration
Configure branding for an MSP.
SP User or MSP user
Client_View
Configure branding for a client.
MSP User
Administration
Configure branding for self.
Tabbed Interface with Table
ACCOUNT
ADD-ONS
SECURITY
ADVANCED SETTINGS
BRANDING
ACCOUNT
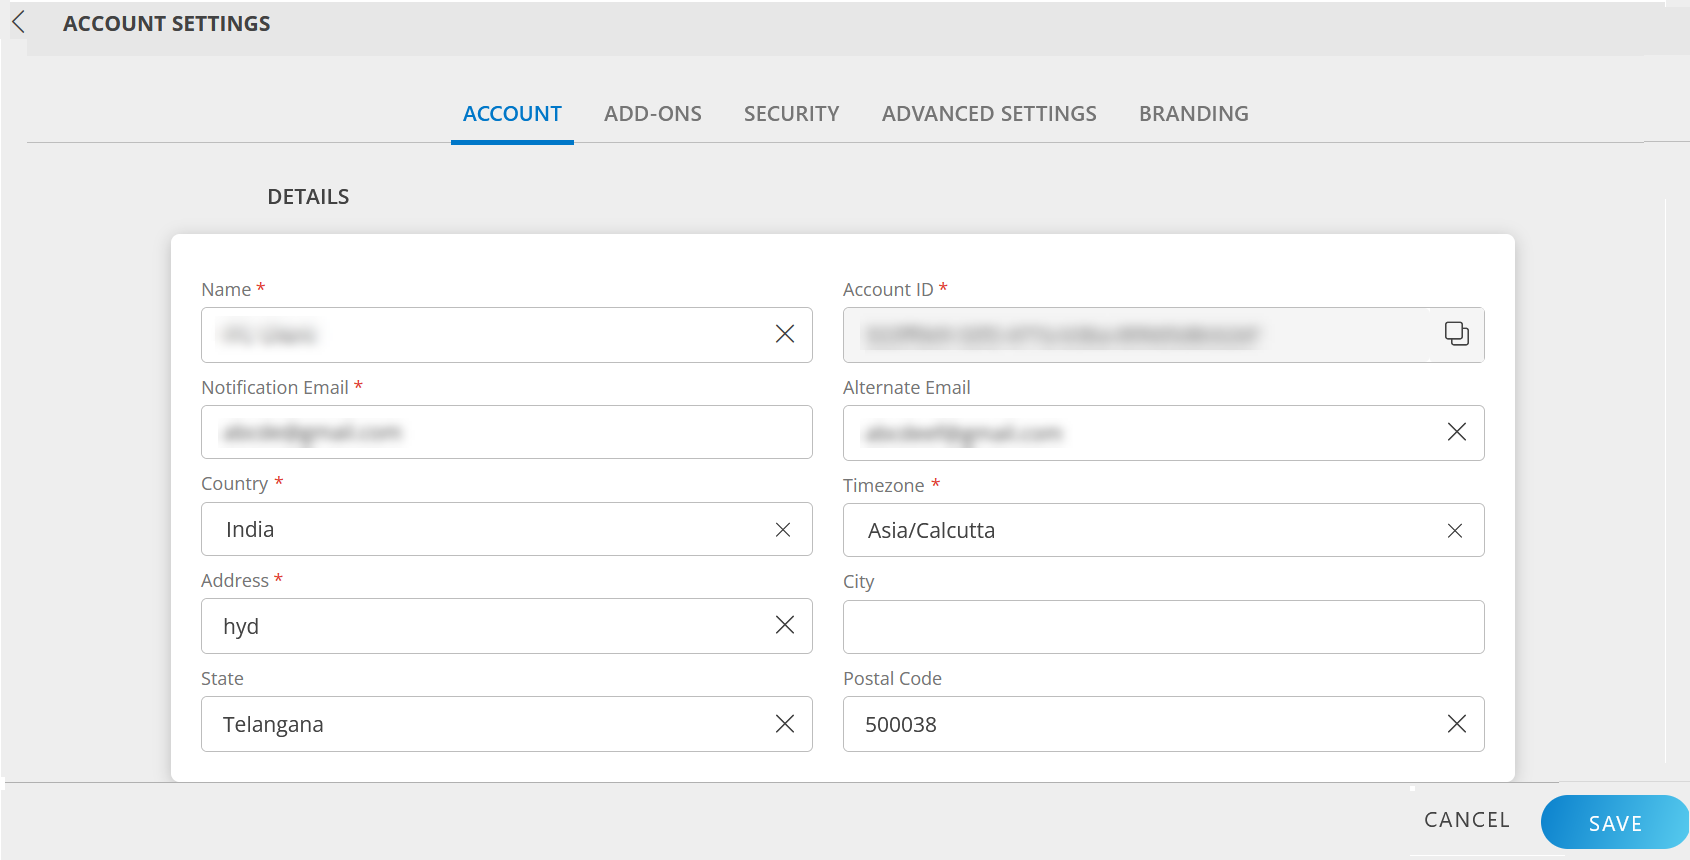
The Account section has critical information and settings about your organization. It allows you to manage personal information like Name, Account ID, Notification Email, and other contact details.
Click Setup > Account > SETTINGS. The ACCOUNT tab is displayed with information related to your account.
Enter the following information and click SAVE:
DETAILS
Field Name
Field Type
Description
Name
String
Name of the client
Account ID
String
Account ID. This field is not editable.
Notification Email
String
Client Email address.
Alternate Email
String
Alternate Email address of the client.
Country
Dropdown
Country where the client is located.
Timezone
Dropdown
Timezone of the client
Address
String
Address of the client.
City
String
City of the client.
State
String
State in which the client is located.
Postal Code
String
Postal code
Edit Account details
Follow these steps to edit account details:
Click Setup > Account > SETTINGS.
Make the necessary changes.
Click SAVE.
ADD-ONS
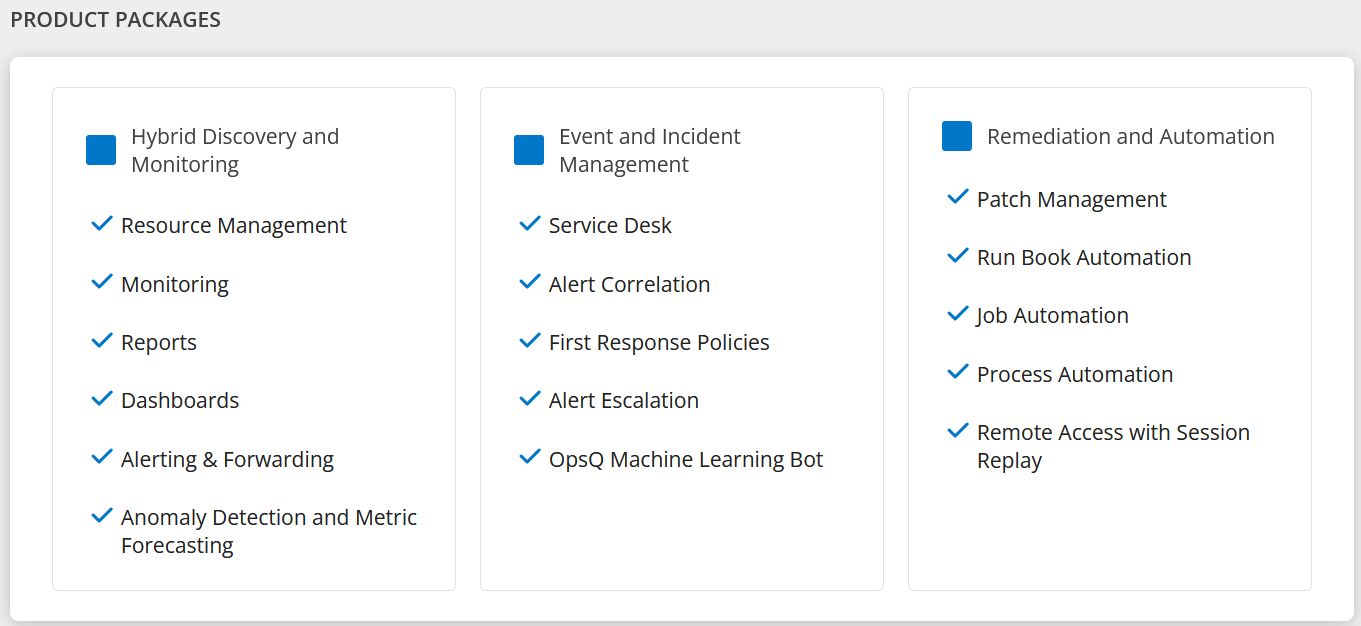
The Add-Ons tab lists the Product Packages and Add-Ons.
You can select one or more of the following packages as per your operational requirement to monitor your infrastructure:
Hybrid Discovery and Monitoring (default)
Event and Incident Management
Remediation and Automation
Choose the packages that match your requirements. Based on the packages you select, the Add-Ons are displayed. If you keep only Hybrid Discovery and Monitoring, you will have Adapter Integrations, Extended Data Retention, Offline Alerts, Log Management, and Trace Management as Add-Ons.
Hybrid Discovery and Monitoring package
A broad range of IT resources across data center, public cloud, and cloud native environments can be discovered and monitored with agent-based and agentless monitors. These include:
Data center applications, URLs, containers, servers, and network resources.
Public cloud environments of compute instances, databases, load balancers, and PaaS services.
Cloud native environments with containers and orchestrators.
Built-in monitors are provided that capture availability and performance metrics and observer optimal threshold limits for supported resources. You can extend the platform to monitor any kind of IT resource by writing custom monitor scripts
The Hybrid Discovery and Monitoring package includes the following modules:
Resource Management
Monitoring
Reports
Dashboards
Alerting & Forwarding
Anomaly Detection and Metric Forecasting
Event and Incident Management package
The Event and Incident Management package leverages proprietary event correlation algorithms, incident creation, and machine learning-powered alerts. The package includes:
Service Desk
Alert Correlation
First Response Policies
Alert Escalation
OpsQ Machine Learning Bot
Remediation and Automation package
The Remediation and automation package implements patch job scheduling, remediation task execution, and resource maintenance using a remote console. The package includes:
Patch Management
Run Book Automation
Job Automation
Process Automation
Remote Access with Session Replay
Add-ons
Following are the Add-Ons for Hybrid Discovery and Monitoring package:
Adapter Integrations – This add-on is used to enable Adapter category Apps, to perform discovery and monitoring of the end device.
Refer Compute, Network, Storage sections under Integrations
Extended Data Retention - You can retain the asset data for 12 months.
Offline Alerts - If any resource goes to an unknown state, an alert will be triggered.
Following features are available only for Clients:
Log Management - Collect, store, analyze and monitor all your log data that is generated by the resources, applications, and services effortlessly.
Trace Management - Track all requests and transactions as they interact with various components of your infrastructure. This ensures end-to-end monitoring of your transactions and helps identify root causes of the issues.
Following features are available only for Partners:
Batch Exports - Batch exports allows you to efficiently extract platform-generated enterprise data for data collection and analysis. You can snapshot and batch export the following types of data for each client on demand and at scheduled intervals to Amazon AWS S3 and Microsoft Azure Blob Storage:
Stream Exports - Get event data to the target location without scheduling the data export. The Streaming Export feature streaming of live data to different third-party tools using AWS EventBridge using the Export Integration and Create Streaming Export.
SKU Management - SKU management involves organizing and tracking Stock Keeping Units (SKUs) across the platform. It allows you to efficiently manage and categorize services and resources based on distinct identifiers.
Events represent business-impacting issues that require a response. Event and incident management uses escalation policies to aggregate, interpret, and act on events detected by monitors, resource diagnostics, and third-party integrations.
Using service maps, you can visualize the relationship between monitored resources and assess business and user impact based on resource health.
Event interpretation and response can be automated. Automation correlates and suppresses alerts, notifies users, and creates incident tickets for alerts that need operator intervention.
Add-ons
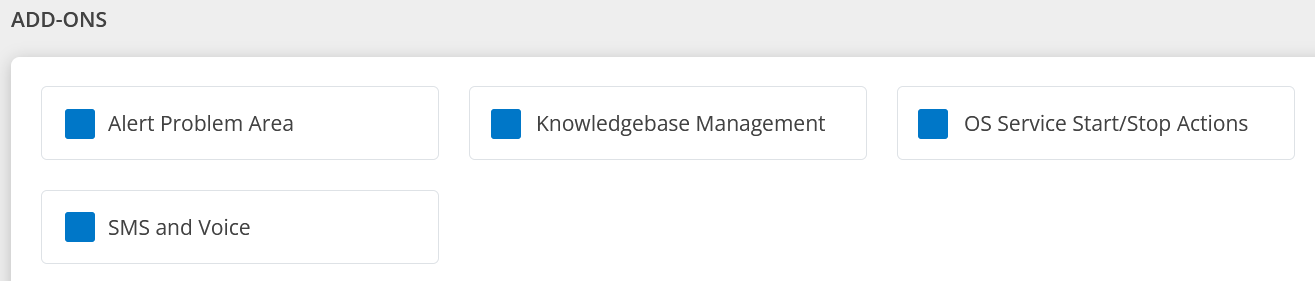
Following are the Add-Ons for Event and Incident Management package:
Alert problem area – Alert Problem Area enriches the alert Problem Area field with information extracted from the alert subject or description. Alert Problem Area is usually used for log-type alerts where rich information is embedded in the alert subject or description, but the metric value is the generic metric name. If the Problem Area field is not enriched, it defaults to the alert Metric field value.
Knowledge Base Management - This enables you to capture product information, operational procedures, and frequently asked questions, providing a reference source for your organization.
OS Service Start/Stop Actions - This add-on provides the ability to start and stop the OS services on agent-installed devices when required permissions are given. Navigation: Infrastructure > Resources Details > Services.
SMS and Voice - This is a paid add-on, and when enabled will send you notifications through SMS and Voice.
Following features are available only for Partners:
SLA Management - This module, when enabled, helps you to configure the response SLA and resolution SLA for a ticket, based on priority. An SLA (Service Level Agreement) is a negotiated and agreed contract between requester and assignee to resolve entities. SLA quantifies acceptable service levels and outlines when the services are delivered.
Scheduled Task Management - The Scheduled Task entity provides the ability to schedule and run recurring tasks for a predefined duration and at a specified time period. Each instance of a scheduled task is recorded and grouped as Tasks in the Scheduled Task listing.
Automate your operational tasks that respond to events or execute routine maintenance activities. Automation workflow capabilities permit you to compose workflows that are tailor made for your use cases.
Event remediation and automation can be automated by composing workflows to handle events. This includes SMS, Voice, and Email notifications. Remote SSH is also supported for alert resolution.
Add-ons
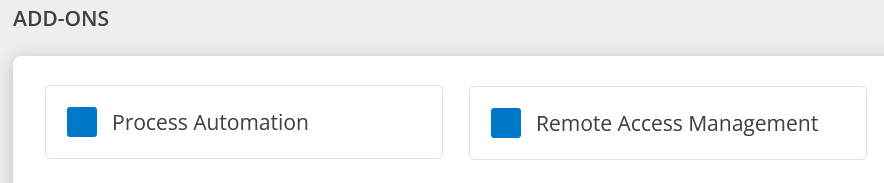
Following are the Add-Ons for Remediation and Automation package:
Process Automation - This add-on provides the ability to define and execute process automation tasks.
The following are unavailable if you opt not to subscribe to this package:
Application Patch Management add-on
Automation option in the Workspace drop-down menu
These permission sets:
Jobs
Consoles
Patch Approvals
Recording Audits
Scripts
Commands
Selecting a client that is not subscribed to the Remediation and Automation package generates the following warning on the Alerts, Service Desk, and Automation screens:
Access Denied! The client is not subscribed to this product package.
Event and Incident Management package:
The following are unavailable if you opt not to subscribe to this package:
Event Enrichment, Scheduled Task, SLA, and SMS & Voice add-ons
The Alerts menu option in Setup (Setup > Alerts)
These permission sets:
OpsQ
Incident
Change Request
Task Request
Service Request
Problem
Time-bound request
Selecting a client that is not subscribed to the Event and Incident Management package generates the following warning on the Alerts, Service Desk, and Automation screens:
Access Denied! The client is not subscribed to this product package.
SECURITY
Security feature ensures effective Access Management and stringent Password Policy Settings. Access Management allows you to restrict specific IP addresses, implement two-factor authentication for improved security. Password Policy Settings enables you to implement strict password settings thereby preventing unauthorized access and security breaches.
From ACCOUNT SETTINGS screen, click SECURITY tab.
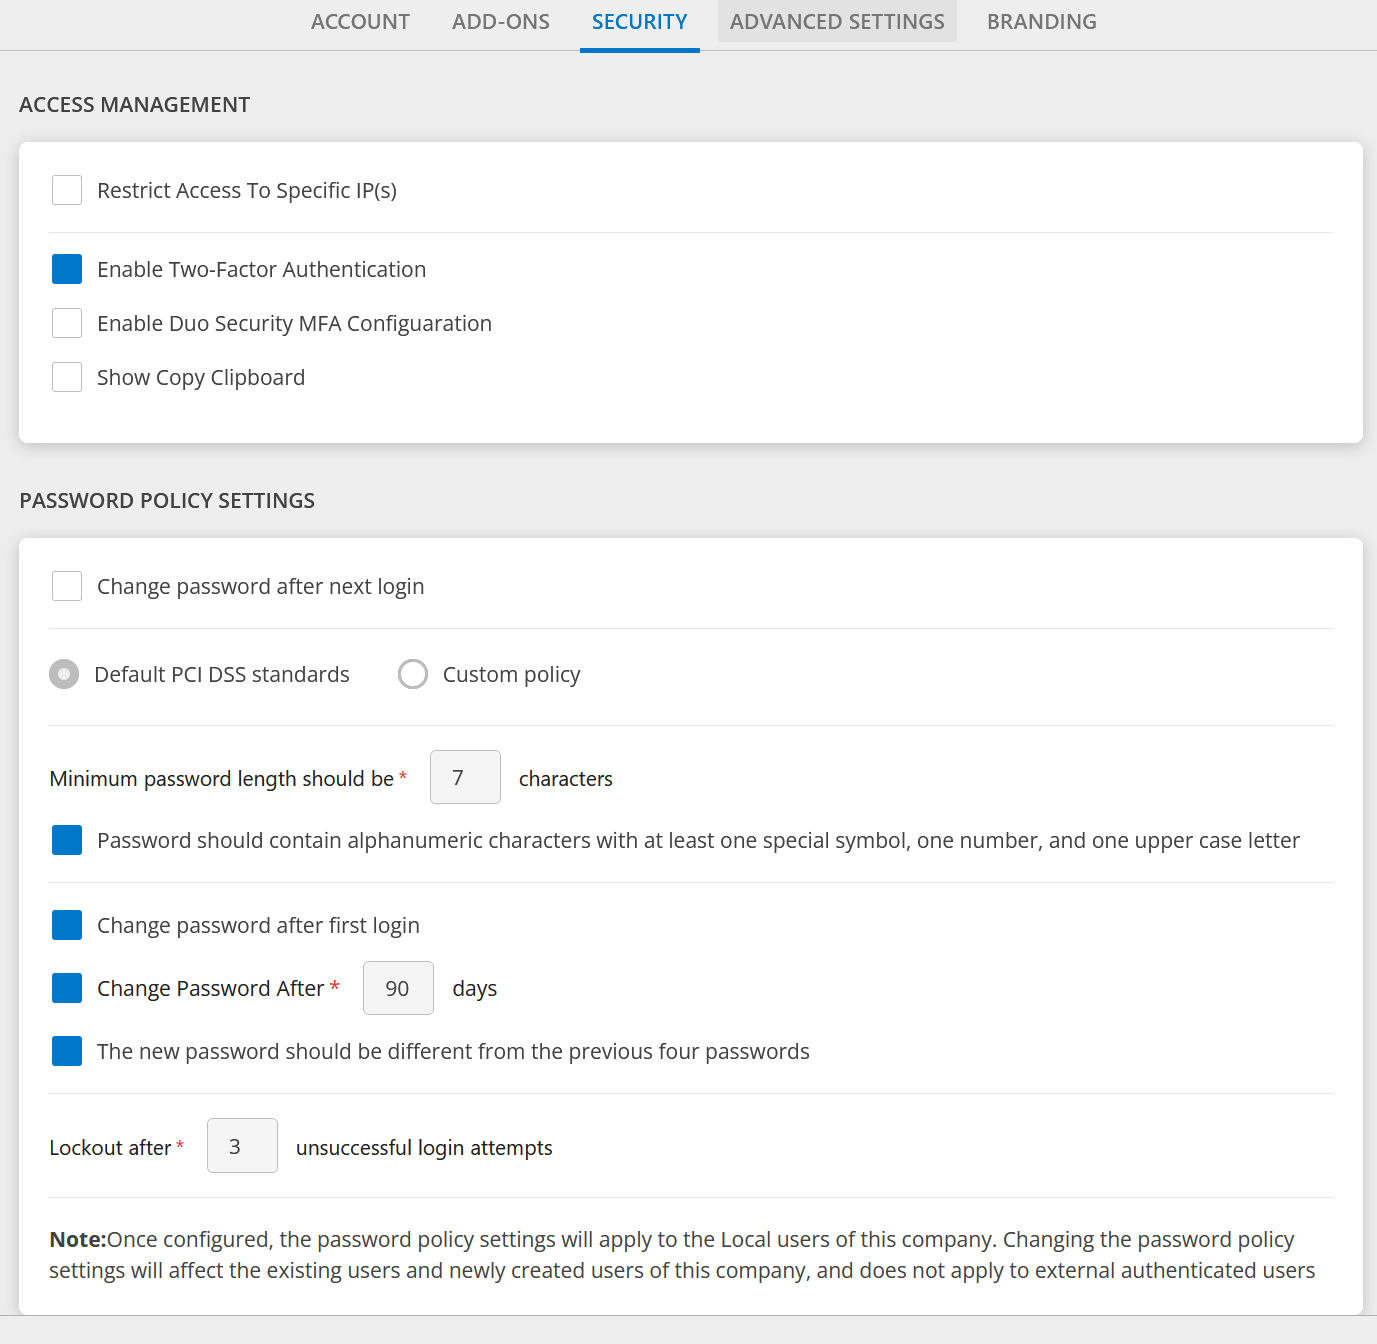
ACCESS MANAGEMENT
Access Management in OpsRamp includes features such as enhanced security with Two-Factor Authentication and Duo Security MFA Configuration, restricting access to specific IP addresses, and enabling the Show Copy Clipboard functionality thereby enhancing usability.
Select one or more of these options as per your requirements:
Restrict Access to Specific IP(s): Restricting access to specific IP addresses can reduce security issues. Enter the IP Addresses separated by comma. The following error message is displayed when you attempt to log into the platform from an IP address other than those permitted: Your organization policies restrict you from accessing
OpsRamp
from your current IP.
Enable Two-Factor Authentication: Select the checkbox to enable two-factor authentication. See Two-Factor Authentication for more details.
Enable Duo Security MFA Configuration: Select the checkbox to enable Duo Security.
Enter the Integration Key, Secret Key, API hostname in the DUO SECURITY MFA CONFIGURATION dialog box and click SAVE. The details are displayed.
Show Copy Clipboard: Select the checkbox to enable Show Copy Clipboard.
Following features are available only for Partners:
Block Duplicate Cloud Accounts - Ensure that each cloud account is uniquely created and managed. This helps you to block creation of duplicate resources across clients and reduce unnecessary CloudWatch expenses.
Skip User Consent Form: Select checkbox to skip user consent form. The form popup appears.
Click ACCEPT to skip the user consent form.
Click DENY to allow user consent form.
PASSWORD POLICY SETTINGS
The Password Policy Settings section allows you to configure password policy, which once configured will apply to all the local users of your company.
Change password after first login: Select this option, if you want to change password after first login. This means that all the users of the organization will mandatorily have to change their passwords after they login for the first time. This change will make all login sessions inactive.
Note: It is recommended not to change the password policy frequently, as this will affect the existing and newly created users of your organization, and will not apply to external authenticated users.
You can opt for Default PCI DSS standards or Custom policy.
Default PCI DSS standards: Select this checkbox to apply default PCI DSS standards. You cannot modify the settings.
Custom policy: Select this checkbox and configure the policy settings as per your organizational needs.
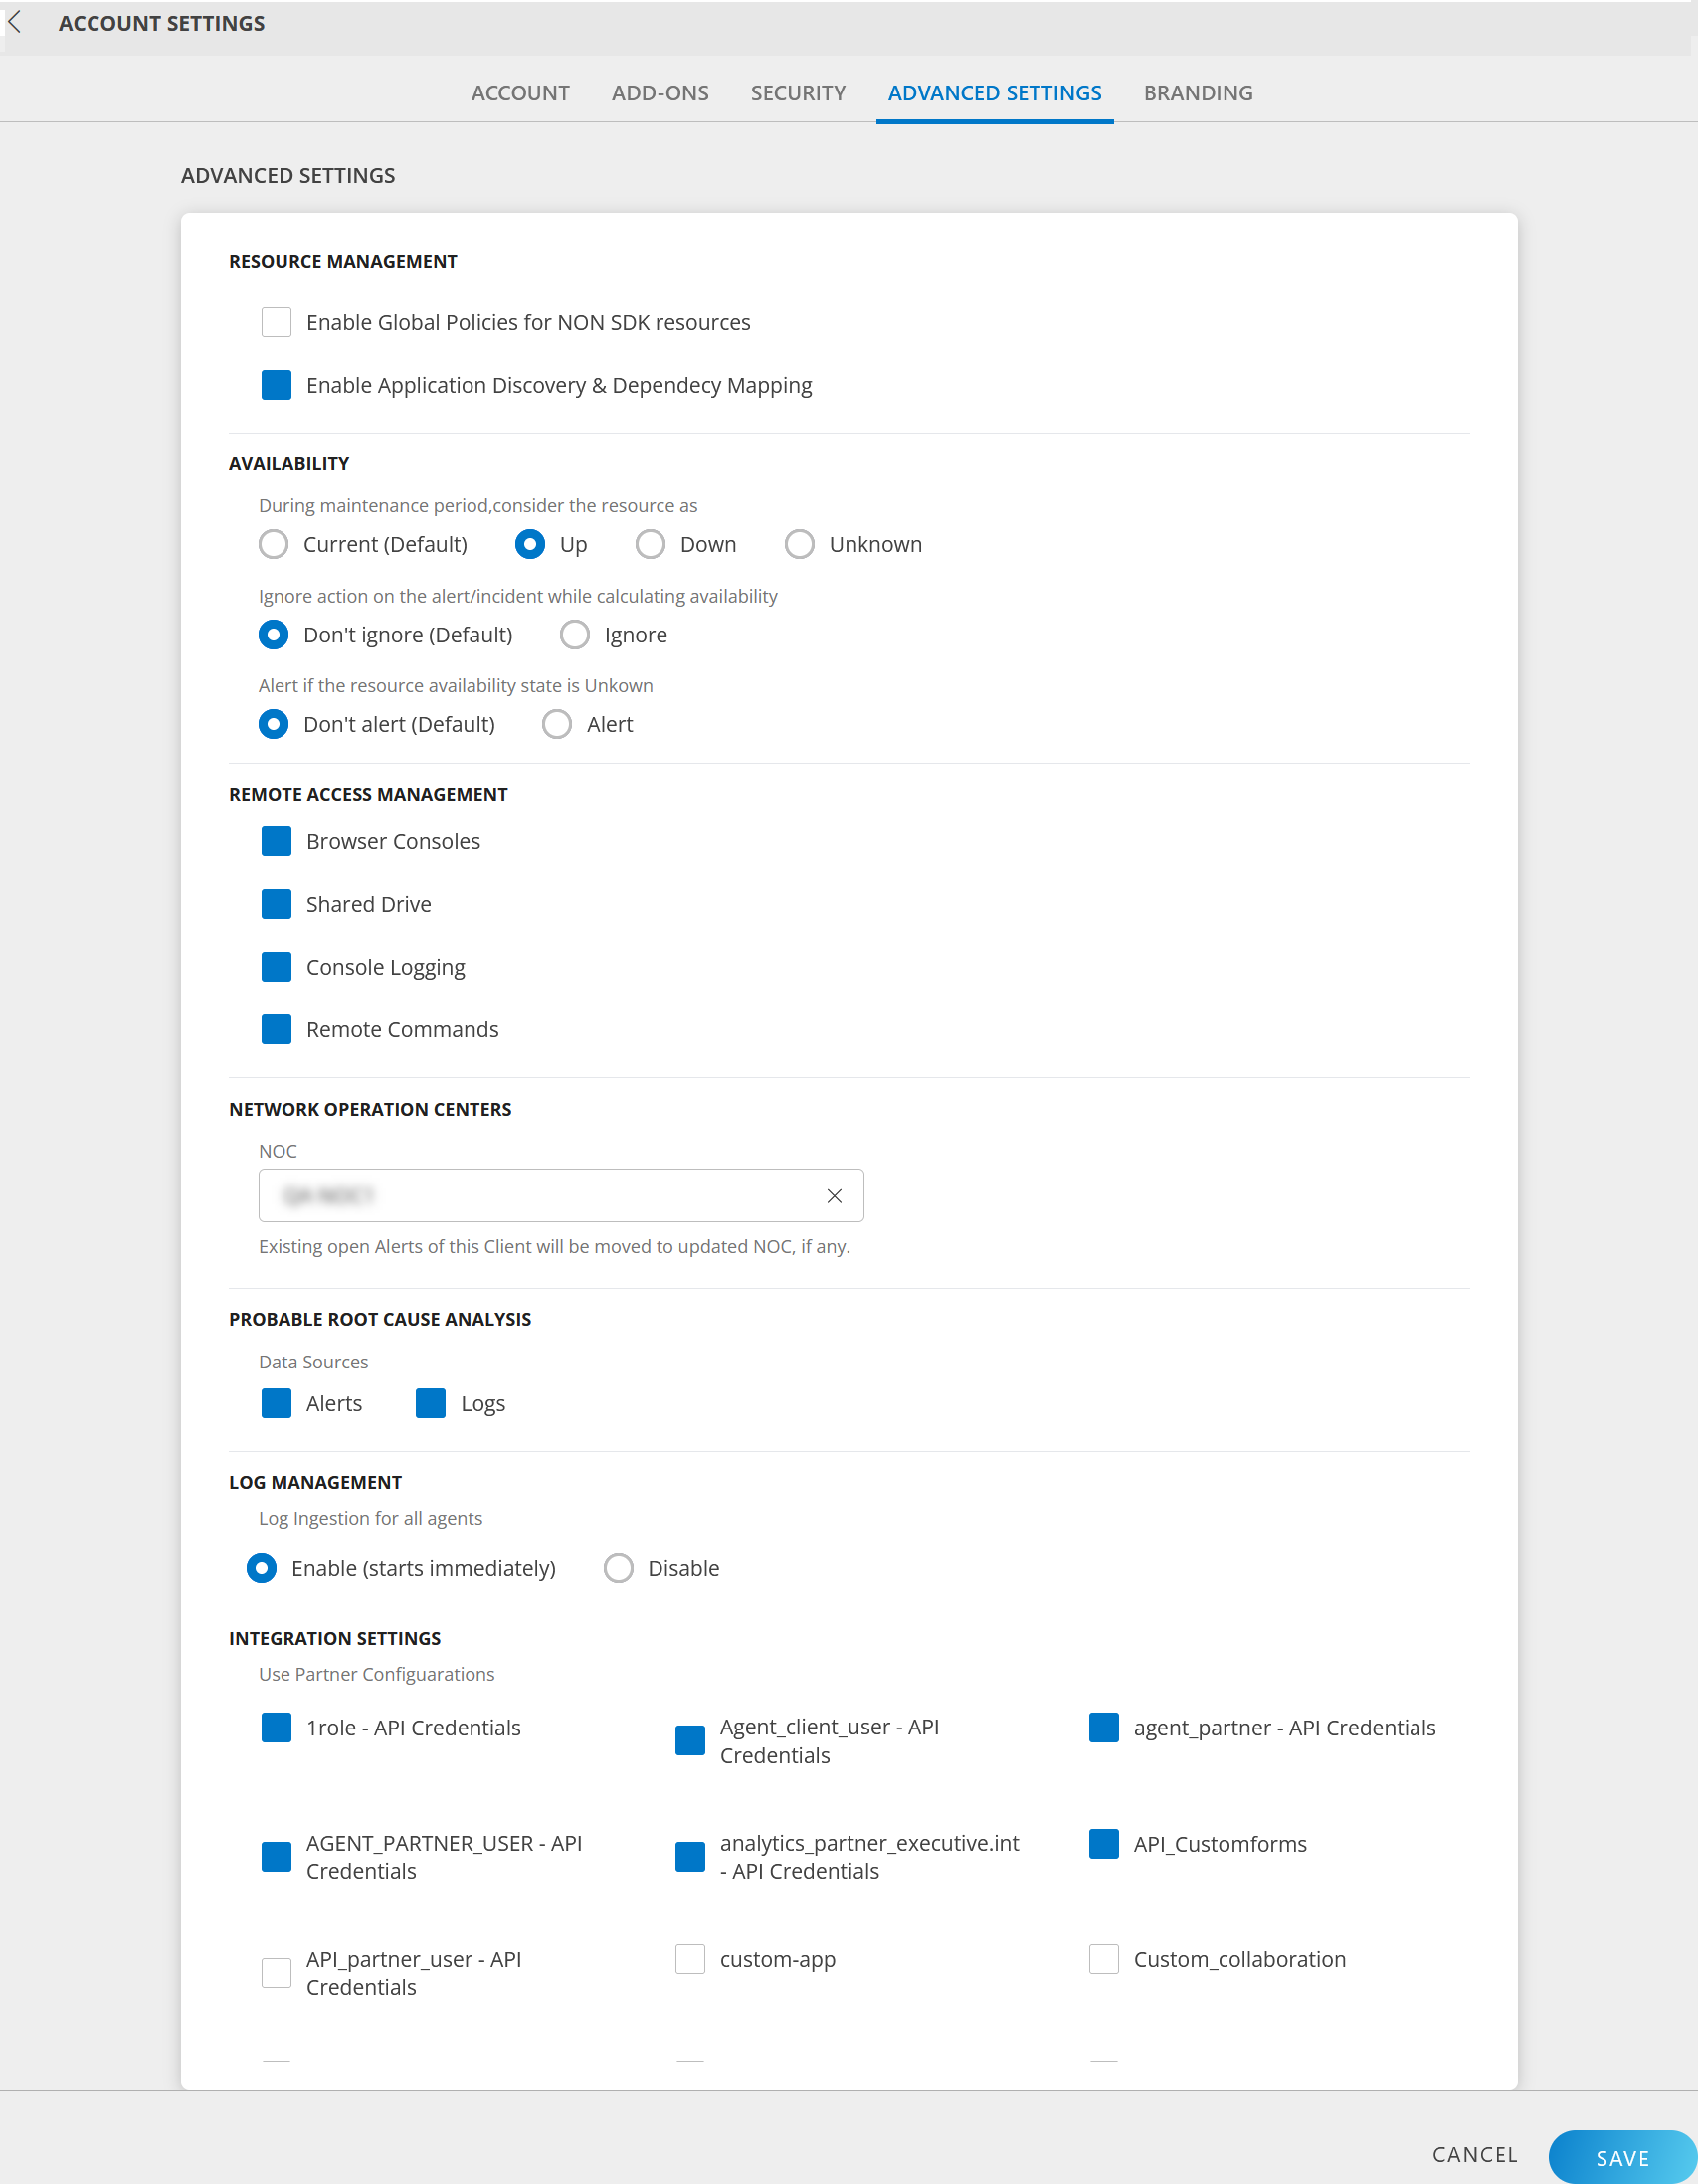
ADVANCED SETTINGS
Note: This feature is available only for Clients.
The Advanced Settings section allows you to configure options designed to optimize the management and monitoring capabilities of your IT infrastructure. These settings enable you to have greater control over aspects such as availability, integration settings, log management, NOC for alert management, remote access management, and root cause analysis through alerts and logs.
From ACCOUNT SETTINGS screen, click ADVANCED SETTINGS tab.
RESOURCE MANAGEMENT
Enable Global Policies for NON SDK resources: Select the checkbox to enable global policies for the client.
This flag is considered for non-SDK based resources.
For SDK based resources, regardless of whether this checkbox is enabled or disabled, the Device Management Policies will be automatically applied.
Enable Application Discovery & Dependency Mapping: Select the checkbox to enable application discovery and dependency mapping.
AVAILABILITY
During maintenance period, consider the resource as: By default, the current state is selected. Select the state of the resources during scheduled maintenance period. If you select the state as Up, during scheduled maintenance period the state of the resource(s) will be displayed as Up, even if your resource(s) is powered off / restarted.
Ignore action on the alert/incident while calculating availability: By default, Don’t ignore option is selected. Select an option as per your requirements. If you select Ignore, the system will ignore actions on the alerts or incidents that are suppressed, acknowledged, etc., when resource availability is calculated.
Alert if the resource availability state is Unknown: By default, Don’t alert option is selected. Select Alert option, if you want to receive alerts if the availability state of the resource is UNKNOWN.
REMOTE ACCESS MANAGEMENT
Choose the features listed (Browser Consoles, Shared Drive, Console Logging, Remote Commands) to enable them on the client.
NETWORK OPERATION CENTERS
Select NOC from the dropdown. All the existing open alerts will be moved to the NOC.
PROBABLE ROOT CAUSE ANALYSIS
Select Alerts or Logs or both, as Data Sources. Alerts: If you select Alerts, the system will consider alerts generated to aid in root cause analysis.
Logs: If you select Logs, the system will consider log data from various sources for root cause analysis.
LOG MANAGEMENT
Select the appropriate option. Enable (Stats immediately): Collects log data from agents in your infrastructure. This will allow the system to receive alerts and insights based on the collected logs information. Disable: Disables collection and processing of log data from all agents. As a result, alerts and insights will not be available.
INTEGRATION SETTINGS
Select one or more available custom integrations that you can inherit from the partner’s configurations.
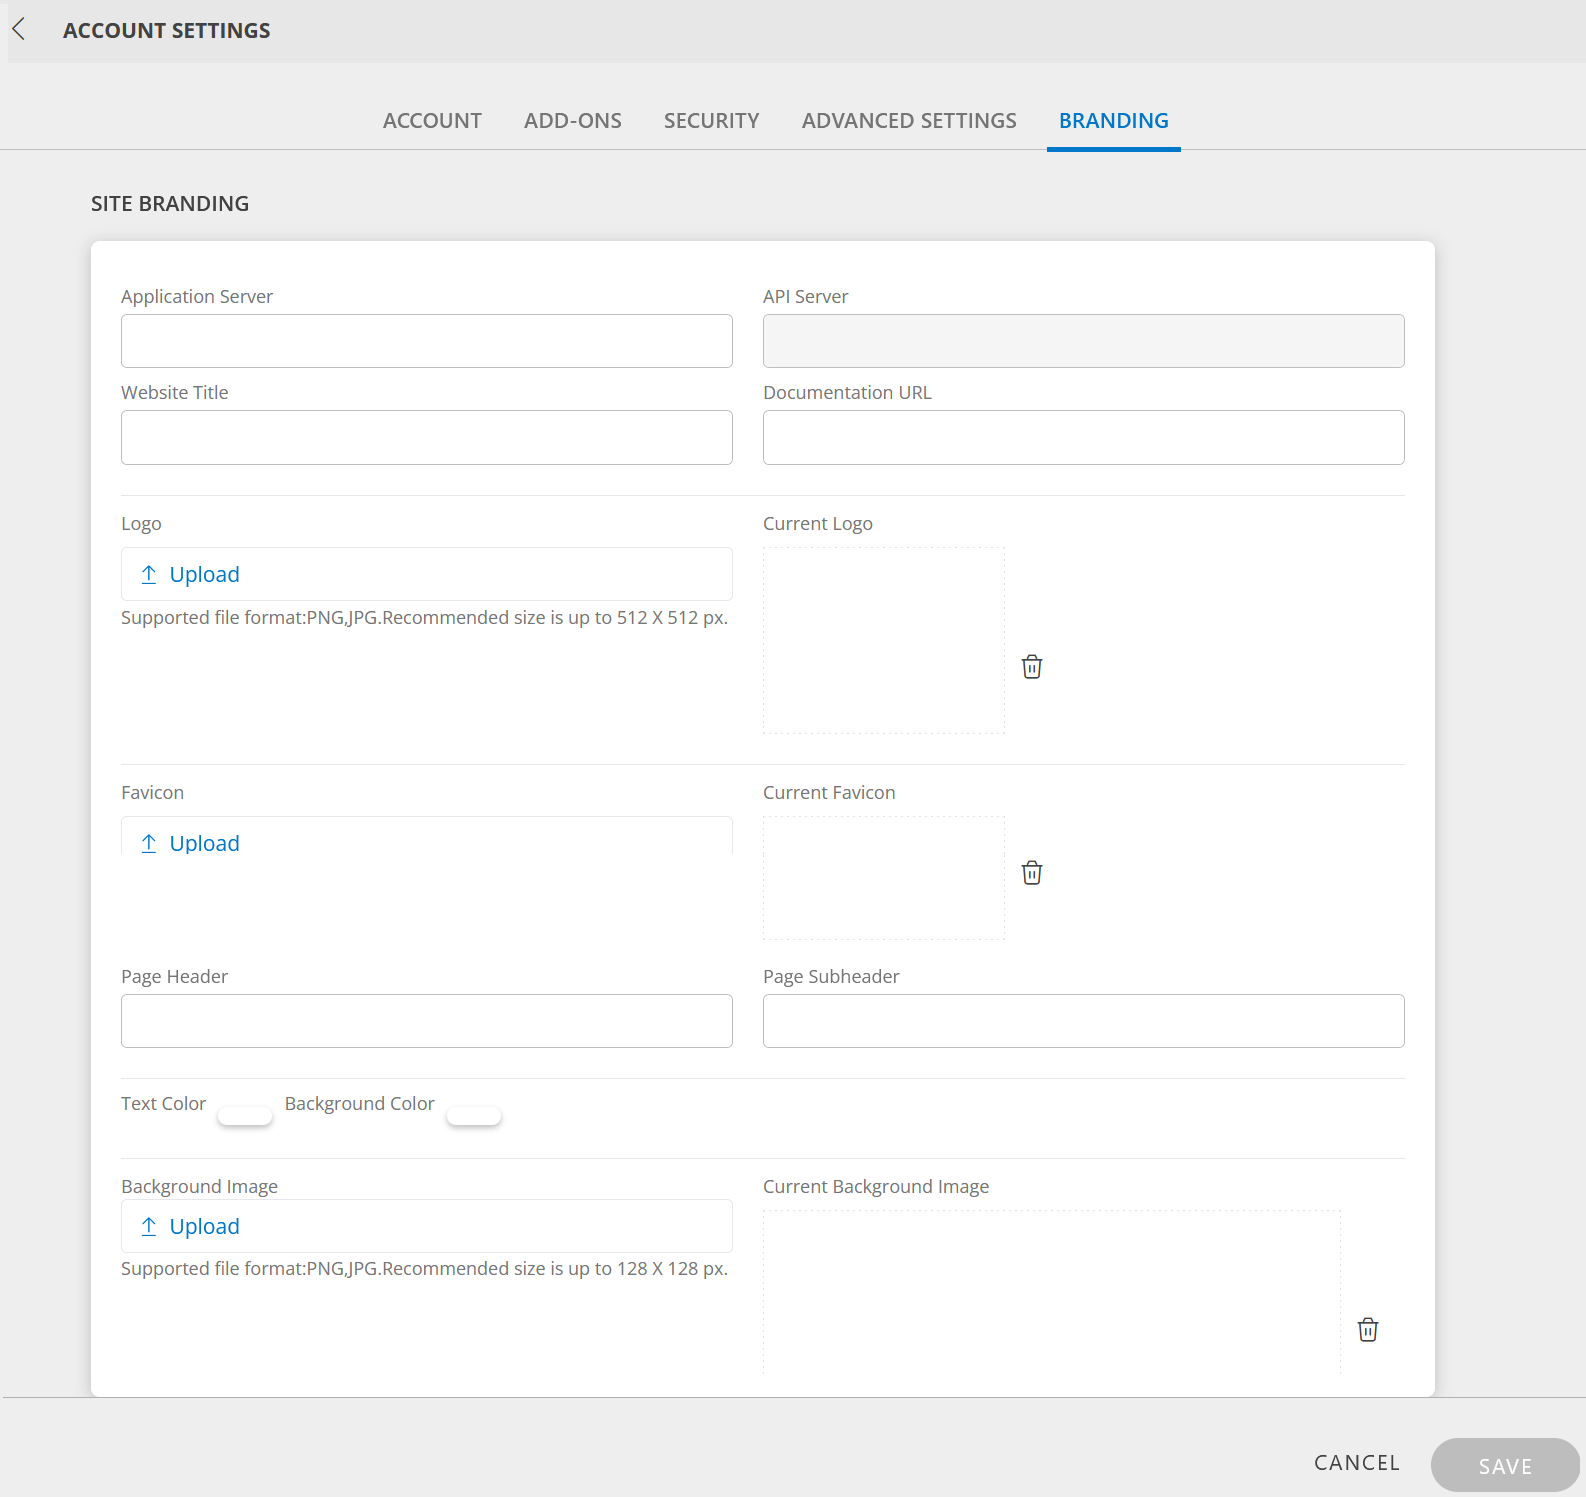
Using custom branding, you can customize the platform UI by adding your company logo, providing a website title, and changing the look and feel of the website to match your company theme.
Note
When you add a new URL in production, you must contact support to have a DNS entry added for the new URL.
Configure custom branding
Follow these steps to configure custom branding:
From ACCOUNT SETTINGS screen, click BRANDING tab.
Enter the following branding elements:
SITE BRANDING
Branding Element
Field Type
Description
Application Server
String
Note: This field is available only for Clients. Custom URL for the application server. When you add a new URL in production, you must contact support to get the DNS entry added for the new URL. The URL prefix you add is concatenated with the other URL values to create the URL for accessing the custom site. Example: If you specify myurl, the URL to access the new website is https://myurl.app.opsramp.com/ Note: The Application URL format accepts any character, except the following: *, #, &, ?.
API Server
String
Note: This field is available only for Clients. Displays the full API server name based on the application server custom URL. This field is not editable.
API Server Display only
String
Displays the full API server name based on the application server's custom URL.
Website Title
String
Custom website title that is used in the browser tab.
Documentation URL
String
URL of the documentation site.
Logo
File Input
Custom image. A logo that is used for the navigation bar and login page.
Supported file format: PNG, JPG
Size: Less than 10KB (recommended)
Dimension:
Height: 512px
Width: no more than 512px
Current Logo field displays the uploaded logo.
Favicon
File Input
Custom image that is used in the browser tab.
Supported file format: PNG, JPG
Size: Less than 10KB (recommended)
Dimension: square, 128 x 128 px
Current Favicon field displays the uploaded Favicon.
LOGIN PAGE
Branding Element
Field Type
Description
Page Header
String
Header text for the login page. Location is on the first line of the login page.
Page Subheader
String
Sub-header text for the login page. The text displays on the second line of the login page.
Text Color
Color picker
Color of the header and sub-header text.
Background Color
Color picker
Colored layer around the logo.
Background Image
File Input
Background image on the login page. The image appears darker than the original due to an overlay on top of the image.
Supported file format: PNG, JPG
Size: Up to 128 x 128px (preferred)
Dimension: 1440x900 (recommended). Smaller images are tiled. Current Background Image field displays the uploaded Background Image.
Click SAVE. The tenant account settings are saved.
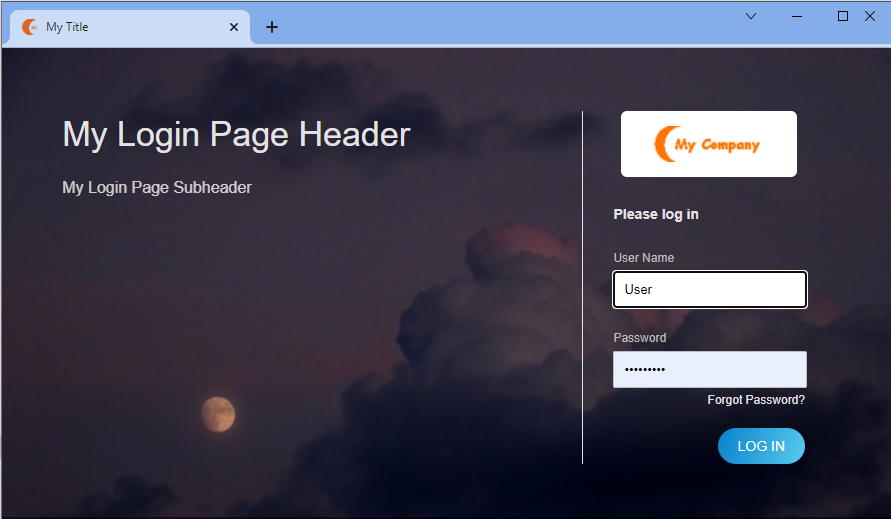
Branding example
Following values define client-level custom branding using a custom logo, favicon, background, and text labels:
Following image shows the custom branding login page:
NOTES
The Notes feature allows you to efficiently document and manage important information at the client level. You can create, edit, and delete notes associated with specific clients or resources. This helps you to keep a record of all the information in one place.
Follow these steps to access Notes:
Click Setup > Account.
From ACCOUNT DETAILS screen, click 0 under NOTES. The count will show 0 as there are no notes added.
From NOTES dialog box, scroll down and click +NOTE.
Enter the following information in the ADD NOTE screen.
Field Name
Field Type
Description
Subject
String
Enter a subject for the note.
Enter Description
String
Provide a description. You can use the formatting tool bar to format the text.
Validity Time range
Date Picker
Use the date picker icon to provide the validity time range. To select a time range:
Click the date picker icon, hover the mouse and select the date range.
Click APPLY.
Note: If you do not select any date range, Never Expire will be set by default.
Click SAVE. A successful message appears, and the note is added in NOTES screen.The newest note is displayed at the bottom of the screen.
Edit a note
Follow these steps to edit a note:
From NOTES screen, click EDIT available under the note.
Make the necessary changes and click SAVE.
Remove a note
To delete a note:
From NOTES screen, click REMOVE available under the note.