Create Dashboards
A partner administrator, a client administrator, or a user with Manage Dashboard permission can create and manage dashboards.
Note: A Dashboard is associated with the user and they can view a dashboard created by another user only if it has been shared with that particular user.
To create a dashboard:
- From Dashboard 2.0, click the hamburger menu.
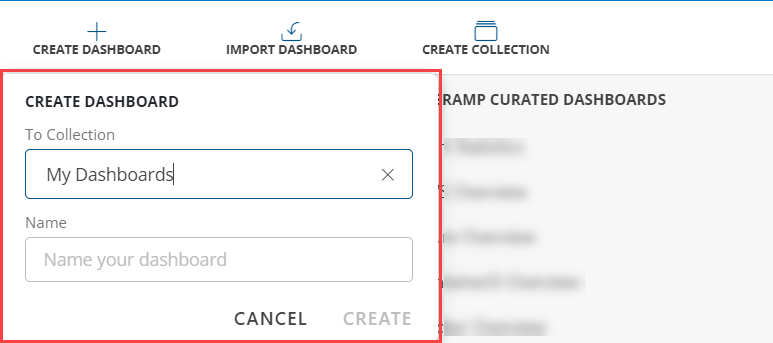
- The My Dashboards slide-out screen that appears, click CREATE DASHBOARD.
- In the CREATE DASHBOARD pop-up, enter the below details:
| Functionality | Description |
|---|---|
| To Collection | Select the name of the collection from the To Collection field. Notes:
|
| Name | Create a new collection and add dashboards to the collection. |
- Click CREATE.
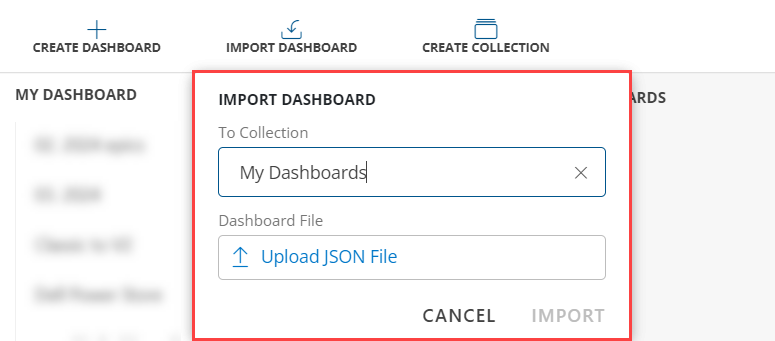
Import Dashboard
Users can use the Import Dashboard to:
- Import a Dashboard.
- Upload a JSON file that can be used to instantiate a dashboard.
Refresh Dashboard
Dashboards automatically refresh every 3 minutes, ensuring you have a near real-time experience with the latest data on your dashboard tiles. Dashboards automatically refresh data for the following tile types:
- Metric
- Resource
- Alert
- Ticket
- Service
Dashboard auto refresh temporarily pauses under the following conditions:
- If you select a specific past time range (e.g., from 1/1/2020 to 1/2/2020). It remains active only for relative time ranges (e.g., last 1 hour, last 24 hours).
- If you make changes to your dashboard, like adding, updating, or removing tiles, you must manually refresh the dashboard (click the refresh button or refresh your browser) to see these changes. Auto Refresh pauses in such cases.
- If you switch tabs in your browser, minimize the browser window, or if your browser tab becomes inactive, auto-refresh pauses. Auto-refresh resumes automatically once you return to the active dashboard tab, but it will take up to 3 minutes to update.
My Dashboard
My Dashboard presents both curated, pre-configured dashboards and user-created ones for partners and clients. Simply click the dashboard entry to view it. Curated dashboards will only appear if the associated integration is installed.
Room Mode
To start the room mode:
Click the ellipses (…) beside My Dashboard.
My Dashboard pop-up appears, select Start room mode.
Notes:
- This option displays a collection of dashboards in room mode with the ability to set the time duration for each dashboard.
- The default time for room mode is 15 seconds.
Note
In the Dashboard Room Mode, performing a drilldown action in the Tiles visualization will navigate to the Data Details page. To prevent this error, users are reccomended to avoid clicking anything during Room Mode.The Create Tile Page appears, you may create a tile or click NEXT.
Note: See Create Tile to know more on how to create a tile.
The room mode is enabled, allowing you to view all created dashboards in auto-play.
(Optional) You may click the Stop or Play option beside the Next Option to Pause and Start the auto-mode.
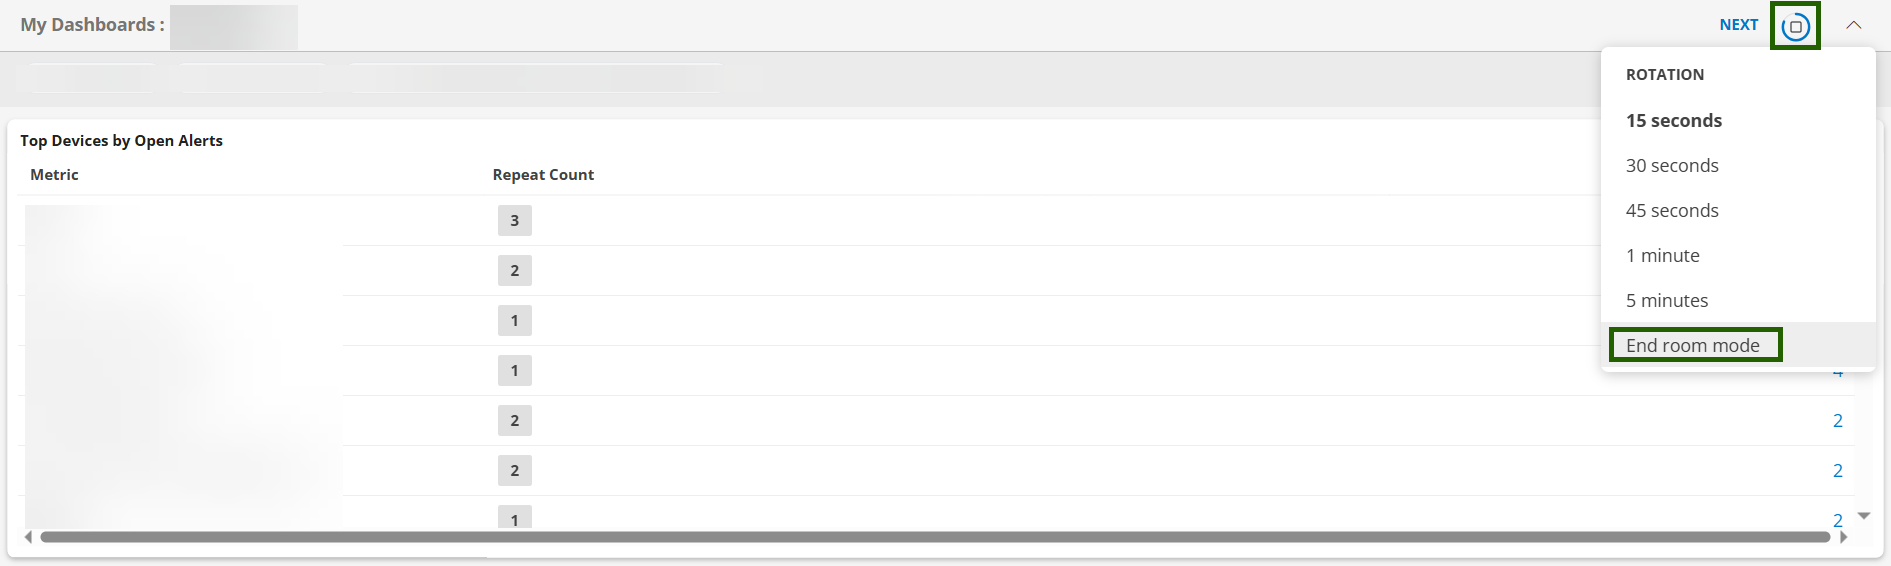
(Optional) Click the down arrow to view the rotational cycle, you may select:
- 15 seconds
- 30 seconds
- 45 seconds
- 1 minute
- 5 minutes
- End room mode
Note: End room mode view will return to the last viewed dashboard. Room mode can also be ended by clicking the square stop button.
Dashboard Options
In My Dashboard, users have the option to Move, Rename, and Remove dashboards under the following conditions:
- The user is the creator of the dashboard.
- The dashboard has been shared with the user, and the user possesses administrative privileges.
Below are the options that you may perform using the Dashboard Options:
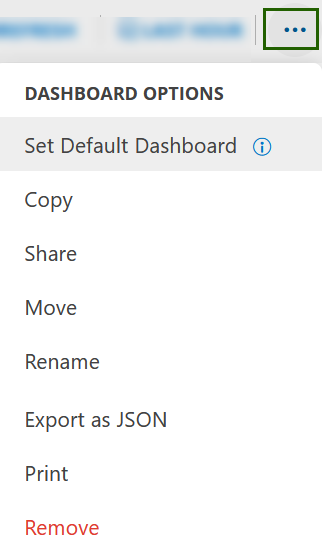
The table below describes the options:
| Functionality | Description | Set Default Dashboard | Following are the minimum permissions required to set a dashboard as default:
|
|---|---|---|
| Remove As Default Dashboard | This feature enables users to remove the default dashboard. | |
| Copy | This function duplicates a dashboard into the specified collection. Each dashboard must have a unique name. | |
| Share | This function allows you to share the dashboard with a Specific Role or with All Users. Notes:
| |
| Move | This action relocates the selected dashboard to a designated collection. | |
| Schedule Report | Set a schedule for reports to be sent to designated client users at the users desired frquency. Here users can also view the recent schedules reports in "Recent Reports" Section. The report will be downloadable in PDF format. | |
| Export as JSON | Export the dashboard as a JSON file, which can later be imported using the Import Dashboard menu option. | |
| Rename | This option allows you to change the name of the dashboard. | |
This option allows you to print the entire dashboard and its tiles. Each tile will take the full width of the page while maintaining its existing height. The output can also be downloaded and saved locally in PDF format. | ||
| Remove | Removes the dashboard. |
Dashboard Reports
You can create reports for your Dashboards to be sent to specific users, as well as scheduling reports to be sent at various periods of time.
To download the dashboard report as a PDF, select the three dots in the upper right corner, then Print. When the print page appears, select the destination and set to Save as PDF.
Schedule Reports
You have the option to schedule PDF reports to be sent at a specific time to selected users.
- On the Dashboards home page, select the three dots in the upper right corner. Then select Schedule Report.
- The Schedule Report page appears. Here you can select the frequency of the reports (Daily, Weekly, or Monthly), as well as narrowing down exactly when the reports will go out. You can also select which recipients will receive the report.
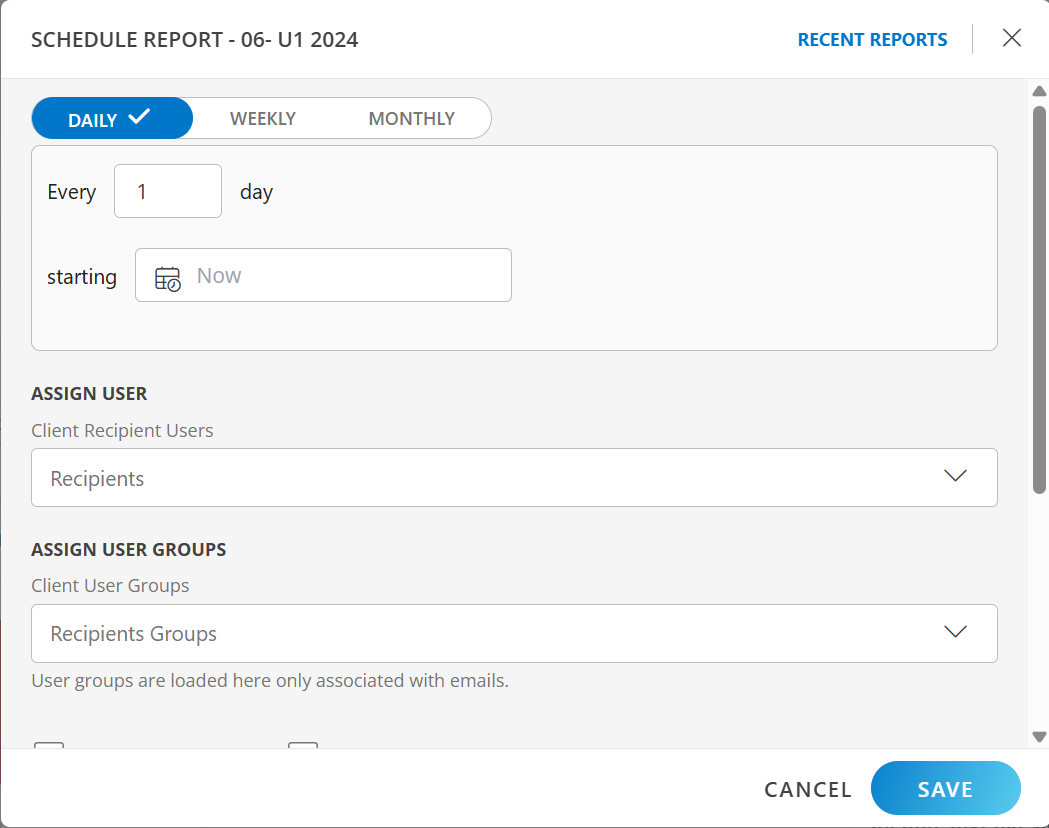
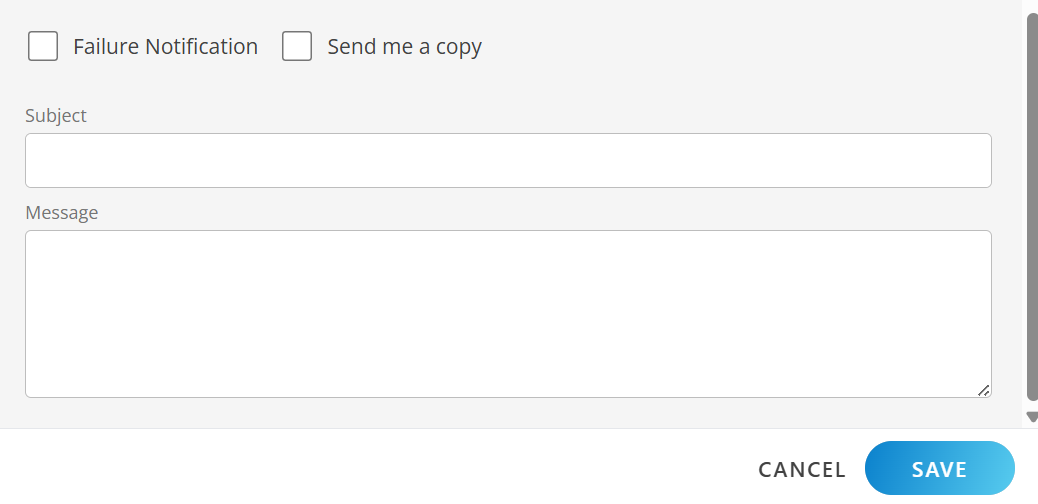
- Select whether you would like to have a copy of the report as well, or if you would like to be notified on failure.
- Include a subject line and message to accompany the report being sent out.
Note
PDF exports will dynamically optimize the output based on dashboard size and system load. Large dashboards may be exported as a UI view to ensure reliability.
If this optimization is applied, a note at the bottom of the PDF will indicate it.
How to ensure consistent full-data PDF exports:
- Limit widgets: Keep dashboards under 15–20 widgets.
- Shorten date ranges: Narrower time windows reduce data volume .
- Apply filters: Filter by specific clients, sites, or resource groups
- Split large dashboards: Create separate, focused dashboards for different data sets (e.g., “Alert Summary” and “Alert Details” as two dashboards instead of one).
Limitations
The following limitations exist when creating dashboard reports.
Embed Widget The tiles visualization is static image. Image may be incomplete due to size constraints.
OpsQL–Table The table visualization will not accommodate all the row data and will show data with limited columns as image.
Copy and export curated dashboard
You can perform the following actions on a curated dashboard:
- Copy a curated dashboard and customize it to meet your business requirements.
- Export the curated dashboard in JSON format.
- Export the curated dashboard in a PDF format.
Permissions required: Dashboard_Manage
Copy curated dashboard
Follow these steps to copy a curated dashboard:
To select your client, click the Client/Partner dropdown menu.
Note: You may either type your client’s name in the search bar or select your client from the list.From DASHBOARDS menu click Dashboard.
Click the hamburger menu available on the upper-left corner of the screen.
From the MY DASHBOARDS slide-out that appears, click on a curated dashboard that you want to make a copy of. The curated dashboard screen is displayed.

Click the ellipsis (…) icon available on the upper-right corner of the screen. The DASHBOARD OPTIONS popup dialog box is displayed.

Select Copy.

In COPY DASHBOARD dialog box:
- Select the collection from To Collection dropdown. The dashboard will be copied to the selected collection.
By default, My Dashboards is selected. - Enter a name for the copied dashboard in the Name box.
- Select the collection from To Collection dropdown. The dashboard will be copied to the selected collection.
Click COPY. The dashboard is copied and a confirmation message appears.

You can perform all available actions on the dashboard.
See Dashboard Options for more information.
Export curated dashboard
Follow these steps to export a curated dashboard:
To select your client, click the Client/Partner dropdown menu.
Note: You may either type your client’s name in the search bar or select your client from the list.From DASHBOARDS menu click Dashboard.
Click the hamburger menu available on the upper-left corner of the screen.
From the MY DASHBOARDS slide-out that appears, click on a curated dashboard that you want to make a copy of. The curated dashboard screen is displayed.
Click the ellipsis (…) icon available on the upper-right corner of the screen. The DASHBOARD OPTIONS popup dialog box is displayed.

Select Export as JSON. The dashboard is exported in JSON format.
Filters
| Filter Type | Description |
|---|---|
| filter on time range | Select a time range to filter the start time and end time for displaying metric data. Select pre-defined time intervals or use the date time-picker. |
| filter on variables | Assign a named variable to the value of an attribute to toggle between series to display. Note: See Variable Filters for more details. |
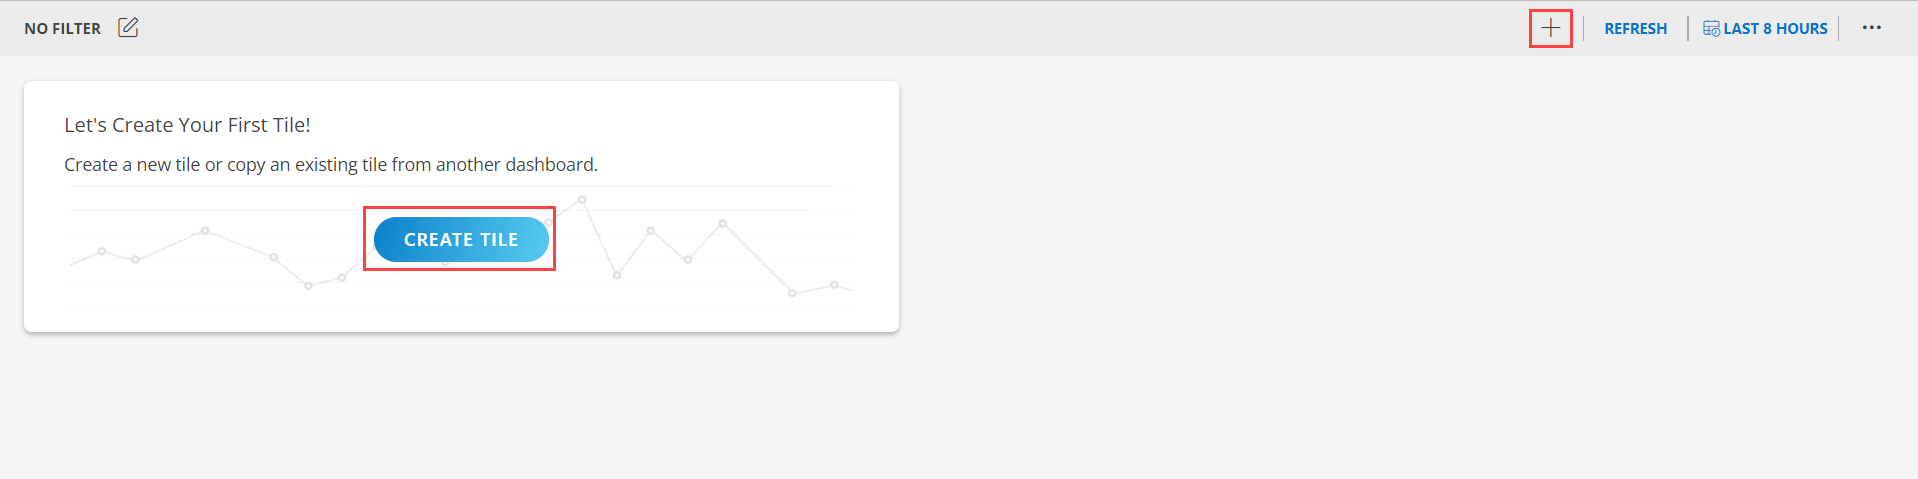
Create Tiles
To create a tile:
Click the CREATE TILE icon or click + from the toolbar. The ADD TILE screen is displayed.
Select the required tile.
Note: See Introduction to Tiles for more details on how to create the individual tiles.
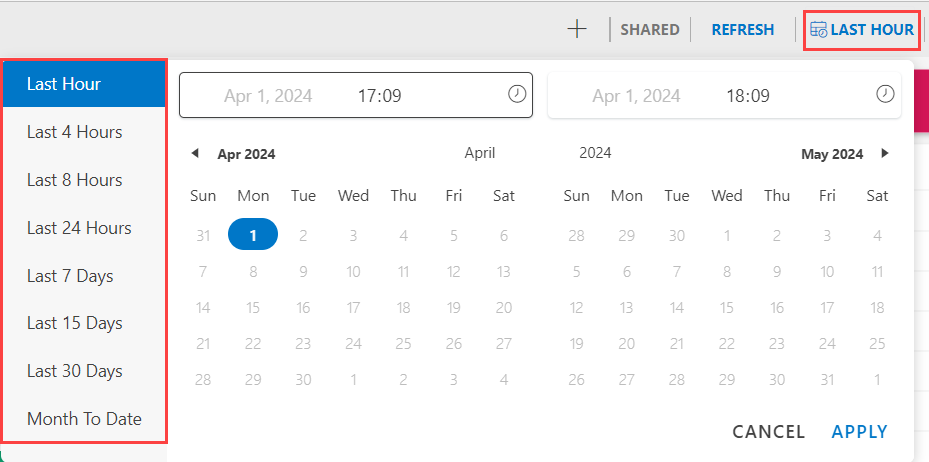
Dashboard Duration
The Last Hour option allows you to select a duration for which the dashboard data must be displayed. The Last Hour is set as the default even though the account credentials are the same.
To select the duration:
Click the Last Hour to select the duration for which the data needs to be retrieved. The duration can be selected for
- Last Hour
- Last 4 Hours
- Last 8 Hours
- Last 24 Hours
- Last 7 Days
- Last 15 Days
- Last 30 Days
- Month to Date
Drag to select a range of days along with the time.
You can select a different duration for each dashboard.
Collections
Collections are designed to streamline and organize dashboards within your OpsRamp environment. They provide a way to group related dashboards, making it easier to access and manage them collectively. A dashboard collection allows you to group multiple dashboards into a single, organized set. By consolidating dashboards into collections, you can:
- Group dashboards that are related by function, project, or team, making it easier to locate and manage them.
- Access multiple dashboards simultaneously through a single collection, saving time and reducing the need for repetitive navigation.
- Share a collection of dashboards with other users or teams, ensuring that all relevant stakeholders have access to the necessary information.
Create a Collection
You can create a collection to organize multiple dashboards into a single, easily accessible group. This helps in streamlining your dashboard management.
Prerequisites
Ensure you have the necessary permissions to create and manage collections.
- Access your OpsRamp account using your credentials.
- In My Dashboard menu, click CREATE COLLECTION.
- Enter the name of the collection.
- Click Create. You can see that the collection has been created and added to the list below. You can now move the exisiting dashboards to the collection.
Share your Collection
Sharing a Dashboard Collection enables you to collaborate with others by granting access to the grouped dashboards.
Prerequisites
Ensure you have the necessary permissions to share a collection.
- Hover over the collection you want to share.
- Click the More Dashboard Options menu and select Share. The Share Collection dialog box opens.
- Select the Partner Roles and Client to whom you want to share the collection. You can multiple clients at a time.
- Click Share. You will see the confirmation message Dashboard Shared Roles Updated confirming that the collection is shared. Also, a shared icon appears against the collection indicating that the collection is shared with others.
Similarly, you can share the individual dashboards from the collection. In this case, only the shared dashboards are shown as shared and collection remains unshared.