This page describes how to download and save the configured analysis reports.
Download the Reports
Once run has successfully completed, you will be able to download the report in (PDF and XLSX) format.
You have two ways to download the reports:
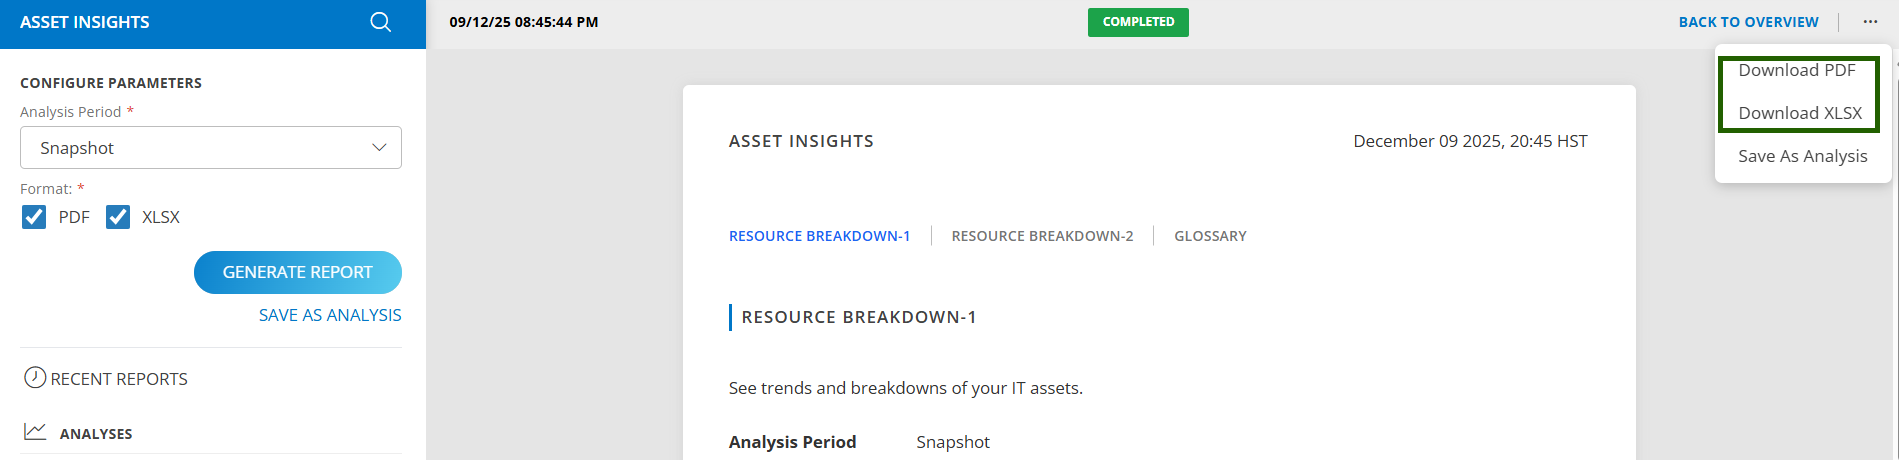
- Option 1: Click ellipsis (…) on the right side of the page, then choose either Download PDF or Download XLSX option to download the report to your local machine.
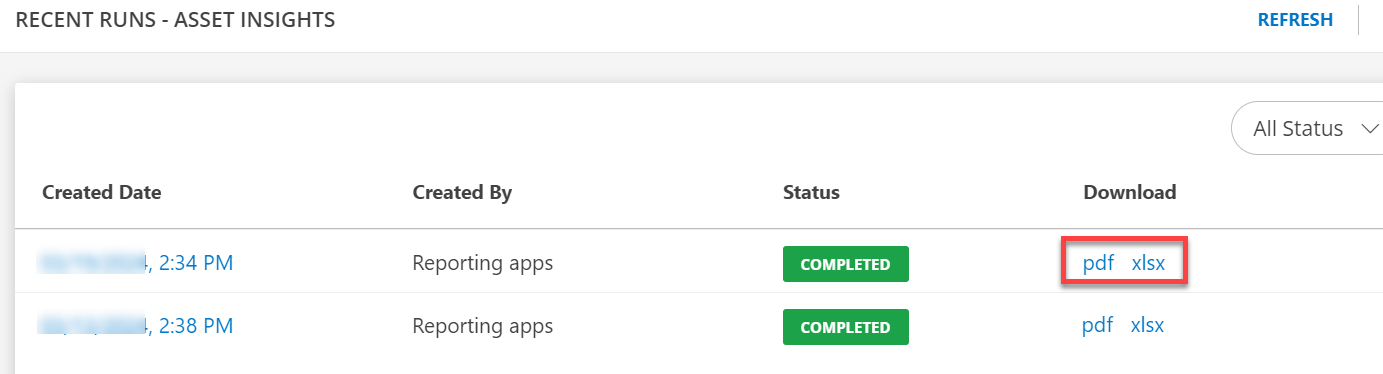
- Option 2: Click Recent tab and then chosse either PDF or XLSX option to download the report on your local machine.
Note
Only completed runs will have an option to Download the analysis report, analysis that are still in progress, running, or failed you will not have option to save it. To see the status of your run, click the Recent button.Download Using API
If the run was not created by you, you cannot download it unless it has been explicitly shared with you. Only the user who created the run can download it, and they need to share it explicitly after downloading.Save the Configured Analysis
After a successful run, you can save the report and schedule it for automatic execution. There are two options to save the configured analysis, as shown in the figure below:
Click ellipsis (…) located on the right side of the page.
Click Save As Analysis option to save the run as analysis.

Next, give name to your analysis under “Analysis Name” field.
Note
When giving a name to an analysis, make sure it is unique and not duplicated for the same type of app at user level.If you want to schedule the run, enable the “Run on Schedule” option and configure the following fields. (This is optional)
- Daily: Select this option to run your analysis on a daily basis and can configure by choosing the available time preference.
- Weekly: Select this option to apply to run your analysis on a weekly basis. Configure weekly schedule by selecting the available time preference.
- Monthly: Select this option to apply to run your analysis on monthly wise only. Configure this by selecting the number of days in a month.
- Set Time Zone: You can run the schedule in a specific time zone. When you choose a time zone, it ignores the different local time zones and uses the time zone specified in the configuration.
- Format: Choose the format for which you want to generate the reports.
- Assign User Groups: Users have the option to select specific user groups from the drop-down menu. This allows them to receive notifications based on the success or failure of the analysis. UserGroups are loaded exclusively within the scope of the tenant.
- Assign User: Select the users from the list to send the report notification. Here Users are loaded exclusively within the scope of the tenant.
Note
The user group will be displayed under “Recipient User Groups” only if the group is configured with an email address.
By default, the full list of Users and User Groups is not loaded in their respective fields. To view and select from the complete list, use the advanced search option.


Note
- In the Partner Scope Reporting App, partner users have the ability to share generated reports with client users and client user groups also. But this client sharing option is enabled when a partner user selects a specific client in the configuration settings. The users and user groups available for sharing are limited to those associated with the selected client in the configuration parameters.
- All reporting app notifications are managed based on the user’s report-level notification settings, including failures, successes, self-notifications, etc. To enable notifications, navigate to Setup > Account > Users and Permissions > Users. Enable the report notification on the User Details page. If it is already enabled, there is no need to enable it again.
- Failure Notification: When users enable the “Failure Notification” option during schedule the analysis run, they will be notified if the schedule run fails.
Only the users who created the schedule analysis run will be notified if the run get fails. - Send Me a Copy: When the user enables the “Send Me a Copy” option during a scheduled analysis run, the user who created the scheduled run will be notified along with recipient users and user groups.
- Subject: The user will receive an email notification with this subject heading.
- Message: You can add your message here, if not added anything the system will send with a default message subject. Date and time in subject are referred to completion of time.
Examples of default message
- Example 1: Metered usage run: Tuesday, June 21 18:05:05 PDT 2022 attached.
- Example 2: Assets insights run: Tuesday, June 21 18:05:05 PDT 2022
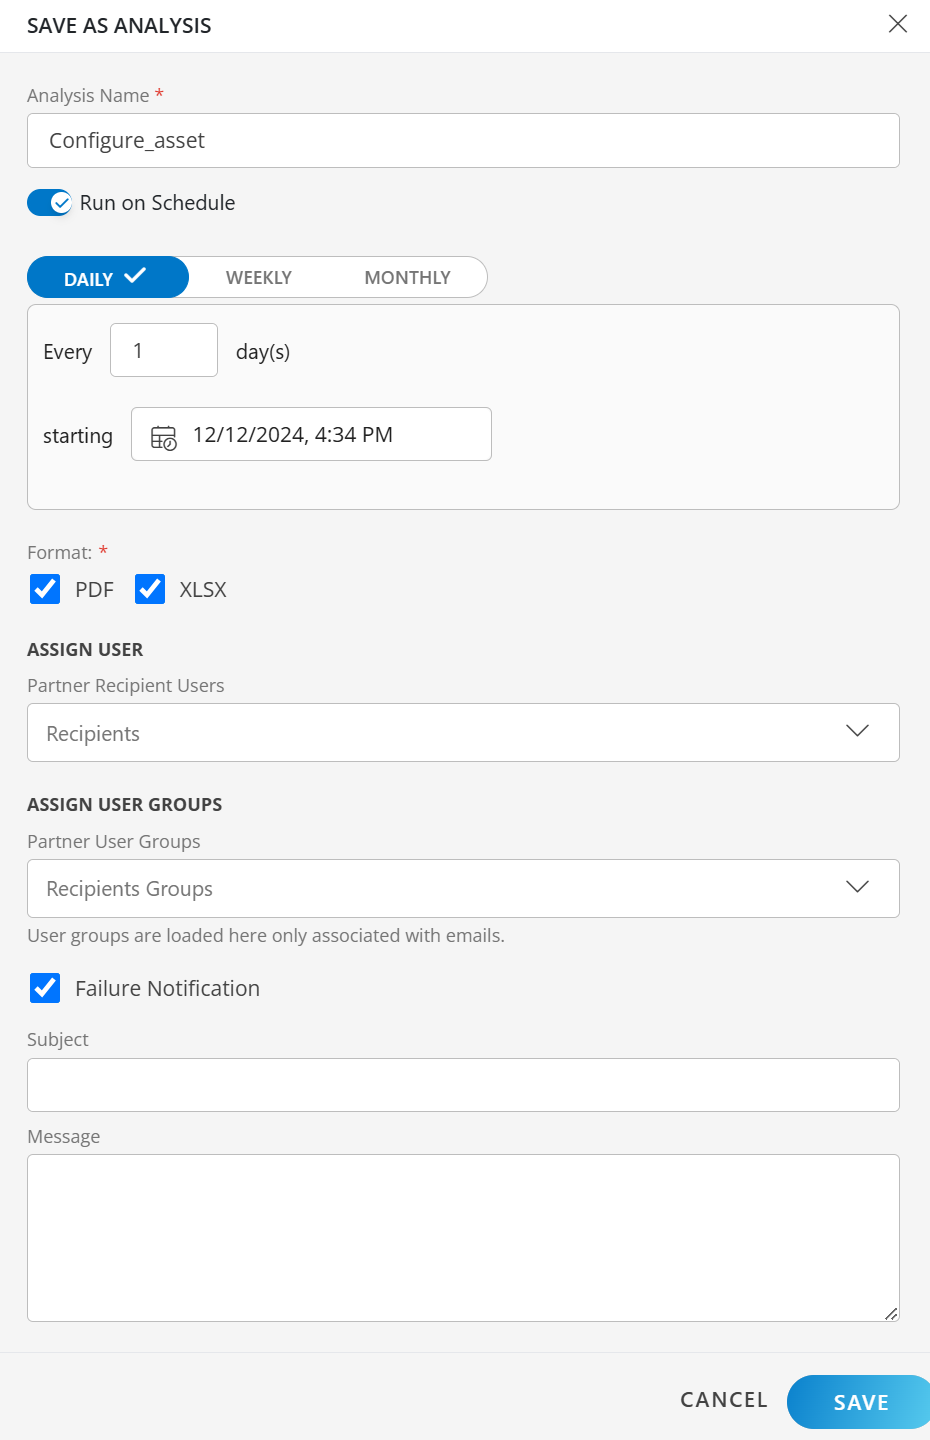
Finally, click Save button.
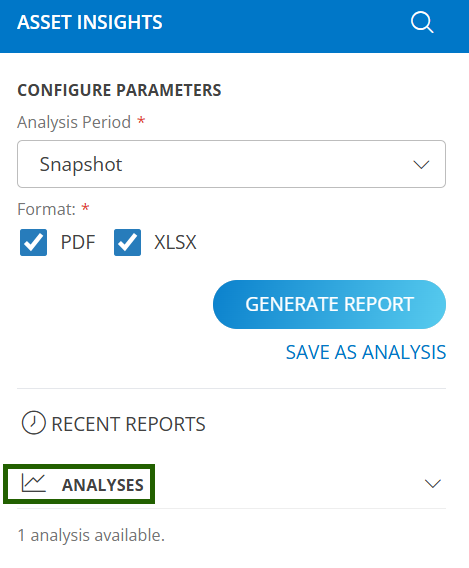
You can find your saved analysis under the Analyses section.
Click Back To Overview at the upper right corner to return to the Overview page.
Next Steps
Refer View the Saved Analysis document.