Deploy a Gateway on GCP
The gateway is deployed in the Google Cloud environment to monitor and manage your resources.
Prerequisites
Download the Gateway by clicking the Download button
Configure GCP
The GCP configuration has the following steps:
- Create a storage bucket.
- Create an image.
- Create a VM instance.
Create a storage bucket
Buckets are the basic containers that hold data. Everything that is stored in Cloud Storage must be contained in a bucket.
To create a new storage bucket:
- Log into GCP with your credentials.
- From the Projects drop-down list, select the desired project to deploy the gateway.
- On the left pane, from the Storage menu, click Storage and then click Create Bucket.
- From Create a bucket, enter a bucket name (Example: opsramp-gateway) and click Continue.
- From the available default storage class options, select Multi-Regional and click Continue.
- (Optional) Configure Control access to objects and Advanced settings.
- Click Create. The bucket that you created now appears in the Buckets list.
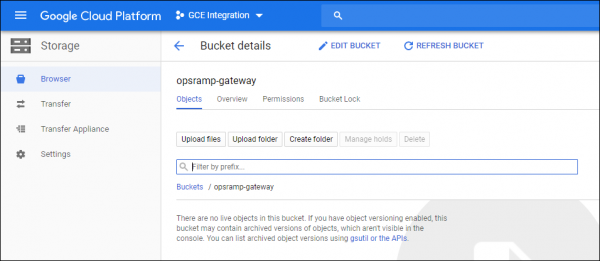
- Click the name of the bucket. The Bucket details screen appears.
- From the Objects tab, click Upload Files and select the gateway image file. The Gateway image file gets uploaded to the bucket.
Create an image
A virtual machine image is a single file that contains a virtual disk with a bootable operating system. Google allows you to define virtual machine images or use pre-defined images which can be used to create one or more virtual machine instances that look alike.
To create a new image for the gateway:
- On the left pane, from the Compute Engine menu, click Images. The list of Images is displayed.
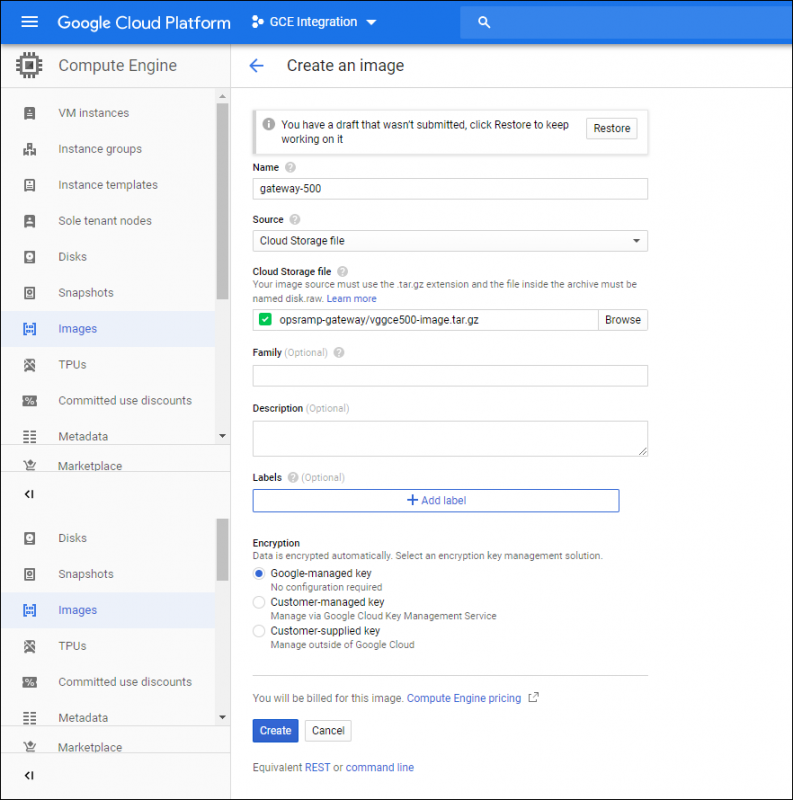
- Click Create Image. The Create an image screen appears.
- Provide the following details:
- Name: Enter a unique name for the gateway image.
- Source: Select Cloud Storage file from the drop-down options.
- Cloud Storage file: Select the gateway image file that is attached to the storage bucket.
- Encryption: Google-managed key is selected by default.
- Click Create. The new image appears in the images list.
Create a VM instance
An instance is a virtual machine hosted on Google’s infrastructure. A virtual machine instance is created for the gateway using the gateway image.
To create a new VM instance:
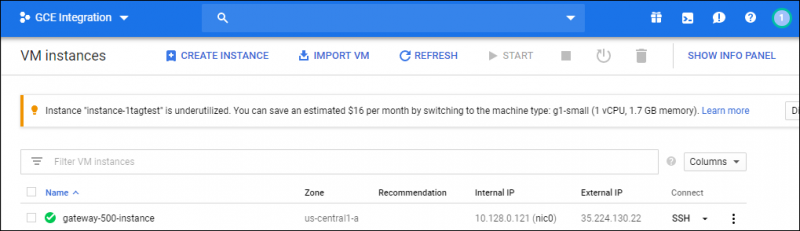
- On the left pane, from the Compute Engine menu, click VM Instances.
- Click Create Instance. The Create an instance screen appears.
- Provide the following details and click Create.
- Name: Enter a unique name for the gateway instance.
- Region: Select US-central1 from the drop-down options.
- Machine Type: Minimum requirement is 2 vCPU, 4GB.
- Access scopes: Allow default access is selected by default.
- Firewall: Ensure that port 22 and port 5480 are allowed on the gateway to access the Web and Serial user interface.
- Verify if the gateway is installed in Google Cloud Platform (GCP).
Gateway Registration
To register a gateway, the gateway registration has to be configured.
Configure the gateway registration
After creating a management profile, configure the gateway registration using one of the following methods:
- Gateway administration console
- Gateway web user interface
Configuring with the administration console
To configure the gateway using the administration console:
- Log into the gateway VM with provided username and password.
For default login credentials to log into the administration console, contact OpsRamp Support. - From the left pane, click General.
- Verify that the Registration Status is
Not Registeredand the Tunnel Status isNot Established.Note
During the installation of the OpsRamp gateway, the first screen prompts you to set a hostname for the gateway. If the hostname is not provided, the gateway is identified based on the MAC Address that is displayed across the user interface. - Click Network, select Use Static IP address and then click Save.
- To configure the gateway to use Proxy, use CTRL+P to navigate to Proxy Settings. By default, Direct connection to the Internet is selected.
- Provide the OpsRamp server
(api.opsramp.com)information and enter the activation token. - Click Update Now to register the gateway to OpsRamp.
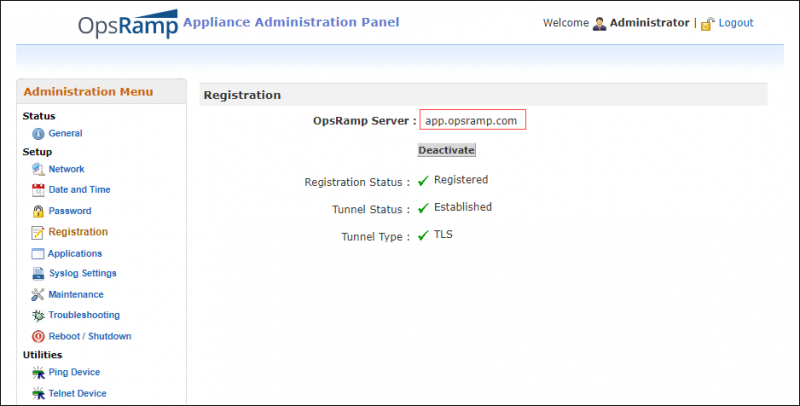
- Verify that the gateway is registered with OpsRamp.
Configuring with the web user interface
To configure the gateway using the web user interface:
- On the web browser, enter the URL using the following syntax:
https://<enter Gateway IP address>:5480. - From the gateway login screen, provide a default username and password.
- Click Network. If required, clear the Obtain an IP Address from DHCP selection and provide the static address.
- (Optional) Enter VLAN, Static Routing, and Proxy information.
- From the Administration menu, click Registration and provide the activation token.
- Provide the OpsRamp SaaS endpoint details
(app.opsramp.com)and click Activate. - Verify that the Registration Status displays a Registered and Success status.
Activate the Gateway
- Login to Gateway Administration Web UI using the URL:
https://<Gateway_IP_Address>:5480
(or)
Login to SSH to Gateway CLI with the default credentials:
Note: To get the credentials, login to OpsRamp portal, go to Setup > Downloads > Gateway. - Go to Registration and enter:
- API Server: copy and enter the host url.
- Activation Token: copy and enter the activation token.
- Complete the registration.
- Change the default password.