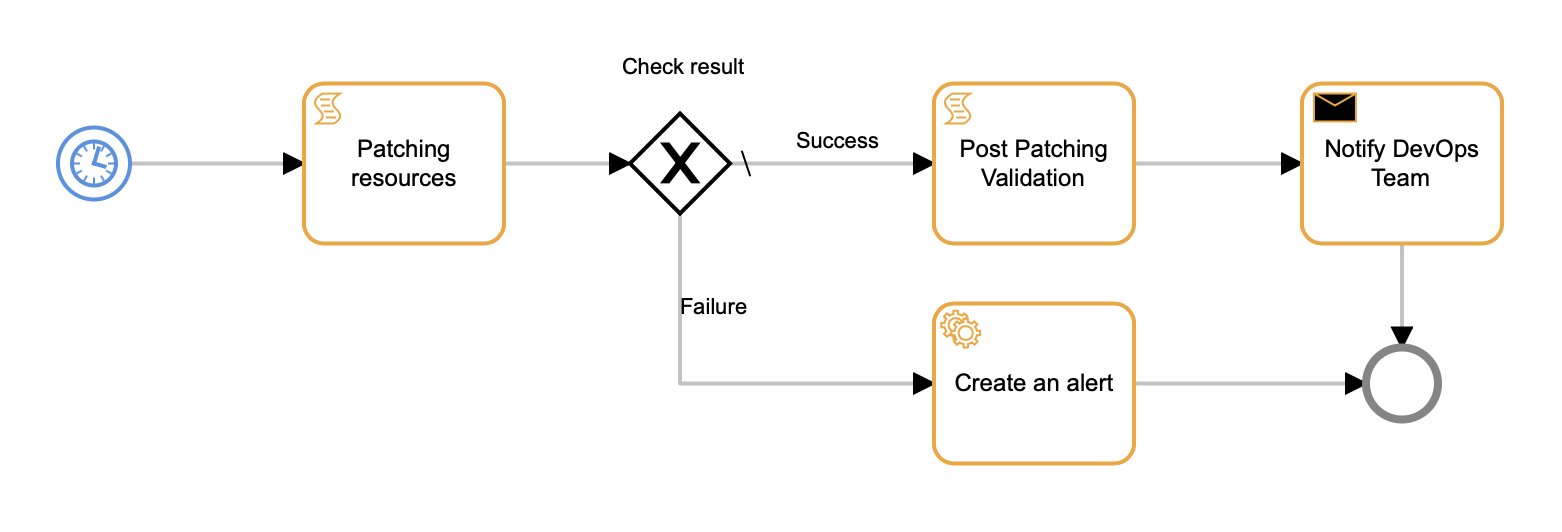
This article walks you through a process definition example that references the more frequently used definition tools. The example automates resource patching:
- Append on a periodic timer event.
- On timer expiration, start a resource patch script.
- If the script completes successfully, validate the patch. Otherwise, generate an alert.
- On successful patch validation, send an email notification to the DevOps team.
This visualization demonstrates a process definition for the example:
To create a process definition for OS patching that uses resources from an existing patch configuration, see Define a Patch Management Process.
In following this tutorial, refer to the Process Definition Reference for detailed information about each component type and the properties available for customization.
The following steps describe how to create the visualization.
Add New Process Definitions
Make sure the Remediation and Automation package is enabled for the client.
- In the main client menu, click Automation > Process Definitions to display the list of defined process definitions.
- To add a new process definition, click + NEW to display the canvas and tools for rendering a new visualization.
- Enter a required Name for the process. You can enter an optional process Description.
- Select a process definition Category.
- Enable or disable the process definition with the Enable Process Definition toggle.
Continue defining the workflow, handling successful and failed paths, and DevOps notification. The workflow must begin with a StartEvent and end with an EndEvent.
Define Start Events
The first step of any process is to define the start condition. The start of a process can be triggered by a timer event, or an alert event. This example demonstrates a timer event:
Click the Create StartEvent symbol from the component tools menu, and place it on the canvas with a click.
Click the Change type (wrench) icon and choose Timer Start Event.
Click the Timer Start Event symbol to display the start event properties.
In the Properties view, enter a start event Name. The ID property is automatically populated.
Click the Start Date edit window and choose a calendar date and time-of-day as the starting condition for automated patch process. Click OK to continue through each dialog.
Choose an Ends option to specify the end of automated patch processing. Select from:
- Never ends
- ends After a number of occurrences
- ends On a specific date and time
From Recurrence Pattern, select the frequency unit.
From Repeats Every, enter the event frequency.
For all recurrence pattern options, set the time in a 24-hour format from the Start Date edit window. The event is triggered at the specified time.
The following options are available:
Recurrence Pattern Repeats Every
(Choose Value)Description Minute 1 to 360 minutes Select the number of minutes to trigger the event after the specified time. For example, set the time as 3 PM and recurrence value as 5. The event is triggered at 3 PM and five minutes after that. Hourly 1 to 120 hours Select the Hourly recurrence to trigger the event after the specified number of hours. Daily 1 to 365 days Set the frequency for the event to trigger after the specified number of days. Weekly Sunday, Monday, Tuesday, Wednesday, Thursday, Friday, Saturday Select one or more weekdays on which you want to trigger the event. For example, select Tuesday and Thursday and the time as 6 PM. The event is triggered every Tuesday and Thursday at 6 PM. Monthly 1 to 12 months Set the frequency on a monthly basis. For example, select 2 as the recurrence value. The event is triggered after two months from the date and time specified in the Start Date edit window.
Define Task and Task Properties
Click the Create Task symbol in the component tools menu and place the task on the canvas. You can also click the StartEvent symbol previously placed on the canvas and click the Append Task icon.
For subsequent components, you have the option of manually selecting and placing the component from the component tool menu or selecting a component on the canvas and choosing the next component in the workflow. This example add components from existing components, which also automatically connects both components.
For the task, click the Change type icon and choose Script Task.
Click the task symbol on the canvas to display the task properties.
Enter the task Name. The name is displayed in the task symbol as you enter it. The task ID is automatically populated.
Select an Agent or Agentless script platform.
Click the Script Name edit box and select from the list of available scripts.
For Resource ID, enter a $ character to display the list of available input sources to the task. Choose the timer start event resource.
For example, if the timer start event is named
Patch Start Timer, choosePatch Start Timerfrom the list of available input sources. In this example, there is only one available input source.Select Default user or Other user as the user with run script privilege.
Define Gateways
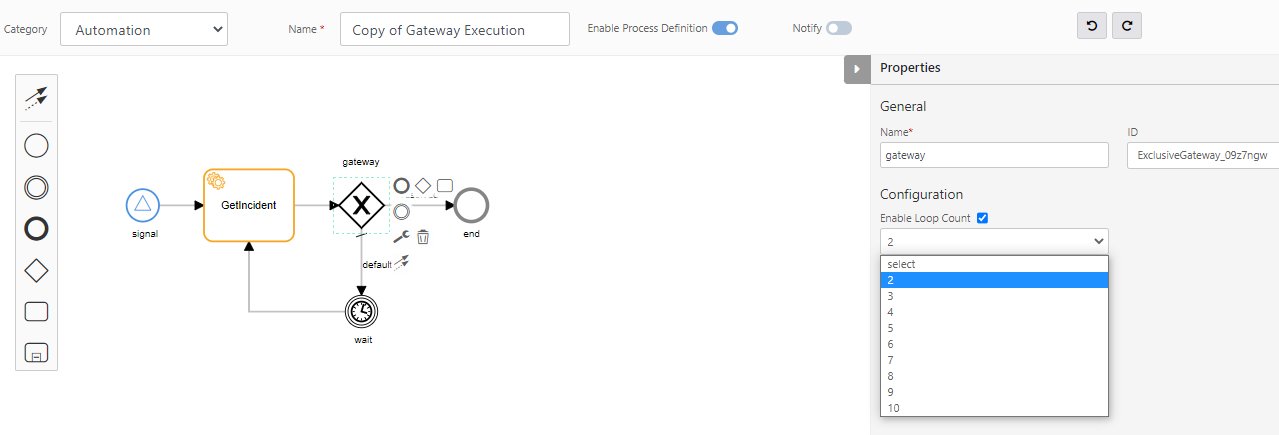
Use a gateway to specify workflow branching. An exclusive gateway provides conditional branching and a parallel gateway provides for concurrent processing paths.
- Click the on-canvas script task and select the Append Gateway icon. This renders an exclusive gateway component by default.
- Click the gateway component to edit the properties.
- Enter a Name property. The ID property is automatically populated.
- Enable the option Enable Loop Count and select the values from the drop down to configure the repeat count value.
Define Conditional Tasks
Define two tasks, one for each gateway path. The task that executes depends on satisfying the gateway conditions.
For the first task, define the task to handle a successful patch operation:
- Click the gateway component and select the Append Task icon. This renders a task for post-patch validation.
- For the task, click the Change type icon and choose Script Task.
- Click the task symbol on the canvas to display the task properties.
- Enter the task Name. The task ID is automatically populated.
- Select Agent or Agentless as the script platform.
- Click the Script Name edit box and select from the list of available scripts.
- For Resource ID, enter a $ character to display the list of available input sources to the task. Choose the name of the patching script task previously defined.
- Select Default user or Other user as the user with run script privilege.
For the second task, define the task to handle a failed patch operation:
Click the gateway component, again, and select the Append Task icon. This renders a task to create an alert if the patch operation failed.
For the task, click the Change type icon and choose Service Task to create the alert.
Click the task symbol on the canvas to display the task properties.
Enter the task Name. The task ID is automatically populated.
From the Service menu, select a Platform Service for the alert notification.
From the Task menu, select Create Alert.
Enter the required alert information.
You can manually enter the information in each field or enter $ to display the list of valid values. For example, the Create Alert option requires a Current State value. Enter $ to display the possible process states. Choose the name of the first task created in this example because that is where the patch operation failed.
Different Types of Services under Service Tasks
There are three types of services under Service Task.
- REST Web Service: You can configure REST API calls with integration setup.
- Platform Service: You can perform following tasks under Platform Service:
- Close Alert Create/Update Alert
- Find Alerts
- Find Resources
- Get Alert
- Get Incident
- Heal Alert
- Post Alert Comment
- Set Alert Priority
- Update Incident with required custom conditions.
An example of a Platform Service is provided below:
To Update Incident Task (see image below).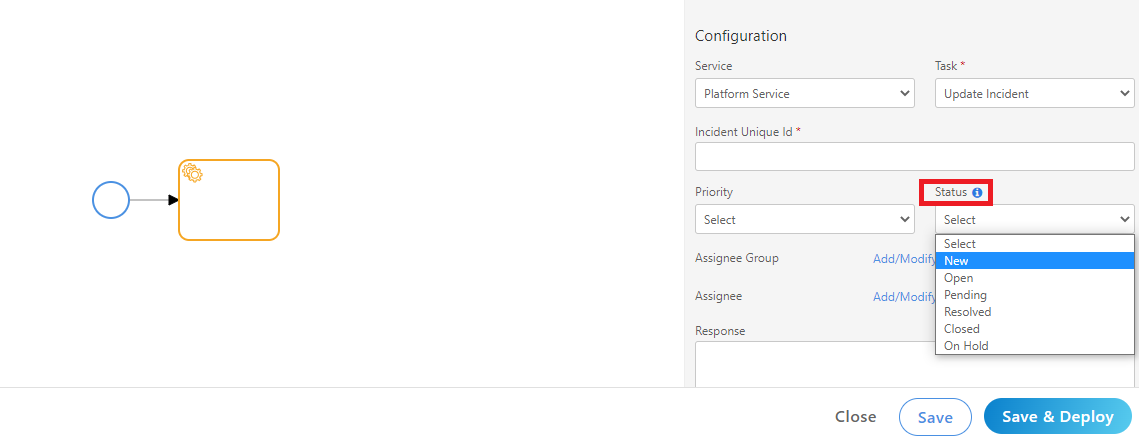
By default, the default flow was allowed under status change (see image below).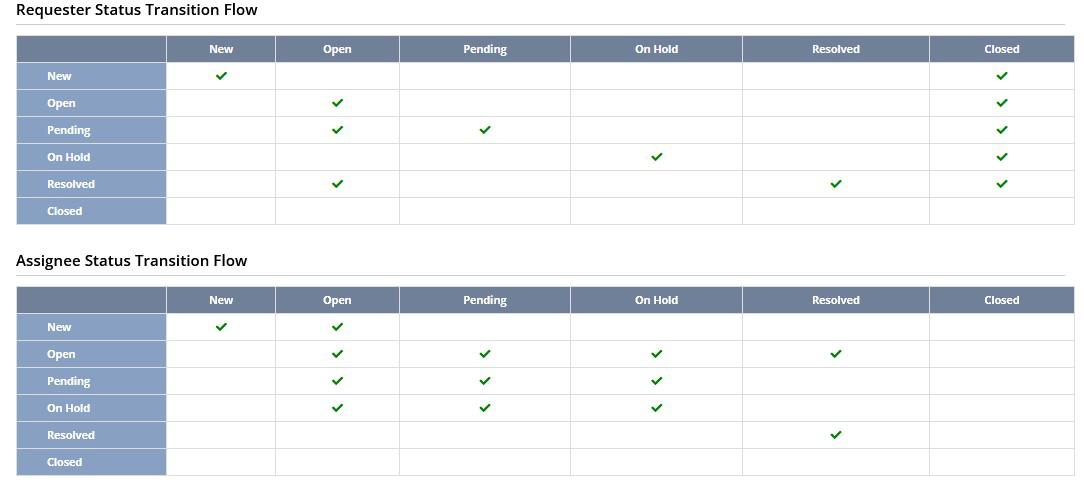
You can configure the status flow at the Partner/Client level if necessary.
Go to Setup » Service Desk » Status Flow to configure the custom status flow.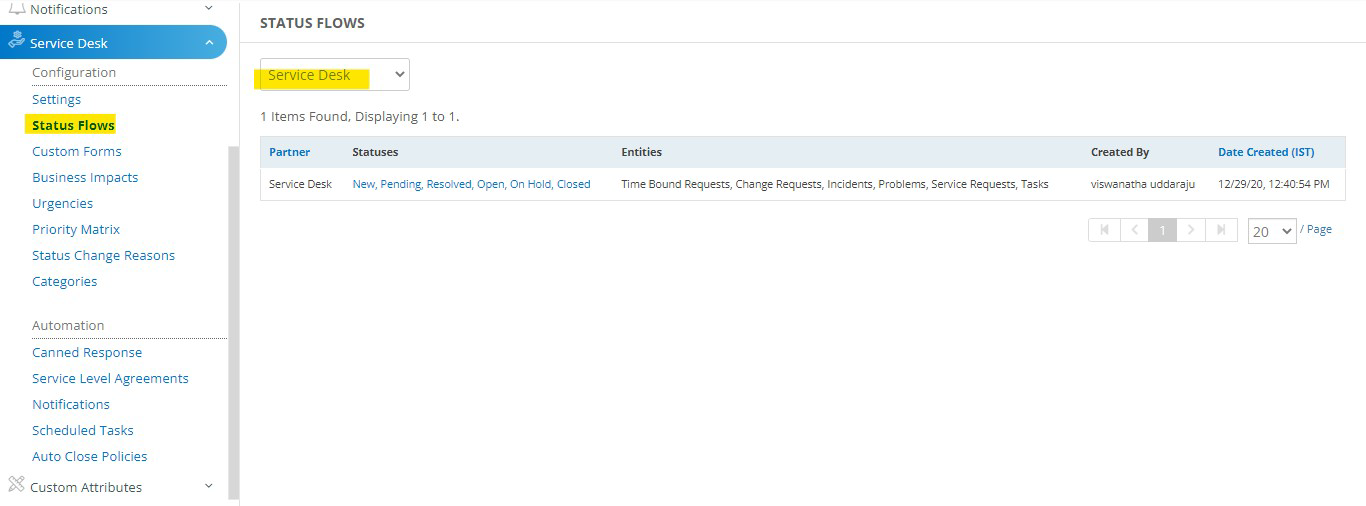
- Utility Server: This service allows you to parse the server.
Define Completion Task and End Events
After successful patch validation, a sent-type task is needed to send an email notification to DevOps.
- Click the previously created validation task and select the Append Task icon.
- For the newly created task, click the Change type icon and choose Send Task.
- Click the task symbol on the canvas to display the send task properties.
- Enter the task Name. The task ID is automatically populated.
- For the Input field, enter a $ character to display the list of available input sources. Choose the name of the patch validation task previously defined.
- To specify the Message Recipient, click Add/Modify.
- Select a recipient from the list and click Add.
- Enter a Notification Template.
- Select a Notification Priority.
Complete the process definition by defining an EndEvent.
- Click the email notification task and select the Append EndEvent icon.
- Click the end event symbol on the canvas to display the event properties.
- Enter the event Name. The task ID is automatically populated.
Connect the failed path handler task to the end event:
- From the component tools menu, select Activate the global connect tool connector.
- Click the script task defined to create an alert.
- Click the EndEvent symbol. This renders a connector between the task and end event.
- Click the connector and in the Properties view enter a connector Name.
Click Save or Save & Deploy to save or save and deploy the new process definition. All required properties must be specified and a complete process workflow must be defined before you can save the definition.
Enable and Disable the Process
Use the PROCESS DEFINITIONS list view to enable or disable the processes as needed:
- Click Automation > Process Definitions to display the process list.
- In the Enabled column, click the toggle button.
Enable and Disable the Notify Toggle
Use the Notify toggle to receive the notifications whenever a particular workflow is failed or stuck for the specified recipients . Recipients could be a within platform user or any other external email id can be specified in the cc field.
You can configure the waiting time before triggering email, the frequency of emails to be sent, the list of users to be notified and cc users list for failed tasks as well as stuck tasks.
The following options are available to configure the notifications:
When Stuck - Option indicates that the process definition has been in a stuck state at a particular task for a specified period of time.
When Failed - Option indicates that the process definition has failed at a particular task for a number of times.

When you select the above options When Stuck and When Failed, the following fields are available:
| Name | Value | Description |
|---|---|---|
| Action | Notify Notify and Cancel | Configured users will receive email notifications accordingly with the configured time and error count frequency. The configured users will receive email notifications accordingly with the configured time and error count frequency, and the stuck running instance will be moved to the Completed section with the state shown as "Externally Terminated". | Duration Time | When Stuck has the following options: 15, 20, 25, 30, 45, and 60. When failed has the following options: 2 to 10 | If any process instance is stuck or has failed, users will be notified for the selected duration. |
| Notify Frequency | Only Once Every Time | If Only Once is selected,the process workflow will send only one email notification to the user when a task is stuck or failed for the specified duration. When the Every Time option is selected, the process workflow will keep on sending the notification whenever the workflow is failing or stuck for the specified duration. |
| Notify Users | Select from the list | You can select the list of available users from the drop-down list to send email notifications. |
| CC Users | Any external email address | If you want to notify any external email address, mention it in the cc field. |

As part of enabling the Failure/Stuck notifications for process workflows, a new column Notify is added under the Workflows listing page. If the user enables or disables the notify option in this listing page, it will get enabled or disabled in the workflow page accordingly.
Next Steps
Now that you know how to define, enable, and deployed a process, continue with the Advanced Process Definition Topics to learn more about managing process definitions.