Introduction
This document outlines the key requirements for creating an Alert definition as well as the detailed steps involved in the creation.
Below are the requirements to create an Alert definition:
- Name – A unique alert definition name.
Example:Cisco UCS 4440 - Power Supply - Filter Criteria – Conditions that determine which resources should be monitored or included in an alert definition.
- When new devices are discovered in OpsRamp, the alert definition automatically assigns the resources that match the query.
- Availability Rule – Specify conditions for availability.
- Monitoring templates – Choose the templates (compatible with the resource type) that should be assigned to the resources.
Once set up, alert definitions help you receive timely notifications about resource performance and availability. For example, alerts can notify you immediately when a resource becomes unavailable or crosses a set threshold. This allows you to take quick action before issues grow, helping you manage resources more effectively and maintain system health.
Create alert definition
The following video guides you through the process of creating a Template-based alert definition in OpsRamp.
Follow these steps to create a alert definition:
- To select your client, navigate to All Clients, and click the Client/Partner dropdown menu.
Note: You may either type your client’s name in the search bar or select your client from the list. - Navigate to Setup → Account. The Account Details page is displayed.
- Click Monitoring tile. The TEMPLATE BASED tab displays all the alert definitions created with Global and Non Global scopes.
- Click +ADD.
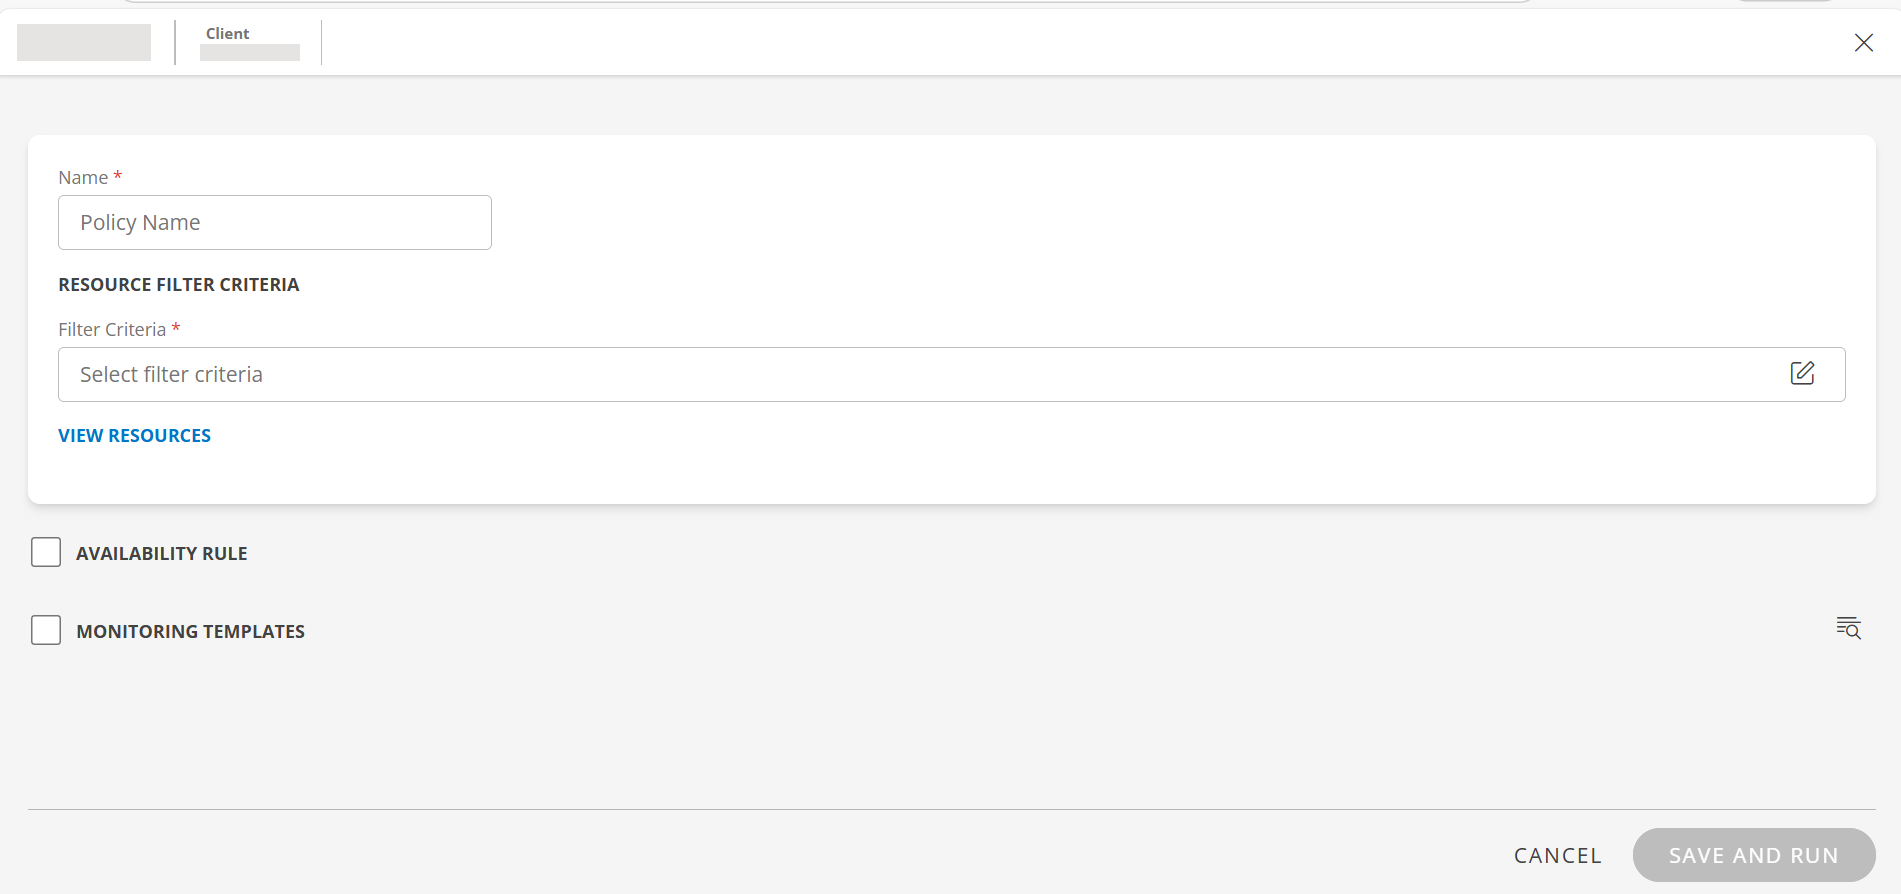
- Enter the following information in the screen:

Field Name Field Type Description Name String Enter a name for the alert definition. Scope Dropdown Note: This field is displayed if you are a Partner user.
Select one of the following:- All Clients: Applies the alert definition to all the clients.
- Include Clients: Applies the alert definition to the clients you select from Clients dropdown.
- Exclude Clients: Applies the alert definition to all, excluding the clients you select from Clients dropdown. So the clients you select from Clients dropdown will be exempt from the alert definition.
RESOURCE FILTER CRITERIA String Use the filter criteria option to filter the resources according to your requirements. - Click anywhere in the Filter Criteria box and click +QUERY in the RESOURCE FILTER window.
- Build a query using OpsQL. The matching results are displayed. The list has Name, IP Address, Operating System, and Resource Type columns.
- Click APPLY. The resources are added.
To view the list of resources, click VIEW RESOURCES.
AVAILABILITY RULE Checkbox Select this option, if you want to set availability rule.
ALL: This option is selected by default.
If there are critical alerts on all the availability metrics, then the resources are considered as DOWN. Otherwise, they are considered as UP.
ANY: If there are critical alerts on any of the availability metrics, then the resources are considered as DOWN. Otherwise, they are considered as UP.MONITORING TEMPLATES Checkbox Select this option to assign monitoring templates to the resources.
Note: Templates compatible with the resource type should be assigned.- Click +ADD.
- Use Search option to search for templates.
You can use the Filter option to filter templates based on Collector Type. - Select the templates.
- Click +ASSIGN TEMPLATE. The template(s) are added and listed in the MONITORING TEMPLATES section.
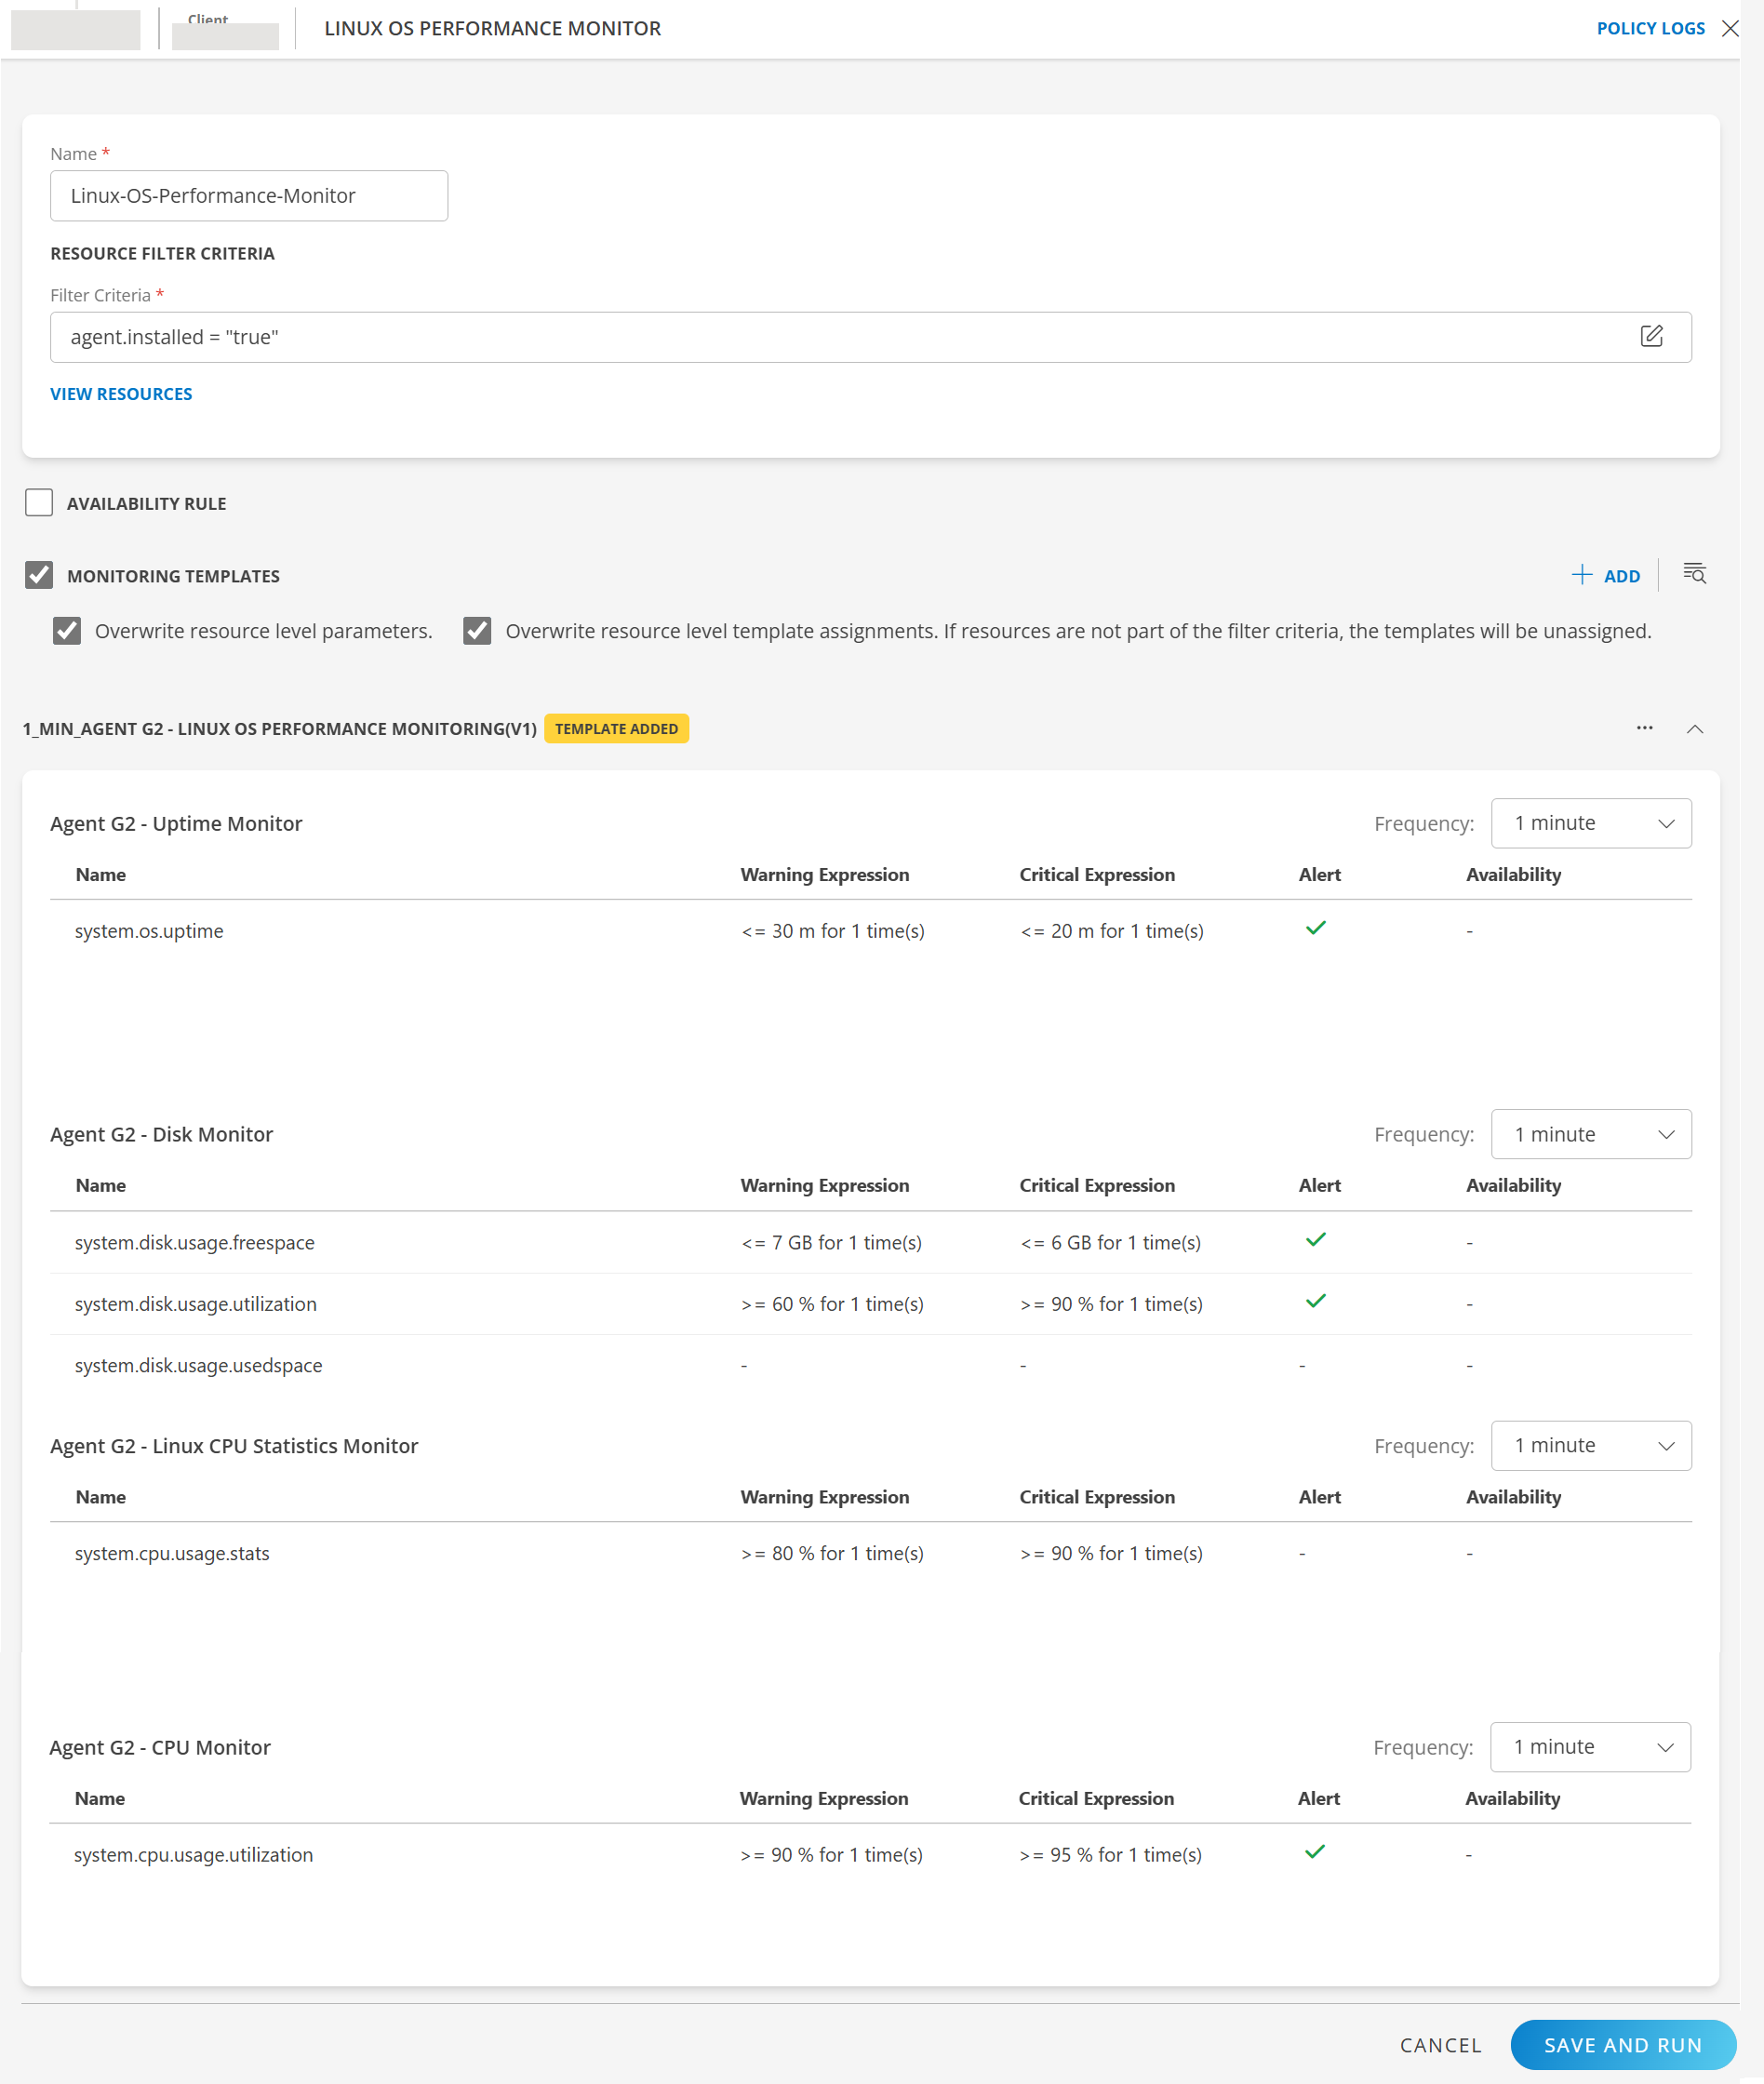
- Click down arrow against the template to view template details.
- Overwrite resource-level parameters: Overwrites user actions and performs alert definition-driven actions on filtered resources.
If you select this option, all the configuration parameter values that you define at the resource level will be overwritten by the configuration parameter values that you specify in the alert definition.
If you do not select this option, the configuration parameter values that you define at the resource level will be protected, and not be overwritten by the configuration parameter values that you specify in the alert definition. - Overwrite resource level template assignments. If resources are not part of the filter criteria, the templates will be unassigned: If a resource does not meet the specified filter criteria, the templates currently assigned to that resource will be removed or unassigned.
If you do not select the option, then the existing template assignments at the resource level will remain unchanged. Resources that do not meet the filter criteria will retain their current template assignments, and no un-assignment will occur.
- Click SAVE AND RUN. The alert definition is created and a confirmation message appears.
- To find the alert definition you created, use the Search option.
Modify templates
When creating or modifying templates in a non-global policy:
Use Case 1: Template not used in any other policy If the template is not used in any other policy, you can modify the template directly.
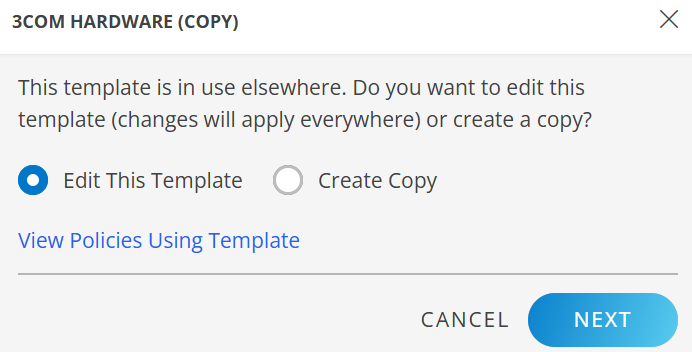
Use Case 2: Template used in one or more policies If the template is used in one or more policies:
- You can either edit the existing template or create a copy.
- You can view a list of all policies where the template is applied.
Use Case 1: Template not used in any other policy:
If the template is not used in any other policy, you can directly make changes to the template and save it.
Use Case 2: Template used in one or more policies:
This is an example of a template that is used in more than one policy. When you modify a parameter or select a frequency, you have two options:
Edit This Template
This option is selected by default. Any changes you make will update the template itself and automatically apply to all policies where this template is used.
Example: You want to modify the frequency, you do the following: 1. Select a frequency from the dropdown. A dialog box appears.
If you want to edit the template, click NEXT.
1. Make the changes and click Save and Run.
The policy is applied to the resources.- View Policies Using Template: Click this link in the popup to view the list of policies assigned to the template.
Create Copy
Any changes you make will apply only to the current policy, leaving the original template unchanged. If you want to create a copy of the template:
- Click Create Copy and provide a template name.
- Click NEXT.
- Make changes to the template and click Save and Run.
The template is created at the current scope.
The policy is applied to the resources.
View Policies Using Template
You can view all the policies that are using this template.
- After you make changes to the template, the dialog box appears.
- Click View Policies Using Template link. The page with the list of policies that are using the template is displayed.

- You can perform the following actions on the policies:

- View Details: You can view policy details.
To view policy details:
- Click the policy name, or click the actions menu (three dots) and select View Details option. The policy details page is displayed.
- Copy: To clone a policy.
Follow these steps:
- Click the actions menu (three dots) and select Copy option. A popup appears.
- Provide a name for the policy.
- Click COPY. The policy is cloned and displayed in the list.
- Remove: You can use this option to remove a policy.
Follow these steps:
- Click the actions menu (three dots) and select Remove option. A confirmation dialog box appears.
- Click REMOVE. The policy is removed and a confirmation message appears.
- View Details: You can view policy details.
To view policy details:
Edit parameters
During the alert definition creation process, after adding a template, you can edit the parameters of the metrics within that template.
Below are examples of templates and how you can edit them:
- Example 1:
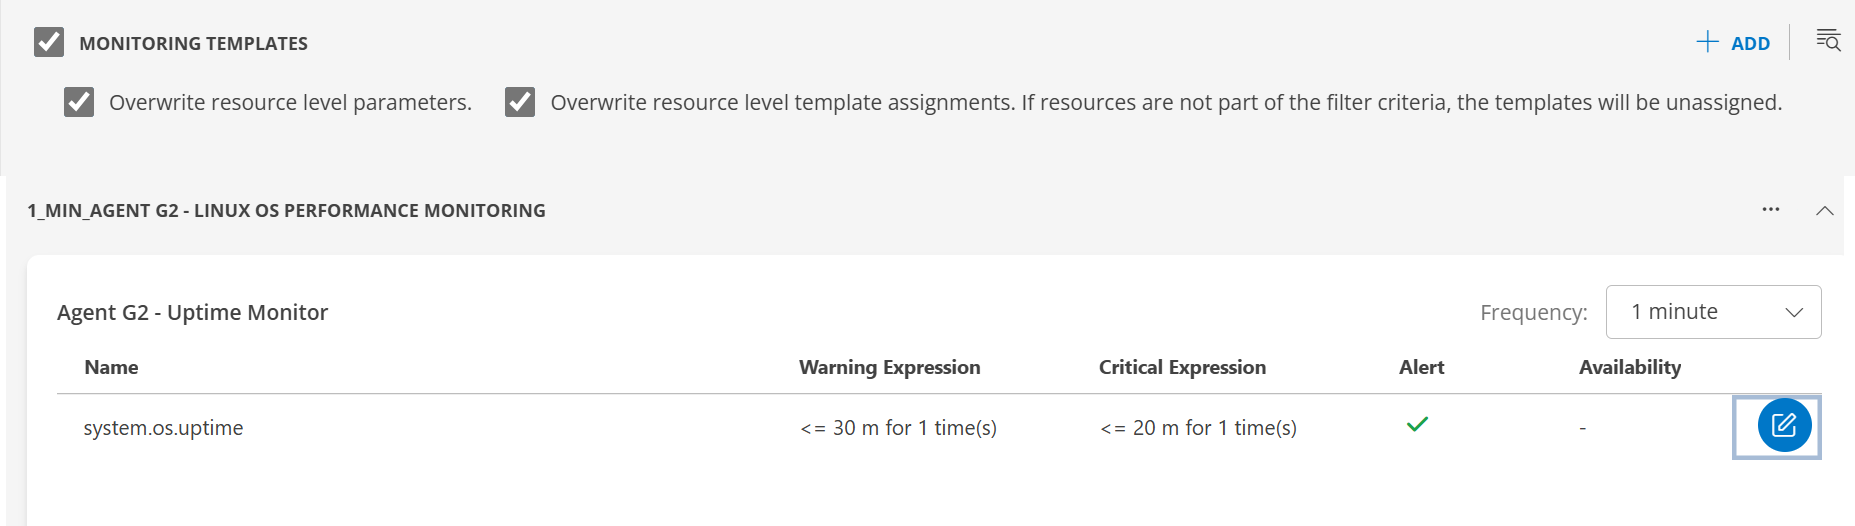
- Select the desired frequency from the Frequency dropdown.
- Click the Edit icon. The metric window is displayed.
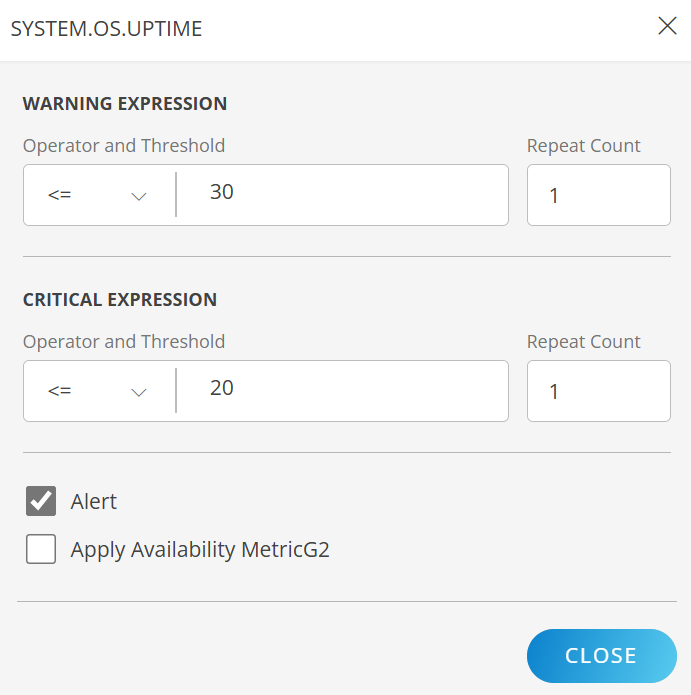
- Edit the parameters: WARNING EXPRESSION, CRITICAL EXPRESSION, Alert, Apply Availability Metrics as per your requirements.
- Click APPLY. The metric details are updated.
- Follow the same steps to make changes to other metrics as needed.
- Click SAVE AND RUN to save the changes.
Example 2:
Editing a template:

- Select the desired frequency from the Frequency dropdown.
- Click PARAMETERS. The template window is displayed.
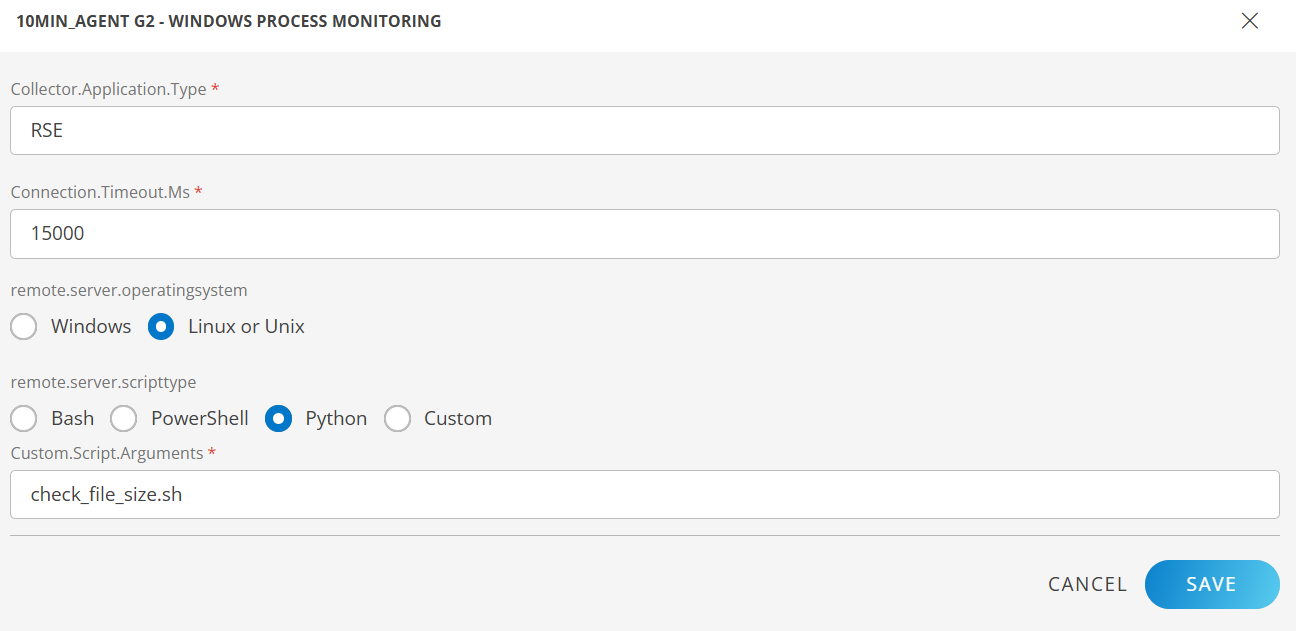
- Edit the parameters: Collector.Application.Type, Connection.Timeout.Ms, remote.server.operatingsystem, remote.server.scripttype, custom.script.arguments as per your requirements.
- Click SAVE. The details are updated.
- Click SAVE AND RUN to save the changes.
Editing a metric:
- Click the Edit icon. The metric window is displayed.
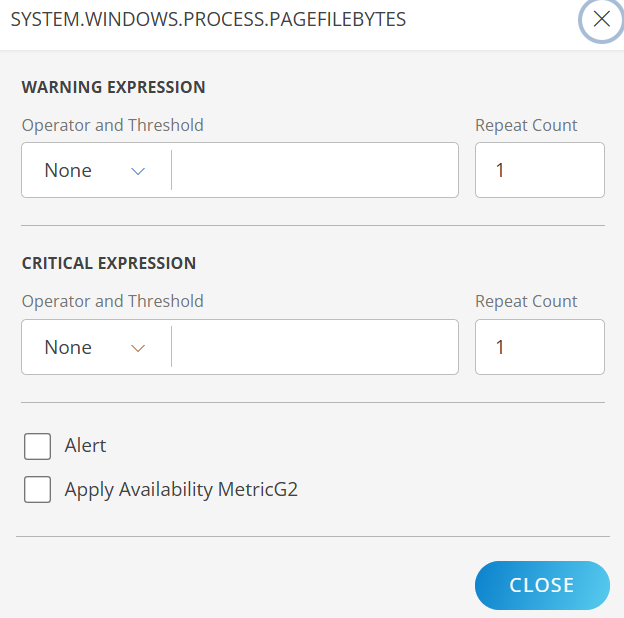
- Edit the parameters: WARNING EXPRESSION, CRITICAL EXPRESSION, Alert, Apply Availability Metrics as per your requirements.
- Click APPLY. The metric details are updated.
- Follow the same steps to make changes to other metrics as needed.
- Click SAVE AND RUN to save the changes.
Reset changes
Follow these steps to reset configuration changes:
The system allows you to reset the changes made to the template or a metric.
Note: The Reset option appears only after you make changes to a metric or template, save the alert definition, and then reopen the alert definition.
- Search for the alert definition you modified.
- Click the alert definition name. The Alert definition page is displayed.
- In the MONITORING TEMPLATES section, click the Actions (three dots) icon and select Reset.
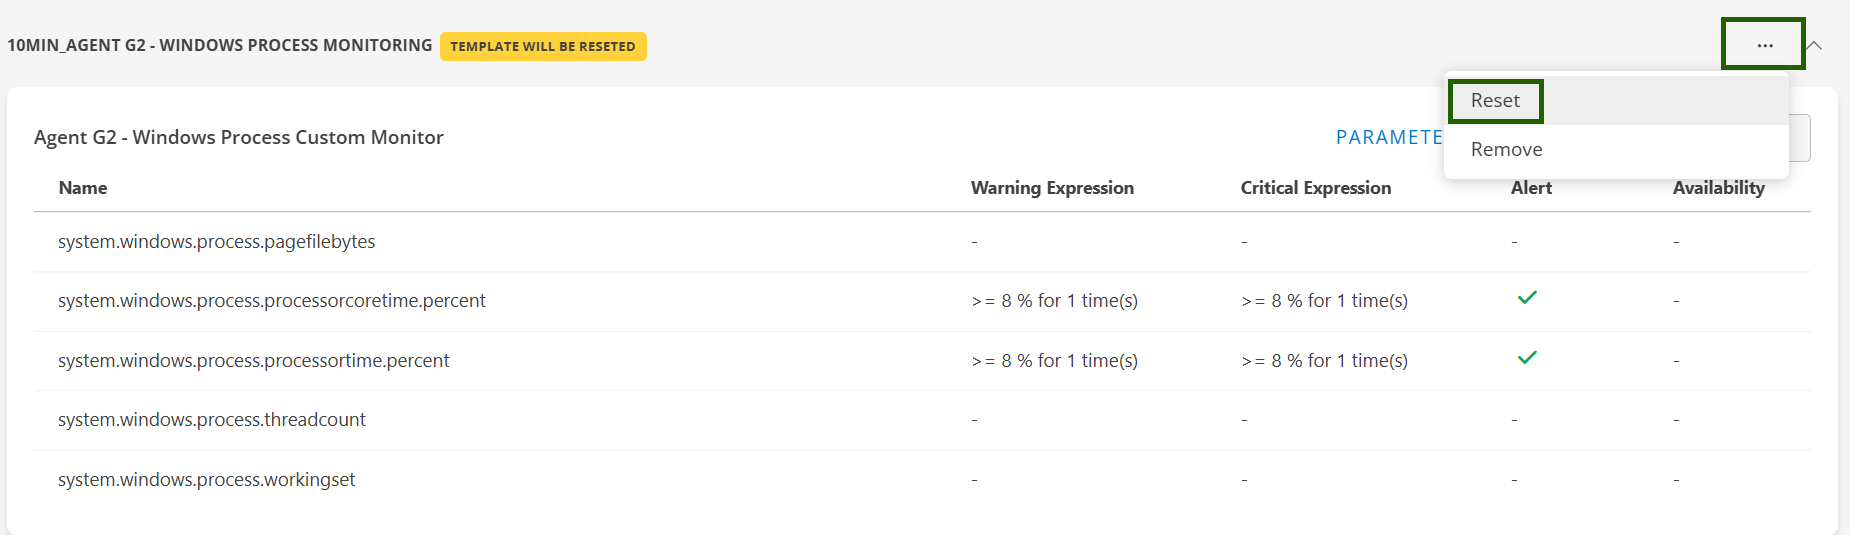
- The template and the metric changes are reset. All the configuration changes are reverted.
Related Topics
×